Table saw / Router table WIP - Finished

UKworkshop.co.uk

Help Support UKworkshop.co.uk:

This site may earn a commission from merchant affiliate links, including eBay, Amazon, and others.
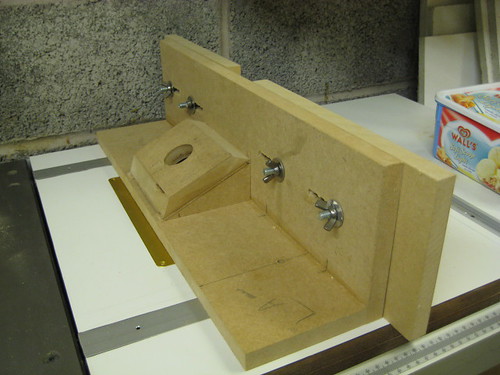
update as of tonight, built the last drawer 2 days ago and glued it up, installed it this evening :

2245306748_a71b0c1130.jpg

2244513593_5323bc24c7.jpg


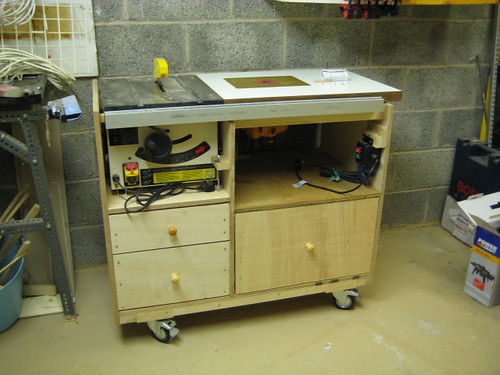
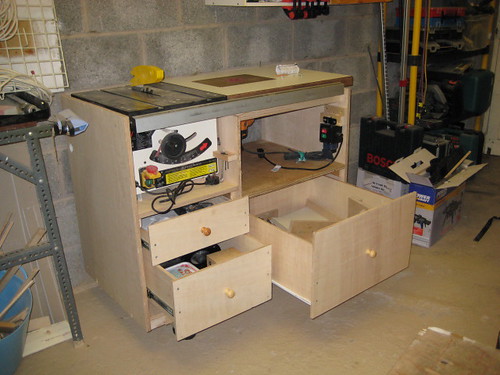
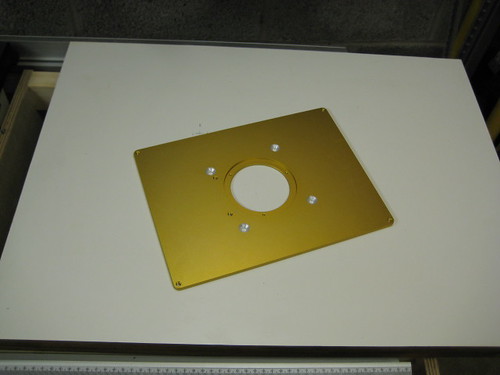
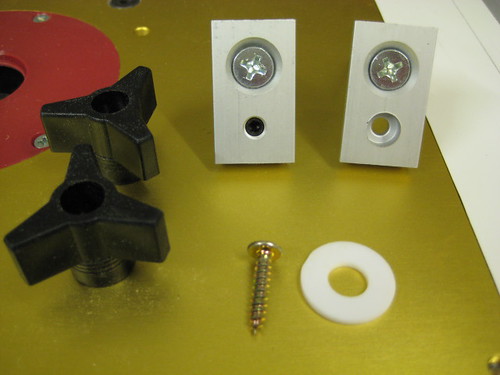
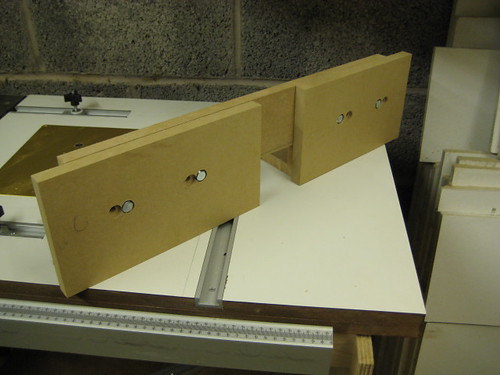
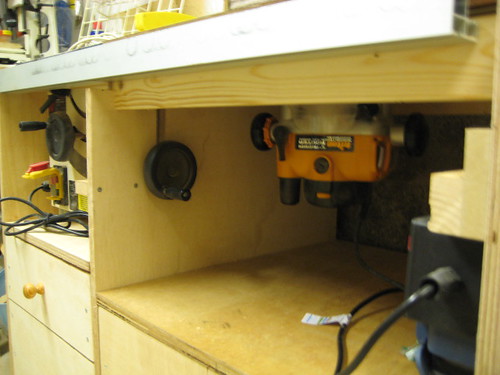
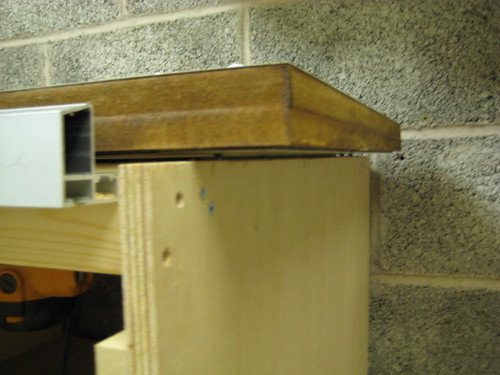
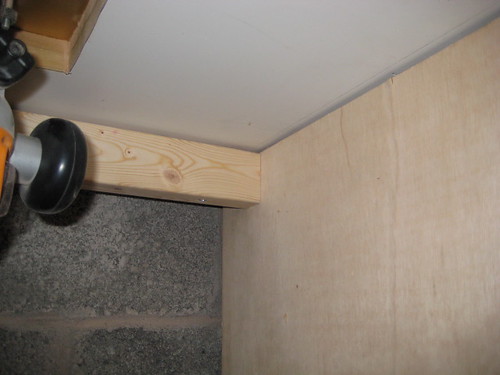
Rich you asked about the mounting for the router table, some pictures which I hope will help (if not let me know and I'll try some different angles), like i said its a pretty simple method of the top sat on the cabinet sides with a couple of rails across, then used screws to level it all off :
2244514179_fc681dc358.jpg

2244514053_431e12b609.jpg

2244513919_0c53009149.jpg


Jobs to finish the unit off are :
1. route the cables through the cabinet (tidy them up)
2. Build a door for front of router section (perhaps with storage built into it)
3. put a back on it and some dust extraction under the router table
4. Build a fence for it

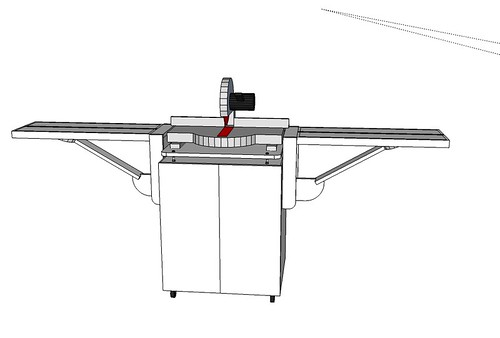
The onto a cabinet for my enormous Mitre saw (Bosch 12 inch sliding compound) as at the moment on the stand that came with it its too big to fit in the shop !
 
MG, Thanks for the pics, most helpful, it really does look good, you must feel very proud, I think you can guess what MY next project will be,
many thanks for sharing and showing.
regards, Rich.
 
Rich":zo33x3pp said:
MG, Thanks for the pics, most helpful, it really does look good, you must feel very proud, I think you can guess what MY next project will be,
many thanks for sharing and showing.
regards, Rich.

no worries rich, if you need any info / measurements e.t.c let me know.

paul
 
fantastic project, loved every installment. Any chance of seeing how the router fastens to the plate please.
thanks
steve
 
stevebuk":32g66lp1 said:
fantastic project, loved every installment. Any chance of seeing how the router fastens to the plate please.
thanks
steve

steve,

i can take some pictures but its simply screwed to the insert plate (three bolts I drilled through the plate), then the plate (and router) dropped into the top, which bit are you specifically interested in ?

paul
 
hi paul
i have read in other parts of the forum that people were having difficulty in getting screws to fit through to the plate, only i want to buy a router table and fit my router into it, never used it yet, and i've had it 3 years. Is yours fastened with the screws it came with.
many thanks
 
ah right, no its not, you'll need screws about 1 inch long (ones in the router are only about half an inch). They are UNC thread, if you look on this thread there is a link to a company that sells them (and loads of people who had the same problem) :

https://www.ukworkshop.co.uk/forums/viewtopic.php?t=20880&highlight=unc+thread

when you get the bolts (countersunk ones) get a nut with them, i had to trim the bolts to size so you'll need a nut to re-cut the thread : put the nut on and screw all the way on, then cut bolt to length required and use the nut to re-cut the thread at the end (turn it back and forth at the end)

hope that helps
 
Paul, have you thought about dust extraction below the table yet?

If you're gonna have an opening at the back of the cabinet, you could consider adding a slope and a valley so that any shavings and saw dust are inclined to slide down and in to the hose?

You could possibly partition off a small section to the right of the router and store small things in there - maybe some push sticks or featherboard?

I wouldn't have thought you'd want to put too much in there in case, you know, it gets sucked up! :shock:

I'll be interested to see what you do with the Bosch GCM 12SD also (I have the exact same model and need to do something similar) when the time comes. What's wrong with your DeWalt saw - you thinking of putting two together on different settings or something?! :shock: :D
 
Olly,

I'd seen a post which had a slope on it under the router so was planning to copy the solution, only complication with the final solution is how to compromise between that, storage space and access to the router for adjustment.

A temporary slope is an idea but temptation would be to leave it out if it made things awkward, so am trying to think of a good compromise which would be permanent.

As for the GCM 12 I am planning something like this :
2255026677_93ac307f8e.jpg


basic principle being fold down sides so that when its not being used it takes up the minimum possible space.
 
Looks pretty similar to the idea I have in mind (Fine Woodworking). Not sure what to do about storage inside though. Drawers? Shelves? Blades? Small machinery? Jigs... I'll get there in the end though. :)

What sort of ply have you been using for the router table project? (sorry, you probably did mention it earlier. :roll: )
 
basic exterior ply 18mm from b&q.

for the next project I went back to b&q for wood and found a cheaper 18mm ply that I think is beech ply, not sure what the difference is except for the price (and the new ply is yellow, old more of a brown colour), think the original was birch
 
Mighty_Genghis":3rerr7in said:
Girlfriend is away for the weekend so made some progress today....

Got the tilgear router plate yesterday so got ready to fit it :
2237670750_620998f34b.jpg

Is there any chance you could let me know the stock number and price for the tilgear router plate? I have just gone through their catalogue and they only have a plastic router plate (£19) that is described as having a slight crown on it, I can not see any metal plates.

I need to build a router table soon and the consensus here seems to be that crowned plates are not as good.
 
Frugal,

It isn't in their catologue but if you ring them they will know what you are talking about (its what I did). On their receipt its down as 'Router Aluminium Table Insert *OFFER PRICE* £29.50 plus vat (305x230x9.5)' but no part number


paul
 
Mighty_Genghis":3tm4icew said:
Frugal,

It isn't in their catologue but if you ring them they will know what you are talking about (its what I did). On their receipt its down as 'Router Aluminium Table Insert *OFFER PRICE* £29.50 plus vat (305x230x9.5)' but no part number


paul

Cheers,

I need to make an order with Tilgear, so I will give them a call and find out what to put on the order form.
 
Finally started on the process of fitting a fence and feather boards to make my router usage easier but more importantly safer.

So today the mitre slots turned up from rutlands, so got those fitted :

2314545977_f7b4d80b8f.jpg


also got 4 kits for mounting jigs. Has anyone used the same ?? I've no idea what the single plastic washer and single self-tapping screw are for. Also no idea why the two metal inserts are different (one has a simple hole, the other has in the same place a threaded alan bolt (supplied with an Alan screw) ?? Help

2314546589_95e717569a.jpg
 
One hole should have a Allen grub screw so that you can clamp the plate in to the track to act as a stop. The other is an unthreaded hole which allows you to screw up from beneath in to a workpiece. You might be missing a plastic washer.
 
Shultzy":cwyam9a3 said:
One hole should have a Allen grub screw so that you can clamp the plate in to the track to act as a stop. The other is an unthreaded hole which allows you to screw up from beneath in to a workpiece. You might be missing a plastic washer.

Shultzy thanks for the info but I still don't get it (having a dull moment thats already lasted 30 years). The grub screw if its to be used like you say (which makes sense) is upside down ? Also why does one of the inserts have it and the other not ?

sorry for more questions but this has me stumped
 
I bought one of those T-slot-things a few years ago and, although I've never actually used it, I think the holes the the extra screw may have something to do jig-making, or cutting cirlces on the router table?

I'm sure something like this was mentioned on the back of the packaging?

The other thing the grub screw might be used for is raising the T-bar slightly in order to get a tighter fit?
 
Shultzy / Olly,

Looks like you were both right, its to enable the construction of a circle cutting jig. Instead however I'm using them as simple runners for the new mitre fence I built yesterday :

2321106603_6eeac5c6de.jpg


2321922846_542d768b71.jpg


You'll notice that on the front I mis-calculated the holes for the adjustment slots (one of those errors that was difficult to hide!)

For the box to accept the vacuum cleaner I tried using glue only to join it = to see how strong it would be. I'm amazed that its rock solid, I always thought that glue wasn't very sturdy.
 

Latest posts

Back
Top