Cheshirechappie
Established Member
Some weeks ago, I invested a few pounds - less than a tenner including postage - in an Ebay panel saw (22", 10tpi) with the intention of turning it into a rip panel saw. It's been a bit of an on-and-off job, but it's done.
The saw as received was a bit of a mess - rather grotty handle, rust, blunt and with a toothline like waves on a pond. No problems here - new handle (beech, modelled on an old Drabble and Sanderson which is particularly comfortable and beautifully curvy, finished with three coats of Danish oil, left for a week to harden then burnished with a soft cloth - very nice to the touch), rust removed (turned out to be a Spear and Jackson Spearior 88 when the acid-etch emerged from the rust and muck, so a good piece of steel), toothline straightened by jointing, reshape, set and sharpen. Nothing particularly tricky, just takes a bit of time. However, the tricky bit was that the blade had a couple of kinks in it. How to get these out?
Well, of course, Google is your friend here. There isn't much on sawblade straightening, but what there is suggests three basic methods. The first is to identify where the kink is, place it over a bench edge, and work it out with finger pressure. That didn't work in this case - does work on some steels, 'cos I've done just that with a Roberts and Lee Dorchester 26" rip recently. The second method is to pour boiling water over the sawblade, and then bend out the kink - that, however, seems to be more applicable to gentle curves rather than kinks. The third method is to hammer out the kinks over an anvil.
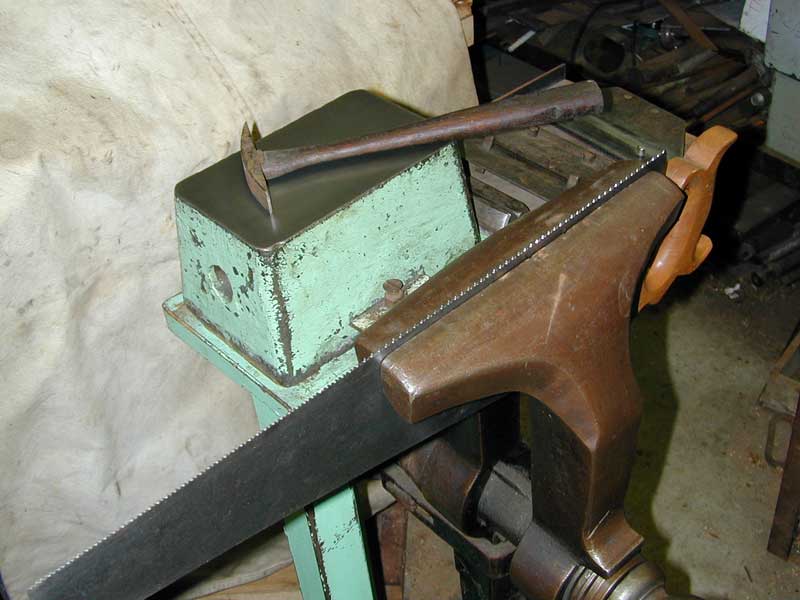
Now, there is much mystery about the latter method - but it worked for me. For an anvil, I used a block of mild steel about 3" by 6", and about 2" thick, filed flat and clean on top, held in the metalworking vice (which I've mounted over the leg of the bench, so there's no 'bounce' when you hit things). The vice is not a big one, just a 4" Record 1-ton basic vice, but like I say, securely mounted. For hammers, I used two; both ball-pein, one 1lb, and one 2 1/2lb, both with the flat faces angle-ground to a slight curve, and polished with emery cloth to about 1000 grit.
The drill (apparently) is to locate the kinks. The recommended method is to hang the sawblade vertically, toothline towards you, good light source behind, and use two short straightedges (about 12" long), one each side to find any out-of-straightness. I didn't do this; I put the handleless blade on a piece of kitchen worksurface, and by gently poking with a finger, found where it didn't lay flat. Mark the kink with chalk. Now, transfer to the 'anvil', and with the small hammer, tap gently on the concave side, either side of the kink. Then turn over, and with the large hammer, knock the kink flat. This takes several goes to find the right weight of blow, and it's best to just give one or two blows, then check progress on the kitchen worktop. The light blows on the concave side stretch the metal, lengthening that side, the heavy blows distort the bend in a controlled fashion. Finally, bend the blade by hand into as much of a curve as you dare, both ways, to settle any remaining stresses.
Somewhat to my surprise, this worked.
That left me with a very slight hollow (about 1/32") along part of the blade, which I wasn't able to get rid of. It's not visible when you sight down the blade, but you can just detect it when you do the 'poke test' on the kitchen worktop. However - it turned out that that didn't matter.
Having got the blade as flat as I could, I put it in the sawvice, jointed the toothline straight. I did this without any jigs, just holding the mill-file by hand - conventional filing to get rid of the really high bits, then lay the handle-less file on top of the toothline, in line with it, and with moderate finger pressure, move it along several times until a 'shiner' appeared on all the old teeth. I used Bugbear's tip here of using a straight piece of thin timber as a straightedge to check progress - much lighter than a metal one. Then reshape (about 10 degrees of rake, again judged by eye), then set (minimally), then a final pass with the sawfile to sharpen.
Out of the sawvice, fit handle (salvaged the screws and medallion from the old handle), and gave it a test-drive.
Wow! Cut like a dream - tracked beautifully, left a superb finish. So the slight cockle left in the (admittedly fairly flexible) blade didn't seem to have any adverse effect on performance. I've tried it on 3/4" softwood, and a piece of 2 1/2" hardwood. Ate the lot, no problem - and no deviation from a straight cut.
Job done!
Was it worth it? As a learning exercise, definitely. As a way to get a tool to do a job, probably not - the total time involved was about 10 to 15 hours, and some semi-specialist kit had to be made. If the time were money, a £200 Lie-Nielsen would be more cost-effective. That said, using it brought a very special feeling of satisfaction. I suspect this is a tool I will always be rather fond of.
(Sorry chaps, no piccies - don't have a digital camera.)
The saw as received was a bit of a mess - rather grotty handle, rust, blunt and with a toothline like waves on a pond. No problems here - new handle (beech, modelled on an old Drabble and Sanderson which is particularly comfortable and beautifully curvy, finished with three coats of Danish oil, left for a week to harden then burnished with a soft cloth - very nice to the touch), rust removed (turned out to be a Spear and Jackson Spearior 88 when the acid-etch emerged from the rust and muck, so a good piece of steel), toothline straightened by jointing, reshape, set and sharpen. Nothing particularly tricky, just takes a bit of time. However, the tricky bit was that the blade had a couple of kinks in it. How to get these out?
Well, of course, Google is your friend here. There isn't much on sawblade straightening, but what there is suggests three basic methods. The first is to identify where the kink is, place it over a bench edge, and work it out with finger pressure. That didn't work in this case - does work on some steels, 'cos I've done just that with a Roberts and Lee Dorchester 26" rip recently. The second method is to pour boiling water over the sawblade, and then bend out the kink - that, however, seems to be more applicable to gentle curves rather than kinks. The third method is to hammer out the kinks over an anvil.
Now, there is much mystery about the latter method - but it worked for me. For an anvil, I used a block of mild steel about 3" by 6", and about 2" thick, filed flat and clean on top, held in the metalworking vice (which I've mounted over the leg of the bench, so there's no 'bounce' when you hit things). The vice is not a big one, just a 4" Record 1-ton basic vice, but like I say, securely mounted. For hammers, I used two; both ball-pein, one 1lb, and one 2 1/2lb, both with the flat faces angle-ground to a slight curve, and polished with emery cloth to about 1000 grit.
The drill (apparently) is to locate the kinks. The recommended method is to hang the sawblade vertically, toothline towards you, good light source behind, and use two short straightedges (about 12" long), one each side to find any out-of-straightness. I didn't do this; I put the handleless blade on a piece of kitchen worksurface, and by gently poking with a finger, found where it didn't lay flat. Mark the kink with chalk. Now, transfer to the 'anvil', and with the small hammer, tap gently on the concave side, either side of the kink. Then turn over, and with the large hammer, knock the kink flat. This takes several goes to find the right weight of blow, and it's best to just give one or two blows, then check progress on the kitchen worktop. The light blows on the concave side stretch the metal, lengthening that side, the heavy blows distort the bend in a controlled fashion. Finally, bend the blade by hand into as much of a curve as you dare, both ways, to settle any remaining stresses.
Somewhat to my surprise, this worked.
That left me with a very slight hollow (about 1/32") along part of the blade, which I wasn't able to get rid of. It's not visible when you sight down the blade, but you can just detect it when you do the 'poke test' on the kitchen worktop. However - it turned out that that didn't matter.
Having got the blade as flat as I could, I put it in the sawvice, jointed the toothline straight. I did this without any jigs, just holding the mill-file by hand - conventional filing to get rid of the really high bits, then lay the handle-less file on top of the toothline, in line with it, and with moderate finger pressure, move it along several times until a 'shiner' appeared on all the old teeth. I used Bugbear's tip here of using a straight piece of thin timber as a straightedge to check progress - much lighter than a metal one. Then reshape (about 10 degrees of rake, again judged by eye), then set (minimally), then a final pass with the sawfile to sharpen.
Out of the sawvice, fit handle (salvaged the screws and medallion from the old handle), and gave it a test-drive.
Wow! Cut like a dream - tracked beautifully, left a superb finish. So the slight cockle left in the (admittedly fairly flexible) blade didn't seem to have any adverse effect on performance. I've tried it on 3/4" softwood, and a piece of 2 1/2" hardwood. Ate the lot, no problem - and no deviation from a straight cut.
Job done!
Was it worth it? As a learning exercise, definitely. As a way to get a tool to do a job, probably not - the total time involved was about 10 to 15 hours, and some semi-specialist kit had to be made. If the time were money, a £200 Lie-Nielsen would be more cost-effective. That said, using it brought a very special feeling of satisfaction. I suspect this is a tool I will always be rather fond of.
(Sorry chaps, no piccies - don't have a digital camera.)