Spacing dovetails

UKworkshop.co.uk

Help Support UKworkshop.co.uk:

This site may earn a commission from merchant affiliate links, including eBay, Amazon, and others.

brianhabby

Established Member
Joined
24 Sep 2006
Messages
1,965
Reaction score
5
Location
Colwyn Bay, North Wales
Hi all.

I know there has been lots of advice here on the merits or otherwise of the different methods of cutting dovetails, but what about spacing them.

So far in my endeavours, I've just been eyeballing them but I wondered if there was an optimum way of sizing and spacing dovetails.

Any ideas?

regards

Brian
 
brianhabby":3lu8k9oh said:
Hi all.

I know there has been lots of advice here on the merits or otherwise of the different methods of cutting dovetails, but what about spacing them.

So far in my endeavours, I've just been eyeballing them but I wondered if there was an optimum way of sizing and spacing dovetails.

Any ideas?

regards

Brian
It really depends on the application. If you're making dovetails for carcase work, then it's generally thought that a tail width of around 25mm is acceptable, with pins that aren't too fine to give adequate strength, so a 6mm d/t chisel should fit in the bottom to clean it up. If the wood is fairly thick, this means that it may be too fine at the apex of the pin...in which case make it a little wider. I aim for around 2-3mm at the top of the pin.
Show dovetails (boxes, drawers) can be made finer but the tails should still be around 20mm or so...really depends on where it's used.
I often see dovetails that have been immaculately cut, but poorly spaced in that the half-pin at the sides is far too narrow. The rule here is half the thickness of the wood + a mm or two, so if the timber is 14mm thick, the half-pins would be around 8 or 9mm
...and the 'divider' method is by far the easiest way to set them out - Rob
 
You'll get a lot of feedback on this one I suspect! Personally I think they should be spaced to look right on the piece, and stock thickness is one factor in that... but what looks right is right. Like with boats 'if it looks fair, it is fair'.
The very thin 'London' style pins are potentially weak at component edges, and personally I don't much like them. Broadly and only as a guide, pins around 1/2 tails at widest pin point, or pin max width around stock thickness. Another key variable is the number of pins in the joint - which depends on aspect ratio of the stock - proportion of width to thickness. personally I do the whole thing by eye and with no markout except for the base-line. (I admit I am a fan of Frank Claus approach to hand-cut dovetails: http://www.youtube.com/watch?v=G-o4jryTkUc ).
With the possible exception of the very thin pins, I believe the angle and fit has far more to do with strength than spacing. Also getting the glue on the long-grain surfaces which is vital as the end-grain won't bond at all well.
 
You can do them how you like. Think "pins/pinholes", forget tails.
Widely spaced thin pins (so-called "London Pattern" for no apparent reason) are easiest (just a single saw kerf) and with a shallow gradient look elegant, but for light furniture only as they are not very strong (obviously).
The angle is not very important (within reason).
More and/or fatter pins are stronger. Strong boxes, cisterns etc. need fatter pins more equal to the sizes of the tails in between
 
Thanks for the input people, some interesting points.

The videos are quite useful and once on youtube there are dozens of them so a handy link.

Geoffs woodwork site looks quite useful too.

regards

Brian
 
bosshogg":bzmmibwp said:
:roll: Another daft gadget nobody needs.
Or more simply, read one of these http://www.geoffswoodwork.co.uk/dovetails01.htm...bosshogg :)
Truth is what stands the test of experience. A.E. (hammer)
Geoff's method a bit fussy. Easier to decide on how much to inset the outer pinholes and mark them first. They need to be bigger than half size - there's a fashion for making them too small. Then subdivide the space between them either by eye or by measuring and dividing by the number of pins, for the centre line for each pinhole.
This is where the single kerf pin comes in handy and why it is so much preferred. With no further marking you can now cut down one side and then the other, with the saw starting in the same kerf. Or you could do a vertical cut to start and then cut the two sides from the same starting kerf. The centre cut makes it easier to remove the waste with a chisel without having to use a coping saw. The side cuts need to go right down to the line and a gnats over so that the corners are easy to remove. With good quality work this gnats worth is barely visible, with cheaper work it may be a long line visible on the side but less so inside the drawer i.e. the saw canted.
I do them in pairs. Any greater stack gets difficult to align.
 
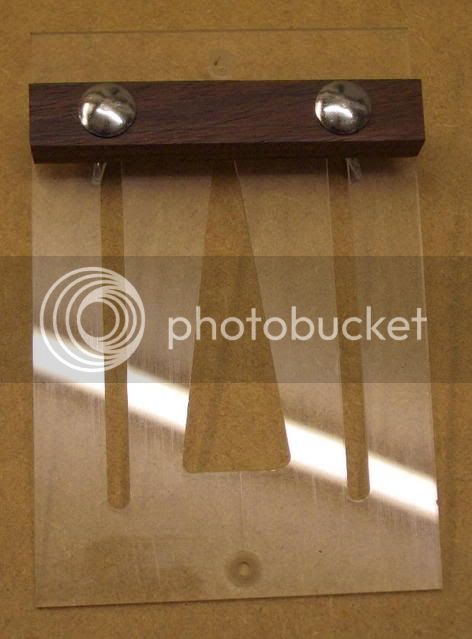
I made this dovetail jig for marking out both the pins and sockets.
dovetail jig.jpg

Centre line marks on the jig are lined up with centre lines transferred to the stock being used, as so -
dovetail jig.jpg

The centrelines having been laid out to either the practical needs of the work, or to my whim...bosshogg :)
Imagination is more important than knowledge A.E. (hammer)
 

Attachments

  • dovetail jig.jpg
    dovetail jig.jpg
    24.1 KB · Views: 130
  • dovetail jig.jpg
    dovetail jig.jpg
    24.2 KB · Views: 155
Dovetail setting out.jpg


This is a setting out diagram. The angle can be changed to suit your fancy, mine is 9 deg, but you set the half pin centrelines to line up with two of the radial lines, then transfer the line centres between these two, to set out the remaining pins...bosshogg :)
Truth is what stands the test of experience. A.E. (hammer)
 

Attachments

  • Dovetail setting out.jpg
    Dovetail setting out.jpg
    24 KB · Views: 109
bosshogg":31zi9o1q said:


This is a setting out diagram. The angle can be changed to suit your fancy, mine is 9 deg, but you set the half pin centrelines to line up with two of the radial lines, then transfer the line centres between these two, to set out the remaining pins...bosshogg :)
Truth is what stands the test of experience. A.E. (hammer)
Still looks way too complicated to me...try the divider method that Paul C posted. Dead easy, simple and it works - Rob
 
Thank Jeff, some useful stuff on your site :)

I've been practicing my dovetails again today and this time I cut the tails first and I believe it definitely makes the job easier. One thing is that the tails are marked from the outside whereas cutting the pins first, the tails are marked from the inside and I don't feel comfortable with that.

Sharp tools are certainly key as well

regards

Brian
 
Back
Top