Philip Hearsey style desk

UKworkshop.co.uk

Help Support UKworkshop.co.uk:

This site may earn a commission from merchant affiliate links, including eBay, Amazon, and others.

Good Surname or what ?

Established Member
Joined
11 Mar 2005
Messages
403
Reaction score
0
Location
Reading, Berks
Earlier this year I asked for help on this tuit.Thanks for all the great advice.

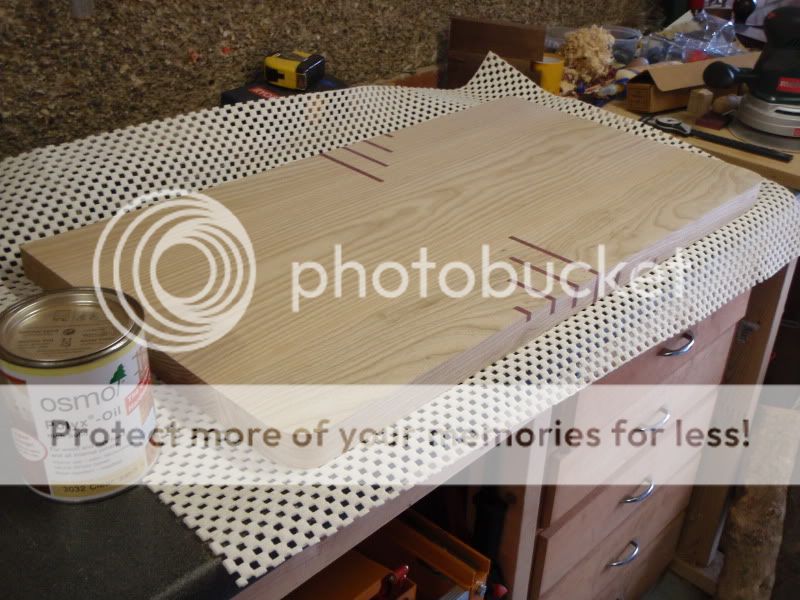
I finally got around to working on it. I biscuited the 5 components together - though I'm not sure what I did with the photos :roll:. So they (may) follow.

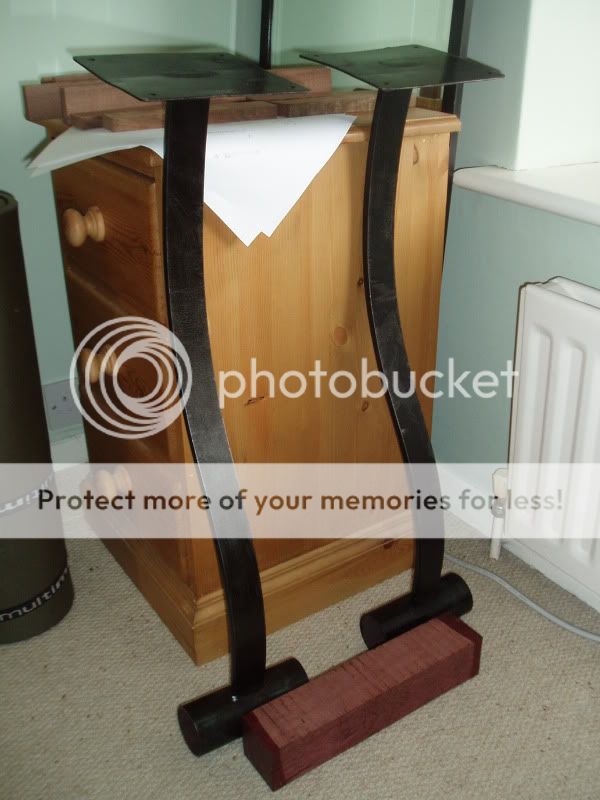
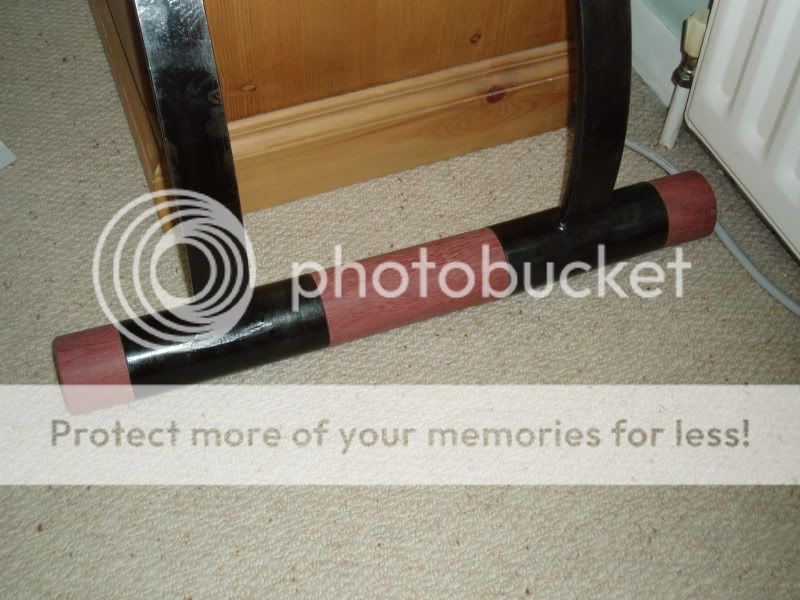
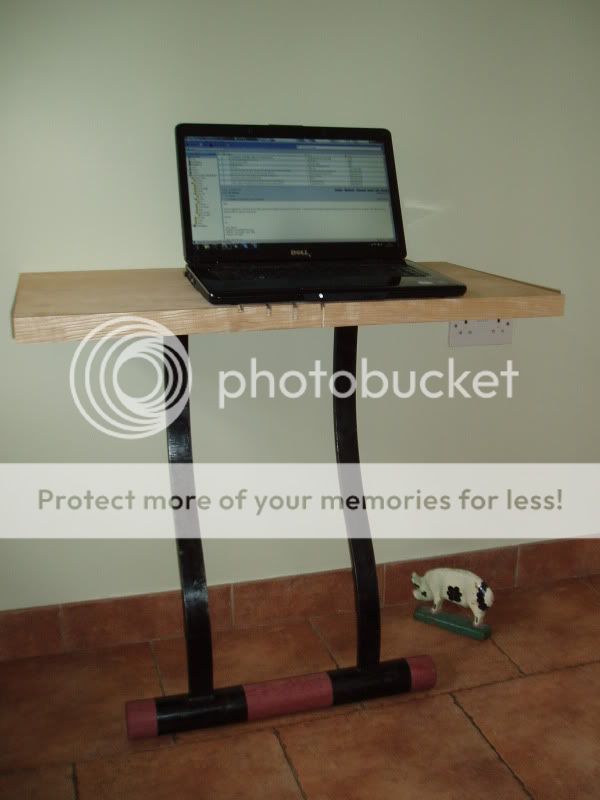
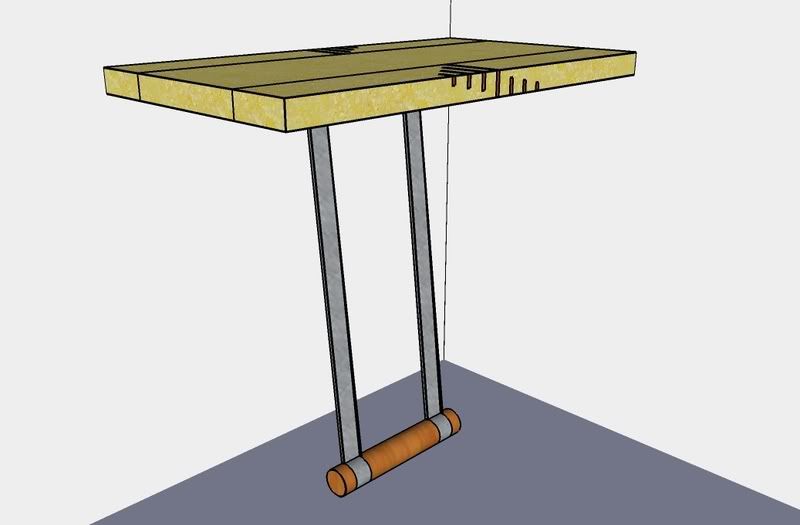
My overall idea is to plagiarise the designs of Philip Hearsey. Philip makes tables/desks that lean against walls. I'd like to terminate my "leg" in a turned cylinder; as below. I've made contact with Chunkolini to see if he can help with fabricating the metalwork.

PhilipHstyledesk.jpg


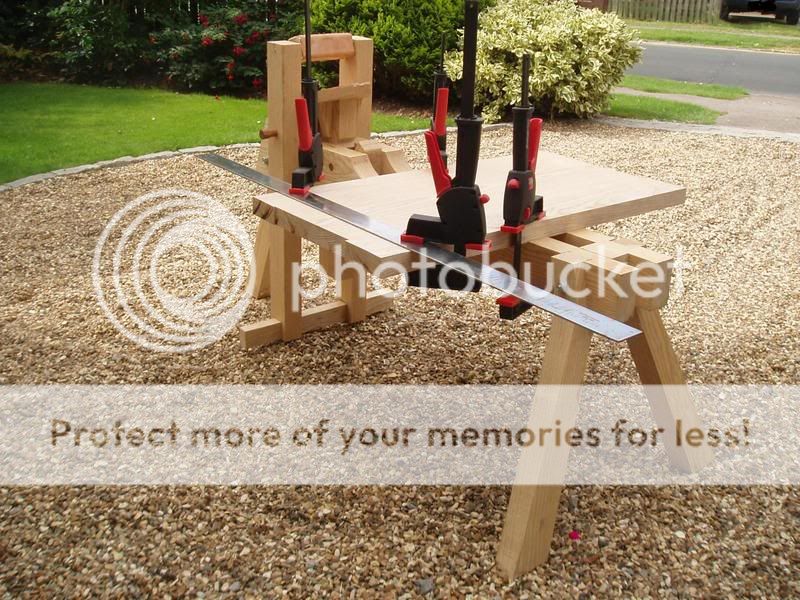
Today I trimmed the top to length with the router using my trusty "Brian Boggs shave horse" as a bench. Its great because you can clamp things in all sorts of ways - and work outside in the sun.

P8300004edit.jpg


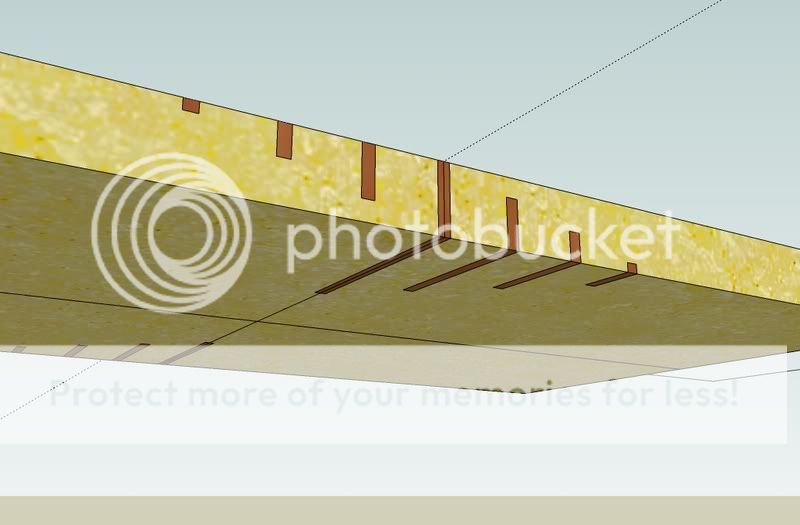
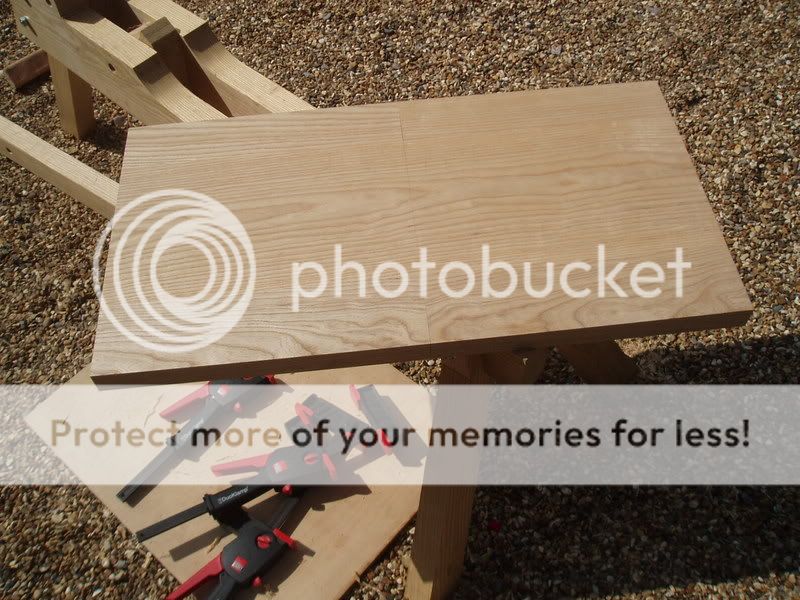
In the next picture you can clearly see where I need to disguise the end-grain joints.

P8300005.jpg


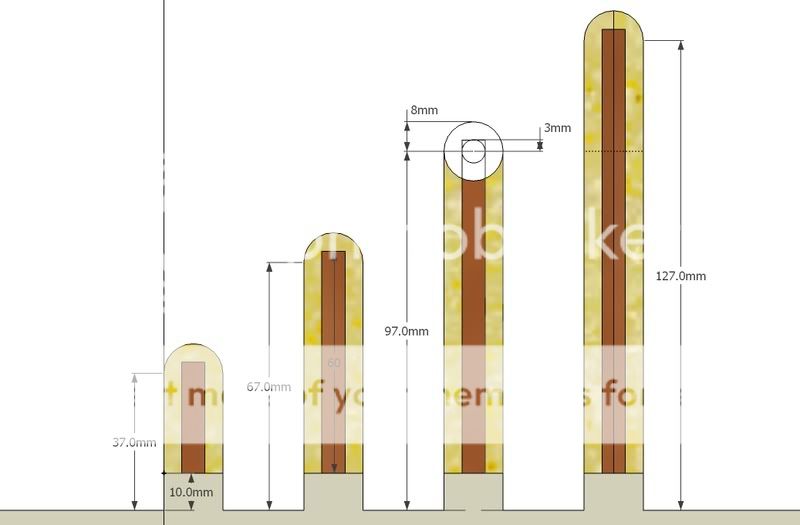
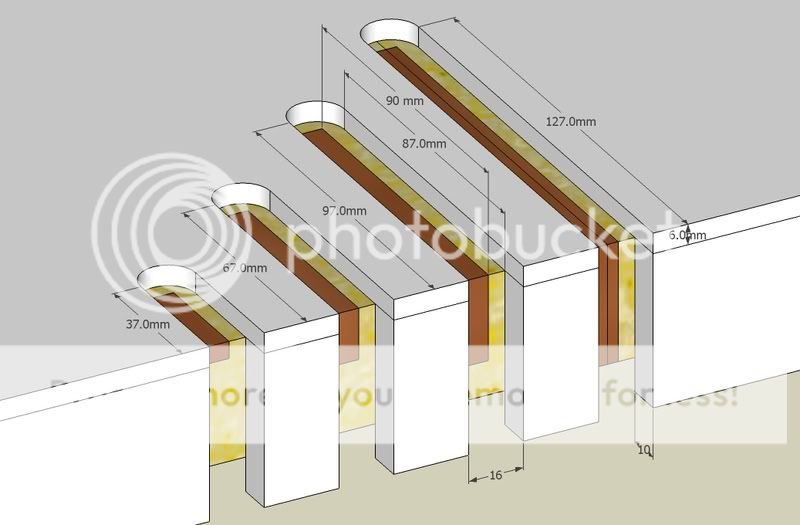
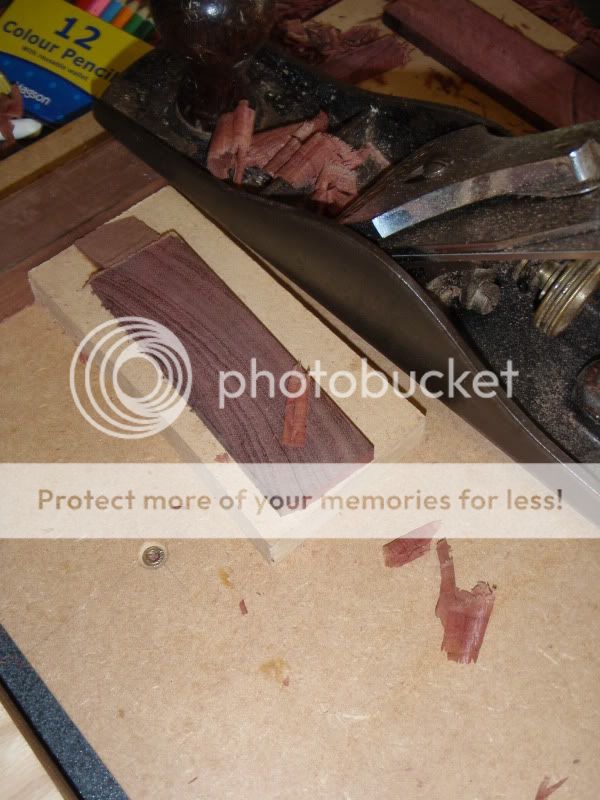
I plan to use a spiral down-cut router bit to ensure clean edges on the cross-grain trenches for the inlay pieces. I intend to make a template and use a guide bush. Hopefully this will ensure accurate symmetry of the inlay.

Note the use of "hopefully" - the router and I are not soulmates. :oops:

I'll keep you posted.
 
This looks good, but I can help wondering how you're going to make sure that it doesn't fall over. Presumably you'll just give it soem very grippy feet on the bottom piece?

If I was tackling the top I think I'd have made up the end jointed pieces (with the inlay fitted) before jointing to the centre board. Will it be an endgrain inlay, or is it short emough that a long grain one won't matter too much?

Cheers,

Dod
 
Dod,

You've touched on 2 of my 3 big concerns :-k.

  • The Philip Hearsey tables I've seen are all pretty stable - they rely mainly on friction between the foot and the floor, but some have legs that continue above the surface and lean against the wall. I might try to calculate how far from the wall the foot should be so that the downforce doesn't overcome friction and let the whole thing slide down and away from the wall :-k (I knew that degree in Physics would come in handy one day).

    Endgrain vs long. The longest bit of inlay will be 120mm. I'm going to cut some 1/4" slices of purpleheart for this. It's probably easier to use long grain bits but I guess I should calculate how much movement I'd get across the 120mm of ash. Another issue here is the way the inlay in the top and edge joins. I'd assumed I'd mitre them. More of a problem is how to rout the channel in the top and then down the edge - I've made life more difficult by wanting to continue the longest (120mm) lines over the top down the edge and then under the bottom.
    undersideview.jpg

    If it did this with endgrain slices it wouldn't make the routing bit any easier but I might be able use L and U (imagine them on their sides) shape inlays - avoiding the mitring.

    Finally, I'm worried that, because this will be used as a laptop desk, extra force applied too near the front edge will cause a rotation forward. Actually, because the foot is only 300mm long while the top is almost 800mm, too much weight on the ends might be an issue too. Thinking cap on :?

There are probably other issues too; but 3 things are enough to worry about today :D
 
Hi Phil,

I obviously hadn't realised you were going to use inlay. I thought you'd be putting "whole" pieces of timber in, which I suppose would be self compensating for orientation of the holes in both faces. Using inlay will probably mean that you needn't worry about wood movement, will use a lot less timber (although it would probably only be a few scraps anyway) and will maintain the strength of the boards.

Presumably you'll aim to get the foot directly below the centre of gravity, or perhaps slightly forward of it to take account of possible leaning on the front of the table. Do you have a super sticky material that you're thinking of putting on the foot? Presumably with the foot too far forward there would be a tendency towards slipping, and with the foot too far back a possible tendency towards tipping over forwards? I think that if I were doing this I'd be inclined to discreetly stick a couple of small screws in under the top somewhere just to be on the safe side, but I guess that's not the point. :D

Will your metalwork be adjustable in anyway, or a single shot at getting the right angle? :roll:

I really like the design and wonder if I might have a crack at one some time, although realistically probably not for a while.

Cheers,

Dod. :D
 
This design looks great, but a right pain in the ass to actually put into practice. I hope you can achieve what you want to, and it will be great to see the finished pictures of this project.
 
JS,

Yes, everytime I think about this it seems a bigger challenge to get it acccurate.

Here is a basic router template to be used with a 1/4" bit and 16mmm guide bush.

The small holes on a line in the middle will give me another chance to line up accurately on the centre line. this might be especially useful if I decide to use only the front left part of the template and just rotate it 180 degrees to do the back edge. I haven't decided if that's a better idea or not.

I have left a 10mm overhang so that the guide bush is well lined up with the template before the 1/4" bit contacts the wood. There's also another benefit to the overhang which I'll show later.

fullroutertemplate.jpg


The housings for the inlay are to be 30, 60, 90 and 120mm long. Hopefully what I have drawn below takes account of the 16mm guide bush and the 6mm (actually 1/4") bit I'll use.

toproutertemplate.jpg


I thought I might be able to use the 10mmm overhang to guide the router down the edge. How I'd cut these slots accurately is another issue. More to ponder I fear :?

RouterTemplate.jpg
 
Don't you think it would be a good idea to dig deep into your personal resources and find an original idea. Rather than copying someone elses carefully crafted and finished pieces of work. You've proved you have technical possibilities, so throw caution to the wind and think up something for yourself. One further point. If you have a central pedestal for a 'desk' where are you going to put your legs? Whoops. One laptop less in the world I fear. PH's tables are carefully balanced they are not though designed to be desks.
 
Gillian,

welcome to the forum.

I am one for always designing my own furniture, and would never consider copying the work of others. However, I would also be very careful about making this point to other people, who take another view. Phil has put loads of work into getting to where he has, so it is a bit late for considering a radical alteration to his design. There is merit in the principal of a piece of work in homage to a great design.

I think his proposal is wall mounted along 2 edges, so whilst the central leg may not be perfect in engineering terms, this very small desk is unlikely to suffer enough flex to put his laptop at risk!

Mike
 
Gillian,

I think it's only one part of the design that is being copied, although admittedly the leaning legs bit does virtually define these tables (or at least the ones I've seen pictures of). Personally I suspect that I would like the look of the top that Phil is proposing more than any of those I've seen on the originals.

One might even say that there are hardly any new designs left anyway, virtually everything is just a rehash of stuff that has already gone before. Let's face it, somebody has probably ballanced a cup of tea on the rung of a ladder before the Hearsey tables came along. :D

Dod
 
Gillian":1mm9p2tj said:
Don't you think it would be a good idea to dig deep into your personal resources and find an original idea. Rather than copying someone elses carefully crafted and finished pieces of work. You've proved you have technical possibilities, so throw caution to the wind and think up something for yourself. One further point. If you have a central pedestal for a 'desk' where are you going to put your legs? Whoops. One laptop less in the world I fear. PH's tables are carefully balanced they are not though designed to be desks.

Wow! I have been away from the forum for some time so missed this. I wonder who Gillian is. I note this is her one and only post.

I have never made a secret of the fact that I have taken Philip Hearsey's basic idea of a "leaning" table and tried to use it to make a desk. This is not something he has done to my knowledge. I've spoken to Philip about his work on a number of occasions when I have met him at events like Artspace. Perhaps when I've finished this I'll show him a picture and get his feedback - I'm sure he'll be less concerned than Gillian. After all I am a hobbyist not a commercial maker.

Anyway, below is a picture of the legs I made yesterday. I did think about commissioning someone to make these but instead learned a new skill and did them myself with the help and guidance of Will Barker, a young blacksmith.

The legs are made of 40 by 10 mm mild steel which we bent on an old fly-press. These are mig-welded to 60mm tubing to form the feet. Thin mild steel plate provides the fixing to the table top. In retrospect this is a wee bit thin as it moved while we heated it for the black wax finish.

P7080063.jpg


I'll turn the purpleheart to plug the outside ends of the 2 tubes and to bridge bewteen them. More to follow when I've had some time on the lathe next week....
 
Hi Phil

I like both the lean-to desk and the shave horse (might have to make one of these one day)! Not sure how practical the desk will be as a desk, but i love the concept. It would be good to hear about it when it is complete and has been used in anger for wee while. Anyway, nice work, keep it up!

cheers
HM
 
Hawk Moth":396baowr said:
Hi Phil

I like both the lean-to desk and the shave horse (might have to make one of these one day)! Not sure how practical the desk will be as a desk, but i love the concept. It would be good to hear about it when it is complete and has been used in anger for wee while. Anyway, nice work, keep it up!

cheers
HM

I did a spot of turning today and then cut the parts to length on my new Triton Workcentre. I can't believe how quickly Purpleheart changes colour when freshly cut. Amazing stuff.

P7110064.jpg


One more step towards the ultimate tests - will it standup ? and will I have to buy SWMBO a new laptop? Of course, I won't test it with mine otherwise I might not be able to check this forum :lol:
 
With all you Doubting Thomases about I began to question if this would really work myself.

So before finishing the routing of the top and fitting the infill strips I decided to temporarily attach the top and have a test type.

P7120066.jpg


It works - the desk is stable even when typing - the distance between the uprights is designed to allow your feet to rest on the foot, and your knees to fit between even that works too!

P7120065.jpg


More in a week or so when the top is finished. I don't feel in the mood for detail work at the moment - too many stresses and strains. So I'll prepare the stock for my next projects instead.
 
Phil, looking good! Never doubted you for a minute! :wink:

We just need a photo of you sitting on it now...!!! :lol: :lol: :lol:

cheers
Steve

Good Surname or what ?":18tbcqgi said:
With all you Doubting Thomases about I began to question if this would really work myself.

So before finishing the routing of the top and fitting the infill strips I decided to temporarily attach the top and have a test type.

P7120066.jpg


It works - the desk is stable even when typing - the distance between the uprights is designed to allow your feet to rest on the foot, and your knees to fit between even that works too!

P7120065.jpg


More in a week or so when the top is finished. I don't feel in the mood for detail work at the moment - too many stresses and strains. So I'll prepare the stock for my next projects instead.
 
Some progress.

I have now filled in the routed slots with end grain slices of purpleheart. I sawed these using my newly acquired Triton workcentre (2nd hand but unused from the 'bay). Im quite impressed because I could never have attempted this without such a stable environment. Being cautious I cut these slices almost 8mm thick and hand-planed to thicness then cut to L shapes to fit - lovely end-grain curls from my super-tuned 5 1/2 (thanks David C.)

P7260042.jpg


I have shaped the front corners to reflect the curves of those 1930's buildings with nautical theme.
ArtDeco.jpg


P7280049.jpg


The eagle-eyed will spot a place by the 5th pupleheart strip from right on the front where the ash has tornout - so I will fix somehow.

So now I'm on to finishing - another area where I lack confidence. I will post the above picture to the finishing forum for advice.
 
Back
Top