Hello newbie here, timber frame log store project

UKworkshop.co.uk

Help Support UKworkshop.co.uk:

This site may earn a commission from merchant affiliate links, including eBay, Amazon, and others.
No skills":202bjcgc said:
I'm sure the purists on here are flattening their waterstones in disgust. Humorous WIP? tsk!

=D> Ooh, excellent :D , if they're doing that they can do mine while they're at it;


The rough one's hollowed out like a Congo canoe and I haven't been out to "true it up" on one of the patio paving slabs for ages :twisted:

As it is, the dislodged grit is great for cleaning tea stains off the kitchen sink! Sorry, I mean grinding work station. Just going off to assume the position and lock my elbows (or is it lock my position and assume my elbows?!) :D
 
No skills":14ynx4iy said:
Spooky :shock: , I too have 'chisels' that look like that... I too have an aldi morticer hidden in the garage that has never been taken out of the box... I too... err... well that's it really.

:D No Skills, hopefully you didn't get into the position I did. Liking a bit of wood-bashing, I got an interest and then started buying a "few basic items", before I knew it I had turned into a "collector" and didn't have time to do any b****y woodwork. I think the point at which I realised this, was after spending 3 hours trying to sharpen a "Ray Iles" Plane Iron for my Bedrock. I bunged the whole caboodle on ebay, stipulating that cos I'd butchered it's mouth with a hand file :twisted: and the iron was half a foot thick, that it was not for collectors. I think I just about broke even there. (B****y thing never worked as sweet as my Record anyway!
 
Now, then youngsters, I popped downstairs to get on with the wotsit, but noticed we’d got more damp in the “workshop”;


I think it’s also spreading near the “climate controlled” storeroom;


Thought I’d have to look into that before carrying on, but decided to turn the heater on instead, to see if that’ll dry it out.

In the meantime, I’ll just “develop” some more photos to show you where I’d got to. I’m running ahead on the work now and I’ll forget where I am if I’m going to keep you lot up to date!
 
Hello again chums, I’ve just got the photos off the dryer, so I can show you a bit more progress.

I seem to remember that I’d “fitted” the holes (sorry, mortices) to the tenons. The next step was fitting the tenons to the h..mortices.

Due to variations in cack-handedness, some of the tenons needed a minor tap with a hitting-stick, some were push fits and a couple had associated “priest holes” and plopped in with no help at all. I’ll have to knock up a bit of “wooden shim” to cover those up before the “roundheads” pop round to check.

Remember, as I’m trying to fit each joint separately, this is a bit time consuming, but I’m learning a lot. I started this job Monday, it’s Saturday now and the total time of wood-bashing has been less than an hour (possibly not more than 10 minutes!). Hopefully the back frame will go together a lot quicker.

First off, offer the tenon up to the mortice and simply insert (as the chippie said to the Bishop☺). Making sure that the timbers are level and square. As I’ve made the tenons long (“It’s easier to take the wood off with a saw than put it back on, so err on the side of caution” I seem to remember being told at night school!), they don’t go all the way and I’ve marked the tenon where it meets the face of the other timber;


What I’m trying to do here is make the tenon fit the hole as fully as possible (“ooh-er missus I don’t know if I’ll be able to achieve that” says Justin Welby, Grief, I just hope he isn’t watching!). As the joint is going to be pegged, I want as much “end-grain” on the tenon as I can get, so that it doesn’t get “torn out”. Nextly I transferred the marked line down a bit to give me a line to cut the end off. I’m using a rule for this, but you don’t need anything so modern, a bit of stick would do. What I did was hold the rule so that one end was on the marked line, I then marked where this met the end of the tenon;


I’m using some “milling engineer’s adhesive setting shim” here. (If any “millers’ are watching, I’m using the stuff in the green packets, a true professional uses the blue packets!). Then I just slide the rule down to where it touches the “shoulder” of the tenon and mark where the “shim” has got to;


I did this both ends of the line, and ruled across between the marks. I could have squared across, but then I’d have to mark from the bit of the line closest to the tenon shoulder, I think there is a good reason for this but I can't remember what it was! Then I marked where the waste was and cut the end off the tenon. REMEMBER, CUT ACROSS THE LINE CLOSEST TO THE END OF THE TENON, NOT THE LINE YOU DREW FIRST! Don’t ask me how I know this!
 
Haunched Tenon: For the end of the “beam” I was going to put one of these in the top of the post, so that it was secure and you wouldn’t see much “choppery-pokery”. I’ve since had a look in me books and all the pictures of these look different to mine! Hey-ho, with any luck no-one’s going to be poking around in there to see (and if they are I’m gonna have to tell Father O’Reilly to scarper sharpish first!).

I offered the tenon up to the mortice. I’d left this the full width of the timber, as I can’t remember where I’ve left me glue! Then I marked the width of the h…mortice onto the end of the tenon, remembering to hatch the bit I didn’t want,;


Next I cut the spare bit off the tenon and I shaved the inside of the mortice as close as any barber round our way(something for the weekend sir?). The picture shows another mortice, these ones aren’t so long remember;


I could now wiggle the bit of the tenon to see if it would fit in the hole. It was a bit too long/wide? So I shaved a smidge off with the big Swede (I call him that because he’s bigger than the other chisel…….and he’s from Sweden. (Great people the Swede’s, but Cross & Blackwell call them Rutabagans?);


Nextly, I bunged the wood in the hole, marked a line, chopped the end off and hey Presto, job done (speaking of which, I’ve not seen a Presto for ages, probably gone the same way as Lyon’s cornerhouse!).

I could now stick the whole thing together to see where I’d gone wrong so far;


Now then, some of you lot weren’t watching properly when I made my lap-joint (“pay to leave? What do you mean I’ve got to pay to leave? This is the oddest pub I’ve ever been in, and some of those girls over there are going to catch their death of cold!”), were you? One of you at least could have told me I’d cut a hole in the wrong side of the bottom beam couldn’t you? I was b****y chuffed with that joint too. Never mind, they say pride always precedes a fall, shoulda been paying attention me’self I suppose.

Anyway, I’m still reasonably pleased with all the joints and there’ll be some bodging I can do to save the day with the bottom beam;


Think I’ll tell Toni it’ll look nice with a lick of paint on, it’s only knotty old carcassing after all, so at the end of the day it’s not supposed to be seen anyway.

Ooh it looks like the heater’s dried out the workshop so I can go and start sorting out me braces. “about time too” says the beloved “you’ve been wandering around all week with your trousies round your knees, with you’re a*** hanging out and your Jockey shorts on display, you look like a flippin teenager you do!”

TTFN See you later.
 
You've got it made, heater in the workshop. Fancy Swedish chisels. Joints that fit. You posh git.

Tool collector? me? slightly, I was a tool collector before I was a woodworker really - still its lead to 'better' things. I cant afford the tools I want these days so I generally wood work more, hopefully the economy will improve and I cant return to my real hobby.

Good progress so far, that would of taken me half a day at least.
 
No skills":1wbjj4g2 said:
You've got it made, heater in the workshop. Fancy Swedish chisels. Joints that fit. You posh git.

Tool collector? me? slightly, I was a tool collector before I was a woodworker really - still its lead to 'better' things. I cant afford the tools I want these days so I generally wood work more, hopefully the economy will improve and I cant return to my real hobby.

Good progress so far, that would of taken me half a day at least.

Not quite so posh unfortunately, the light and heating have both gone out (vanished behind a cloud!) and I don't think I've got ten bob for the meter :? I know some people who get brilliant tools at car boot sales, but you've gotta be first in-line at the gate.

And the real hobby is?

Thanks for watching and saying hello :D

Ross
 
“Ladies an’ Gennelmen, I’m afraid to say we’re going to have to interrupt the main feature once more, this is due to some unruly elements in the back row of the theatre, we will be sorting this out with some help from the local constabulary and appreciate your patience, Gladys will be coming round with some complimentary Gold Leafs for anyone who would care to partake or she’ll let you have one of her poppets if you ask nicely! She’s that kind of girl. She will not be approaching the rear of the auditorium, as she says she will not be held responsible for her actions if someone else grabs her well-stacked tray. We will be playing a short public information film……”

Sorry about that, but the concentration wanders. I thought I’d give a couple of handy tips I’ve picked up.

I noticed there was a little bit of damp in the tool-box;


So I thought I’d sort it out before I needed a sledgehammer to separate the tools. Firstly I found an old rag, this is one of my wife’s from the washing basket;


she’s got loads so I’m sure she won’t miss it! Then I got some “Canadian Oil”. I call it “Canadian Oil” because it’s oil……and it comes from Canada;


You can tell it’s Canadian, because the label is in French and English, plus the top 95% is very lightly populated and all the oil seems to be going to the South! I’m sure this stuff is good because when I tried to look up the instructions they said “First, get yourself a C130 Hercules, a compressor and aboot three 55-gallon drums of ACF 50…” I kid you not! Try looking it up!

I then dried out the box with half of the rag (she really won’t miss it, I’m sure. I mean she’s got loads that look just like that hasn’t she?). Dried off all the contents and squirted a few drops of the oil onto the steel parts and tried to make sure every surface was well wiped over. With the block plane I made sure I dismantled it and dried and wiped all the bare surfaces with the oil. (crumbs, I’m gonna have to give that iron a quick swipe over a stone someday soon!). Apparently you don’t need to swamp everything with this, as a small amount goes a long way. The one thing to bear in mind, is if you are going to be working on anything that’s going to be glued, painted, or given a surface treatment, that you will need to clean off the oil with a solvent first. The oil can cause problems when using your tools on those things. You should now have a good oily rag, which you can use on your motorised bicycle, particularly if you leave it outside all year, like wot I do.


When trying to mark in from an edge, say like using a chisel as a guide, and you haven’t got a flat surface to lay the work on, as I am here;


particularly where the edge is relieved, rounded-over,mullered? I found that holding something flat, like the rule I’m using, flush to the surface/edge you’re marking up to, gives you something to rest the chisel against whilst marking your line on the opposite side.


If your workbench is ventilated like mine, being made of boards with gaps on it, don’t leave your chisels lying parallel to the “ventilation gaps”. They may roll off. I find laying them across-ways with the bevel down seems to be an advantage;


otherwise you may find this happens;


Now then, where did I stick them sharpening stones? I think they’re on top of the freezer in the larder.


I also discovered on my “workbench’ that I hadn’t driven all my fastenings fully home, into their nice countersunk or counter-bored holes;


I’ve a feeling this may possibly mark the bottom (lower face) of anything I’m working on. It seems a good idea to me, to check your work surface before doing anything important on it and best not assume things’ll be all right. So I attempted to remedy this by….. “introducing, Mr Makita”;


“ Dahh Da Dahh da…Mr Makita, he very tough, Mr Makita he very strong, Give him one charge and he lasts all day long…Dah da!” Unfortunately there was an issue with the pointy bit of the screw not quite wanting to go any further, ho-hum. I will admit I thoroughly recommend Mr Makita, well this one anyway. An excellent bit of kit, though you’ll have to sell your wife and apprentice to afford a new one. I’m sure we’ll see him again. If I were to be picky I'd say that the LED "headlights" are in the wrong place. They turn on when you pull the "trigger" and stay on for a bit after you let go, very clever! However, although they illuminate the way ahead reasonably well, the chuck gets in the way so you can't see the end of the "drill-bit" in the dark, or inside kitchen cupboards for that matter. On the other hand it's pretty good at showing the way home from the pub if you don't have street lights, like round here.


“Ladies n’ Gents, please regain your seats etc……Gladys how are you? are you sure? Can I get you a brown paper bag to breathe into?”
 
RossJarvis":36mzfx9t said:
I then dried out the box with half of the rag (she really won’t miss it, I’m sure. I mean she’s got loads that look just like that hasn’t she?).

If she says anything, just blame the apprentice :lol:

Cheers :wink:

Paul
 
As I said earlier, following advice from the beloved; “Just because you act like a teenager, it still doesn’t mean you should look like one”. I thought I’d better pop into the “workshop” to fix me braces.

So far I’ve somehow managed to make a bundle of sticks into some semblance of a square shape. Any “engineers” amongst you will realise that a “space frame” is not particularly rigid and benefits a lot from “triangulated bracing”, to increase “torsional rigidity”. Braces are also b****y handy to stop you being sent up before the beak for indecent exposure in my experience!

I didn’t do these on the course at Weald and Downland so these are a bit new to me in the mortice and tenon form. I did lap-joint (Hello officer, can you help me out, this gentleman is trying to charge me for leaving this pub. What do you mean what’s my name? I don’t see why you need my name, this man is obviously in the wrong. What do you mean you’ve met my sort before? I’ll have you know I’m a High Court Judge and you b****y well know that, as you were giving evidence in Smith v Regina last week, WHAT DO YOU MEAN YOU”RE ARRESTING ME FOR OFFENSIVE LANGUAGE TO AN OFFICER OF THE LAW!) braces, including a couple of dovetail ones in Mk 1. But I really want to do the other sort in this job. The braces will be fairly basic in form as the timber is straight. I’ll leave the curvey ones till later.

First thing, I loosely assembled the frame, face down, on some ceramic “levelling blocks”, which had lain dormant in the “workshop” for some time, one in each corner. Then I levelled the whole lot with pairs of wedges at each corner on the levelling blocks;


For some strange reason there’s a fair bit of “drop” across the floor, but there again I didn’t lay it (If I had we’d probably call it a staircase!). I used the “Short Israeli” for this as the “Big Austrian“ was in a strop. Plus, when I applied the “sash cramps”, it might cause problems having a six-footer lying about. As my cheapie “Carpet Warehouse” cramps are currently in someone else’s stables several miles away, along with my saw-stools, and tool box No 4, I had to improvise. This is probably more in keeping with the “classic style”. The garden twine was not up to the job so I had to use nylon and a few sticks;


This seemed to work well, pulling the joints tight(ish);


This is the “Short Israeli”;


I call him that ‘cos he’s shorter than the big Austrian…….and he comes from Israel, he’s pretty bright, modern and fairly well thought out, although the lines in his bubbles are a bit wonky. He also spends a lot of time leaning against walls with the Big Austrian. I’ve off-set him above the frame here ‘cos the sash-cramps were fouling the back face of the frame. I checked that these “offsets” were the same thickness to prevent(ish) errors. Then I eyed up across the timbers for “wind?”, or to check it was all flat as well as level;


Lastly I squared the frame with a "pointy stick";


This is a stick........with a point carved on the end;


The one I am using is a bit flimsy for this size of job (and also happens to be the hardwood peg supply!). But the one I’d made from batten appears to have done a “runner” over night (never should have carved a spoon in the end of it, and I haven’t a clue where one of the dishes has gone either?). If you’re really posh, you carve a point on two sticks and bung ‘em together with a rubber band! To use one of these, you base the assumption that a “squared rectangle” is equal in distance, corner to corner (generally I agree with the Pythagorians here, but I have some sympathy for the pre-Socratics, ‘cos I’ve been to East Anglia and it’s obvious the Earth is flat there, and there’s nothing like an argument between the Greeks, particularly when a lot of retsina’s been taken), However, I digress (and the magistrate said I can’t do that unless my wife agrees).

Ahem, let’s start again. If you’ve got a square shape and want to check all the sides are “square” 90 degrees in each corner, you can check this by measuring diagonally, corner to corner. If this measurement is equal, then the shape is square. Stick the point of your stick into one corner and measure to the diagonal corner, then do the other two corners. If the measurement is the same, then the shape is square. If one measurement is longer than the other, then bash or tap the corner inwards where the length is longest. Keep doing this till the measurement is equal. This only works, if the distance from one side of the shape to the other in both axis is equal………….Oh hang geometry, if you don’t know what I’m talking about by now, you’re as lost as I am, let’s go and do the braces. I just measured the b****y thing to check that the corners were all the same distance apart.

I had made up the length of the braces off the top of my head, when doing the plans earlier. These were based on the Mk 1 model, which seemed to work and I had made ‘cos they looked right. Someone who knows what they’re doing can say if there’s an ideal length for these. I tried to cut these timbers so that there were no knots at the ends as these would make the tenons very weak.

I’d made these about 20 inches long, so stuck ‘em in each top corner, using the “American Carpenter’s Square”, (I call it that ‘cos it was called a carpenter’s square.......and came from America!) to set them at a 45 degree angle;


I wanted to use as much of them as I could, but the most important thing was moving them up and down a bit to ensure that the mortices weren’t going to have knots in either. Once happy with the positions, I checked that they were the same distance from each corner, to be equal. Then I marked their positions on the rear side of the beam and uprights;


And cramped them up;

Having a slightly dry throat after a hard day in the “workshop”, I had a couple of glugs of cider (doesn’t it show). And I think it’s time for bed, so Nighty Night and I’ll see you in the morning.
 
Paul Chapman":1s6cvuzj said:
RossJarvis":1s6cvuzj said:
I then dried out the box with half of the rag (she really won’t miss it, I’m sure. I mean she’s got loads that look just like that hasn’t she?).

If she says anything, just blame the apprentice :lol:

Cheers :wink:

Paul

I think we're on the same wavelength here :twisted:
 
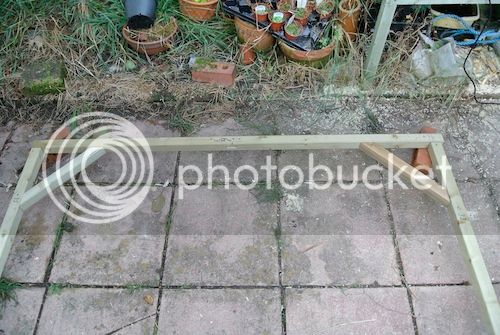
In my last post I’d got to the bit where the braces were cramped to the corners, (we could always start an argument now about whether I’d clamped ‘em or cramped ‘em, that’s why I think it’s easier to put a brick on top instead! I started with a pair of “handy clamps”, but I’m not sure now).

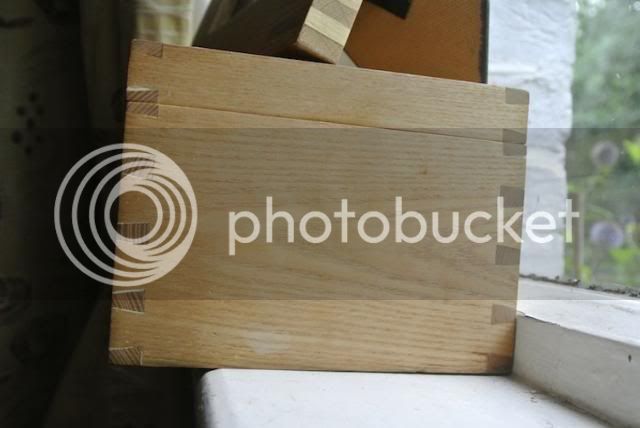
I’m noticing that the timber’s started moving about a bit now and it’s got me scratching my head a lot, as to how to cut the joints to minimise the gaps. As it’s a pegged job I can’t use the “cascamite-and-sawdust-inlay system”. Speaking of which, here’s a job I did a few years back, where I think the inlay shows the hand-cut dove-tails to fine advantage!;


I’m sure there’d be a proper way of doing this framing malarky, but as you’re probably aware by now, I’m making this up as I go along! (The labourer down the wood-yard is the only person to notice this, but as his timber selection method is “Now then, I fink them bits at the top of the pile are wot he really wants”, I’m not sure I’d trust his wisdom completely. However, I suppose if I were hefting wood around all day myself, I couldn’t fault his logic. I’ll have to ask him if he’s an Aristotelian or a Boolean next time I’m down there!)

Enough digression (I told you love, it’s my gress not yours!).

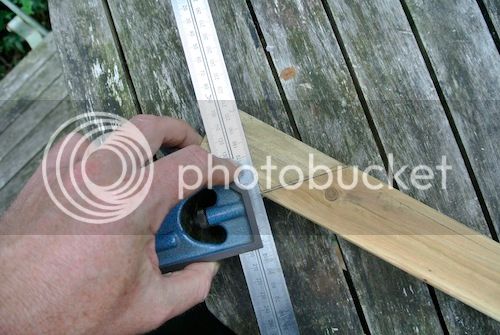
Having marked the rear of the frames for the positions of where the braces would be, I used the square to mark down onto the “inside” of post and beam, for the end of the mortices. I tried to mark under the braces for the “shoulders” of the tenons, but this was tricky as it’s all so close to the floor and tried to square up the sides of the braces. I don’t think using the square was ideal here, I would suppose using a chalked plumb line would be better, particularly if it was much bigger. I’m having difficulty remembering which bits should be “scribed” and which bits would be “plumb(ed)”. Anyway, it’ll all come out in the wash, I’m hoping a little bit of wooden “shim” and a plane will cover up some of the bigger mistakes. (I’ll park a chair in front of the biggest mistakes!).

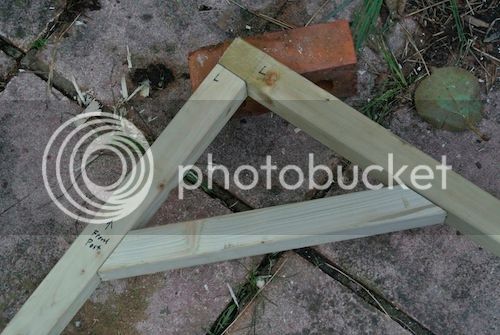
I then compared one brace to the other, to see if they were similar enough to be right. Doing this helped me notice the slight “mistake”, that when setting them out, I’d measured down from the top of the frame for one brace and the inside of the frame for the other!!! Luckily as I hadn’t applied the saw, I could fix that with a rubber and a new scribble, luckily I had a rubber in the tool box (strangely enough my big brother always carried his in his wallet, he says if you put it there you wouldn’t make mistakes! I really should’ve listened to his advice when I was younger!). This is comparing the two braces after I’d re-scribbled;


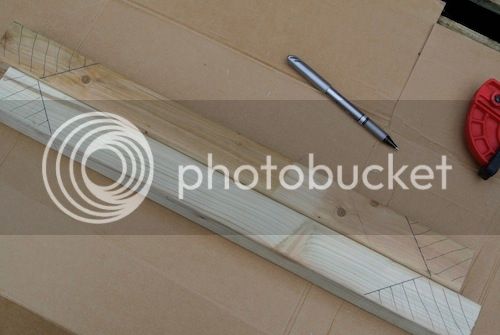
You might notice that there’s about ½ inch difference between the two. This could be down to the irregularities in the wood, or probably I’ve just cacked up again. As it is, they’re nearly six foot apart so who’s going to notice? It’ll only be ¼” when they’re in place anyway.

Nextly; Cutting the tenons. Due to the angle of the brace, I found there was a lot of wood to rip through, but I only needed to come in from one side as the shoulders were at 45%. Here I found the sawing was getting hard, possibly because the “grain” was curling the wood in, but I dare say that I might not have a good technique yet!; Anyway, I had a bright idea, so I popped in, found the wife’s best candle and rubbed it all over the blade;


This seemed to do the trick as the sawing got easier. You’ll probably need to use the missus’ best candle as I’m sure the wax’ll be better! She won’t mind surely? I think, if your blade is straight and you know what you’re doing you won’t need the wax. Plus, if you’re going to be gluing the tenons, the wax would cause a lot of problems. Luckily, I’m going to be using pegs, and the wax’ll help waterproof the joint!!!

Et Veolia (as the Bin-men say in France); two part-finished braces;


I used to think you’d cut the mortices into the posts at 45 degrees for braces, but apparently not, it’s probably too fiddly and not necessary, plus I think you’d never get the thing together during assembly. I’m hoping I’ve got this next bit right. I marked the tenon, back 45 degrees on the longest edge of the brace;


….and chopped the end off (too late to go back now!). This should mean that the tenon will slide in square to the face of the beam/post. Then I laid them out on the posts with the LI just to see what other mistakes I’d made;


So far so good, but looking at the twist I’d cut in the Tenon!!! You’d think I was a “prop-maker” for Sopwiths. Never mind, a sharp chisel and wooden-shim’ll sort that out.

If you chop the mortice full depth along its length, there’ll be a big gap inside the mortice when the joint’s done up, so if you’re handy with a chisel I’m sure you could cut one end of the mortice at 45 degrees. Personally I think Father O’Reilly might need somewhere to hide his Bushmills when his mates pop round and he might need somewhere for his mates if the “roundheads” come round, so I’ve left some big “holes”! I might try something different on the back frame.

Next I BRRR-GRAUNCH-WHIRRED the mortices, shaved their edges, popped the braces in the holes, marked the depth of the tenons, sawed a bit more kindling off and “Hey Presto” (I think Presto became Safeway actually!);


Job Done!! I’ll not make you jealous by showing you close-ups of the braces and how flush they are to the front face……still, nothing that a quick wipe across with a plane won’t settle!!!

See you later, I’ve been blathering on when I should be drilling some holes for the pegs today!!!

Oh look! The apprentice has popped round for a hob-nob or two; look at him, lying down on the job, as usual;


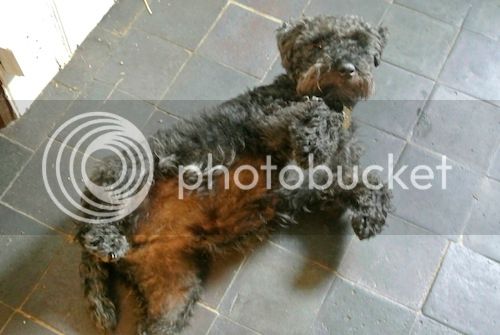
This is when I’d just told him “look Sonny, none of your cheek! I’ve forgotten more about carpentry than you’ll ever know”. “Izzat so gran’dad I wish you’d remembered some of it when you was tryin’ to teach me!!!” he said back. I don’t know, the Yoof of today eh!!

We were never like that, were we?
 
RossJarvis":mwevhce7 said:
I don’t know, the Yoof of today eh!!

Tell him if he doesn't get his hair cut he might find himself being used to wipe the excess glue off your joints :twisted:

Cheers :wink:

Paul
 
Paul Chapman":lutzxiwm said:
RossJarvis":lutzxiwm said:
I don’t know, the Yoof of today eh!!

Tell him if he doesn't get his hair cut he might find himself being used to wipe the excess glue off your joints :twisted:

Cheers :wink:

Paul

:D :D :D :D Thanks Paul, you have just given me such a wicked idea :twisted:
 
richard56":2bxtb09o said:
Is the apprentice on treble time today?

Treble time, eek!! I'd end up paying hime more than a pound if he was on treble time! Speaking of which, he does have a little purse for his "pocket money", since that time we took him to the vets!
 

Latest posts

Back
Top