Hello newbie here, timber frame log store project

UKworkshop.co.uk

Help Support UKworkshop.co.uk:

This site may earn a commission from merchant affiliate links, including eBay, Amazon, and others.
I marked the mortices for the end of the beam, by resting them flat on the ends of the posts with the front face down, I then marked them up by using the mortice chisel. A lot of head scratching occurred trying to do this in the middle of the beam, cos I couldn't get it flush due to the wide shank. I then remembered how to use the "American Carpenter's Square" as a marking gauge, this means I can probably do away with the older beech gauge I was using.

What I did was place the chisel flush to the right angled handley bit (stock?) and slid the rule down till it was flush with the chisel;

_DSC2756.JPG


Then I could use this to mark in from the "front face", using the end of the rule to scribe along.

_DSC2755.JPG


Then I dropped the chisel on the stone flags for a third time #-o #-o #-o #-o #-o #-o
 

Attachments

  • _DSC2756.JPG
    _DSC2756.JPG
    46.9 KB · Views: 1,095
  • _DSC2755.JPG
    _DSC2755.JPG
    55.8 KB · Views: 1,095
Now all the joints are marked out, it's time to do a check. As AndyT said, he likes to do the parallel timbers together, which is to my mind the best way of knowing they're right. So what I did was put all the posts together and lined up the marks at one end;

_DSC2757.JPG


I'm not overly concerned about them being dead in line to a thou or two as this is a bit of rustic garden furniture, so tolerances are fairly loose. I then look at how the other ends line up;

_DSC2758.JPG


You can probably see that they don't line up perfectly, and this would probably not be acceptable for a piece of fine cabinet work, but I'm happy to leave these as they are till I've cut the tenons. The two main reasons for error/difference is my own cack handedness :oops: (I know, hard to believe, but possible!) or it could be down to some twist,wind,spring,bow, etc etc in the wood. The fact that the distances between the marks seem unequal makes me lean toward the former. If the marks, particularly for the middle post, were higher or lower it might be more likely to be the wood.

Now for the beams, line up the tenons at one end and, oops :shock: ;

_DSC2759.JPG


That's a bit outside tolerance, even for me! So, lay out all the bits again,

_DSC2760.JPG


no need for levelling here, and only an "eyed in look' for square. Place the parts together lining up all the marks and then measure between the posts. It was fairly obvious the top of the right hand post was a good 1/2 - 3/4" out of where it should be. I think it got knocked a bit during yesterday's marking up/out. Obviously the bricks weren't up to holding everything together well enough. (in case you're wondering what the bricks were for, they were to pin the posts onto the beams to restrict movement. This was a "traditional method" wot I invented cos my handy clamps weren't big enough to hold the timbers together :idea:

Once I'd put it back where it should be I could re-mark the end of the mortice and job done! In my way of working I find it best to check everything a good few times before committing myself to hewing and sawing. It doesn't prevent all mistakes, but brings the number of them down to managable levels :D

Aha, the apprentice has arrived, late as usual!

_DSC2761.JPG


I wanted him to do the mortices for me, but he says no! Some lame excuse about not having opposable thumbs.

Anyhoo, it's now past Simpsons O'Clock so I think I'll put the tools and timbers to bed and go and carry on sitting down inside :D

If anyone can help me figure out whether to cut the tenons first or the mortices, please chip in. For some reason I've now forgot, I was going to do the tenons first and then offer them up to the marks for the mortices and then do those. Is that a good way round? or should I do the mortices first? Or is it a case of 6 1/2 of one and half a baker's dozen of the other?
 

Attachments

  • _DSC2757.JPG
    _DSC2757.JPG
    72 KB · Views: 1,083
  • _DSC2758.JPG
    _DSC2758.JPG
    119.3 KB · Views: 1,083
  • _DSC2759.JPG
    _DSC2759.JPG
    71.1 KB · Views: 1,083
  • _DSC2760.JPG
    _DSC2760.JPG
    77 KB · Views: 1,083
  • _DSC2761.JPG
    _DSC2761.JPG
    60.1 KB · Views: 1,073
Fwiw I meant it was a good idea to cramp all your stock side by side and mark them all at once!

But I'm sure you are in tolerance on this job and it will all go together with a little persuasion from a 'Birmingham Screwdriver!'

And I prefer to cut mortices to the size of my chisel and make/adjust tenons to fit.
 
AndyT":2bxqqai5 said:
Fwiw I meant it was a good idea to cramp all your stock side by side and mark them all at once!

But I'm sure you are in tolerance on this job and it will all go together with a little persuasion from a 'Birmingham Screwdriver!'

And I prefer to cut mortices to the size of my chisel and make/adjust tenons to fit.

Thanks Andy. I had assumed you meant that about the marking, I might not have made that clear. I learnt on the framing course that this wouldn't have been done a few hundred years ago on house framing.

With well seasoned and stable wood, accurately cut, this method is fine and I think preferable to marking each piece individually. On "green oak" that's been converted by side Axe, 12" square plus. There won't be a straight line or a flat face, (however the skill and accuracy of some working in the past and today, with a string line and side axe is awesome to behold). In that case, each joint has to be cut in place, face to face off-set, in a levelled and squared frame. We were shown how to join two twisted beams so that where they met the faces were flat and square and you couldn't fit a fag paper into the joint. All with a plumb bob level and a pair of dividers, a couple of saws and a couple of chisels. That's what I'm sort of trying to replicate here, in scale.

In this instance, comparing the joints next to each other "after the event" shows up major errors pretty well.

I'm a strong advocate of measure twice, then just to be sure measure again, go get the saw, then measure again, maybe it is now safe to cut. Then measure it again to find out where you went wrong :D

Try and teach that to the youth of today and they'd just laugh.,
 
Morning all.

Well another day dawned, It rained last night and some damp seems to have got into the workshop;


Luckily I threw a tarp over the timber, so it shouldn’t be too wet, (well no wetter than it was when I got it from the wood-yard {when I say wood-yard, I actually mean a car-park down the local hardware store, not a proper wood-yard![when I say hardware store, I actually mean a branch of a well known money-removal chain with the initials TP, not a proper hardware store!]})

Anyway, where were we? Oh yes, looking back over the previous posts I noticed I was starting to sound like a teacher and getting into a lot of possibly pointless detail. Please chip in and tell me if I’m being boring or irrelevant, though try and be gentle about it.

Todays progress, a tenon and a lap-joint have been part completed (I’m sure it’s not called a lap -joint, surely a “lap joint” has subdued lighting and shiny poles everywhere!)

Firstly I clamped the post to my “workbench”, not having a good vice I used some clampy things. I discovered it best to have the long arms of the clamps going under the bench, not out where your legs are (ouch). Clamping as close to the bit you’re going to cut seems to be a good idea, but a bit tricky with long bits of wood if you want them upright.


So I had to lay this down a bit further than in the photo, I didn’t want it flat ‘cos I wanted it at an angle to see the marked lines at the top and the side. This meant I could line the tenon saw up;


Then I sawed at an angle till the hole (kerf?) had got down to the line marked for the shoulder of the tenon;


For this bit I was using a “rip cut” tenon saw, which seems to be working well “along the grain”. I bought this from a well known “Carpet Warehouse” (see if you can work out which shop I mean here!) a few years ago, like with most of my tools, it’s been lying around and attracting the “tin worm”.

I cut both sides (cheeks?) of the tenon and turned the wood round and came in from the other side, leaving a “v” shaped bit in the middle;


The last bit I did was cut “square” trying not to go past my marked “shoulder” line;


Nextly I cut square across the wood, using a hardpoint “tenon saw” which has a “cross cut”, this seems to be easier “across the grain”. I tried my best to get the lines and the blade vertical, and “eyed down” the blade to get it straight;


And “bam! Roberts your father’s brother”, “job done, one slightly wobbly sided tenon;


To be continued……
 
Now it was time for the “lap joint”. First I clamped the timber to the “workbench” (If you’re making a nice bit of furniture, make sure the bench is dry and the moss has been brushed off!).

Then I eyed up the cross-cut saw across the lines, trying to remember to cut “inside the lines”, and then cut across. I tried holding the saw with the handle lower than the blade, so that I could see when I got to the line, Once done I carefully got the saw level and cut down looking to see that I hadn’t gone too far on the other side. I then cut the other end of the joint and sawed across the middle too. This seems a good idea, so that the “chunks” I knock out with the chisel aren’t too big, and don’t take wood away wot should stay in the timber, innit! (sorry, lapsing into yoof speak there).


Once this was done I rolled the timber on its side, with the joint away from me, so that I could whack it with a big chisel and mallet. I did it this way round so that the chunks of wood would fly off into the beloved’s flower pots and not anything important I may have below the waist (I’m sure they’ll come in handy some day, just like all my other unused tools!). I had the bevel of the sharp end toward the bottom of the joint, in the hope that this will stop the chisel diving into the wood;


BISH, BASH, BOSH, A few applications of the hitting stick to the chisel and there’s chunks of wood in the dahlias and a right old mess in the hole! When I got nearer to the line, I turned the chisel round, so the flat edge was nearer the bottom of the hole and bashed a little bit softer. I only bashed out to about halfway through this side, I think next time I’ll stop a bit further from the line and come back to it later;


Then I flipped the wood over, bashed in with the chisel from the other side, leaving a little “hillock” in the middle. Lastly I turned the wood “flat” and shimmied in with the chisel by hand, using a “wiggling” motion, this seems to work better than forcing it, or using the hitting stick;


As you can see from the piccie below, I’ve sawed down a bit too far and probably bashed out a bit too much wood, the bottom of the joint is a bit on the p*** (not flat!) I'm not sure if I need more saw cuts in the middle of the wood, or less bashing! (probably both). I was also a bit unnerved to see that I’d missed a mark, and thought I must have cut across the wood at an angle;


However checking with the square showed that I had cut across the wood reasonably well, meaning I’d drawn the line in the wrong place. Can’t have been squaring the square, square across the wood very well, had we then!;


The edges of the joint weren’t particularly vertical, but hopefully this’ll all come out in the wash, when I fit the joint and re-apply the sharp cutty thing (if that’s not mixing too many metaphors, synonyms, whatever!);


“Et Viola” (as the musicians say in France!), after much procrastination we have a part finished post.


I’m going to cut one part of each joint on all the timbers first and then offer each one up to it’s opposite number before doing the next lot. Hopefully this’ll help me bodge all my mistakes into some semblance of “carpentry”.

Ooer, look, it’s lunch time already and all I’ve done is start cutting two joints, I better get on and stop blathering to you and get them joints done. (Lunch time! MMMMMMM, where’s that frying pan gone?)
 
Aha, whilst cutting out the next “lap-joint” (oh hello…erm, what is your name? Susan. I couldn’t see your name badge…mind you I’m not sure where you’d put a name badge!)

Oh! Where was I, yes, the next lap joint. I cut two extra slots across this, about ½” apart. The wood chunks popped out very nicely from this and went all the way across so I didn’t have to turn it over to come in from the other side. I stopped a couple of mm above the line, then just pushed the chisel down vertically, this sliced the wood out easily and left a nice smooth surface at the bottom of the joint, I believe you need a nice sharp chisel for this;


Five tenons and two lap-joints done and still loads of time for doing the next bits, plus sitting down with a cup of tea (no hob-nobs though, the b****y apprentice scoffed the lot when I wasn’t looking!);


see you later!
 
Oooh, just sat down on the sofa for a minute to rest my eyelids and look, here we are three hours later. The “apprentice” wanted to go round the park for a walk and to play with some tennis balls, and as I’m sure any trades-people here will know, all he did was get into a fight and sit on his balls for a while! Won’t do any fetching or carrying that lad! Just need a cuppa, then I’ll pop out and see to the timber.
 
“Ladies and Gentlemen, We interrupt the main feature for a brief intermission, choc-ices, Poppets and Kia-Ora can be bought from Gladys, who will come amongst you with her well stacked tray! Woodbines, Park Drive and Capstan Full Strength can be purchased from the Kiosk. We will be showing a public information film called ‘a brief review of the Power Craft 370W Bench Morticer”.

I’ve only used one of these things once before, so if anyone who knows what they’re doing can see the “stupids” I’m doing please chip in!!

Many a year ago a friend of mine suggested popping into Aldi/Lidl/Netto as they had some carpentry stuff on sale, I’m sure nobody on here has ever been taken in by this reckless impulse☺.

So off we popped and an hour or two later and despite my usual desire to buy the best kit I can get, I came home with a bench morticer, table saw, compound mitre saw, a set of morticer “chisels” and a set of dowels and £120 less in the bank. Anyway most of this has been placed in the “climate controlled store” till such time as it may come in handy, that’s it in the box under the generator;


Having been asked to do this log-store thingy, I thought “aha” the time of handiness has come, so out it got shifted.

Somehow it seemed to be in good nick and this is what you get;


A lump of metal and some bits ‘n’ bobs, loose or in bags, including one 5/16 “chisel”. It has Omega-Wolf Ltd on the label and is made in China. This may be a successor in name to Wolf, the old British Machine-Tool company who used to make very good industrial machine tools “back in the day”. It says the chisel range is 6-13mm and maximum drill size is 13mm.

You need to fit the fence, footie-holdie-woodie-down thing, piece of wood for the table wotsit, pull-the-thing-down handle and you get an extension piece/taper doo-dah (which they call a taper drift, but it aint wot I call a taper drift, that's wot you knock one of these things out with surely) and spare chuck to use it as a bench drill. The machine itself is made of castings, as is the base and feels pretty solid and weighty. Not too bad for about 30quid thought I! There are four slots on the “foot plate” for a drill vice or similar and four mounting holes. BEFORE USE THIS MACHINE REALLY DOES NEED TO BE SECURED TO A STURDY WORKBENCH, YES, REALLY!”

Once (ahem) securely mounted on the machine bench!!!……..

“WARNING WARNING, don’t try this at home children, this man is a trained professional (admittedly not in a wood workshop!), and says he knows what he is doing! He may not necessarily follow best H&S or machinery practice to the letter!”

…..I attached the fence, the foot thingy and the wooden base-plate wotsit. The instructions are okayish but not overly clear, the machine already had the fence guide fitted which was not how the instructions had it.

Having loosely put this together I tried to square the fence up to the two pillars that the morticer moves up and down on;


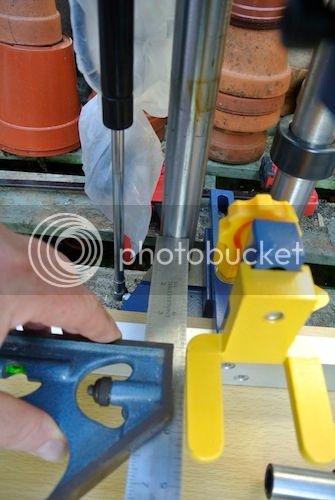
I found that the guide that the fence moves in and out on has a fair bit of slop and if you’re a perfectionist, you’ll have to square the fence every time you move it, plus I doubt whether it’ll stay square when used. The travel on the fence is locked with a lifty-handley thing and the foot wotsit is adjusted and locked by a turney-wheel handle. Having tried it, I think they would be better the other way round, but they have different thread sizes so can’t be. You need to get more force on the foot to hold the wood down, particularly when withdrawing the chisel after the first cut. After the first cut, the wood grips onto the chisel quite hard and lifts with the chisel, pushing the foot back up. As it is, I had to lean down hard on the timber and pull the handle up, or apply a mallet! The motion is also very stiff and you have to put a lot of force on the handle to move it down, or pull it out of wood. This may be because it doesn’t have a normal spring, but a piston-rod-thingy like on the hatch-back of a car.

It has a depth-stop(?) Which you need to set by rule-and-eye or by lowering the mortice chisel to the required depth, but it’s a bit tricky as I can find no lock for setting the lowered morticer at a fixed height. I also first set this by eying through to the body casting, which is where I thought it would contact, but found a panel on the base of the casting actually touched the stop first;


Unfortunately this is all a bit irrelevant, as the depth-stop(?) does not bite onto the pillar very well. The amount of force required to lower the machine and cut into the wood is so high that the depth stop will slide down the pillar when the morticer gets to it. I found I had to lean down to look at the depth-stop to see when the casing came to it, cos I had it on a low bench. The low bench was an advantage as I had to lean on the handle very hard to get it to work, the handle is made of thin-walled tubing held by a small screw and I’m concerned as to how well it will stand up to the force placed on it.

Next thing I did was mount the chisel. This is a squared hollow piece of steel, machined to have four sharp points and sharp edges to cut a “square hole”into the wood, there is an auger bit up the middle to cut most of the wood out. I was using the largest bit, 19mm which is (ahem!) bigger than specified (oops!) But it came in the set wot were on sale in the same shop from the same brand!!!. This may have caused some issues, which smaller chisels won’t, so bear this in mind when reading this review.

Due to clearance issues, I could not put the chisel in followed by the auger, so I put them both in together pushing them up using my finger tip, as stated in the instructions, there’s probably a much safer way of doing this! Please someone tell me!

I realised I had to open the Jacob’s chuck first as the auger shank is pretty thick. The chuck itself is fully enclosed in the casting, and there are two “windows” you can open to tighten and loosen the chuck with a “safety key”. However it’s very easy to leave the key in the chuck as it can stick in the window. Remember “EITHER THE CHUCK’S IN THE HAND OR THE BOX, NEVER LEAVE IT IN THE B****Y CHUCK OR YOU”LL BE B****Y SORRY!” as an instructor I know is fond of saying;


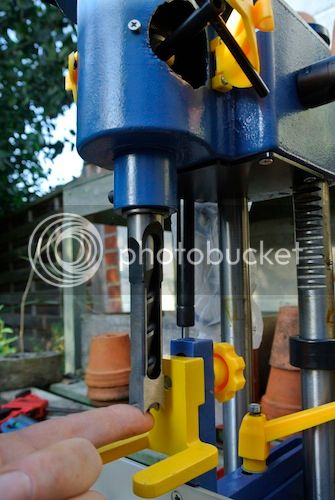
The chisel itself is held in the collar of the machine with a hex socket screw and “Allen Key”;


There doesn’t seem to be anywhere to clip the key to the machine, which is a bit of a pain, however the chuck key can be clipped to one or other of the windows. When you drop the “Allen Key” under the bench, which you will do, often, this is an excellent opportunity to find all those other little wotsits you couldn’t seem to find earlier☺;

I think the chisel should be squared to the fence; sliding the fence forward and setting it to the front face of the foot thingy could do this;


Mind you this showed up another problem; the footy thing slides down in front of the fence, this means you can’t get the chisel closer to the fence than about 19mm, ¾”. If you’re doing smaller mortices you may want to have a smaller gap to the fence and can’t. I thought you may want to put some hardwood, nylon or something on the fence, either side of the footy thing to do this. You could use carpet tape or glue to do this, but there are no holes in the fence to screw something to the face. You’d have to do this yourself. If I’m missing an obvious trick here please tell me, (gently of course).

It was now time to get the thing going, smoke was plumbed into the machine through a piece of electric string via a standard 3 pin plug and the start button was pressed. The machine has a start button and stop button, the start button being guarded by raised edges, the stop button not, which is a “safety feature. At this point I realised I’ve probably set the thing up wrongly. I think the auger should be inserted quite far into the chisel, but I seem to have pushed it in too far. With the power on the motor hummed but did not turn the auger. It was fouling inside the chisel. I stopped and restarted the motor and there were some grindy, crunchy noises and then it seemed to run smoothlyish. Have I missed a trick here? Or is this a normal bedding-in process. Should I have locked the chisel in place first and then dropped the auger a tad, or is there some quick way of setting a clearance?

I then applied some brute force to a piece of treated pine (CLS?). This is where I found you need a lot of force on the lever and you definitely need to have the thing bolted down to a solid bench. There is a lot of resistance in the mechanism, which may be simple to “fettle” out but I haven’t had time to look into that. This may have been in some point due to using too large a chisel, but it was very stiff even before the chisel got to the wood. I can’t see the auger pulling the chisel through the wood with the current set up. The working surface is quite small and there are no outriggers. You’ll need to have supports for wood of any length. I also realised that if you were going to put this on a smaller bench, you’d probably benefit from pre-drilling mounting holes at each end and the middle of the bench and maybe using wing-nuts to secure it. You can then easily move it around for longer lengths of wood. I SUGGEST YOU DON’T GET TEMPTED INTO USING IT WITHOUT SOME FORM OF SECURING! Also; THE CHUCK KEY SHOULD ALWAYS BE IN YOUR HAND OR IN THE TOOL BOX, NEVER LEAVE IT IN THE CHUCK!!

To sum up: This is not a serious machine for serious carpentry. It seems to be suitable for light craft-work and occasional use. It is limited to a13mm cut. It is a pretty solid machine, which could be much improved if you’re a good fettler. I think it needs a certain amount of fettling out of the box to be usable or safe, but that may be because this one has been in storage for a few years. I’m not sure if these things are on sale at the moment, but this sort of thing comes around every so often in Aldi/Netto/Lidl (still can’t remember which one!). Also I’m sure idiots like me are putting them on ebay now and again.


“Ladies and Gentlemen, please return to your seats as the main feature is about to start. Gladys also asks that the young gentlemen in the back row stop pinching her Kia-Oras or she’ll give ‘em a right what for!”
 
Hennyway (as they say in Croydon!)

I’d completed all the tenons on the front frame pieces and cut the lap-joint (“I say, HOW MUCH!?!?, for a gin and tonic!? When I wandered in here I was thinking it was like any other normal pub!”).

I thought I’d fit the lap-joint first and then offer all the other tenons up to see if I’d got anywhere near with the marks for the mortices. First thing I noticed was that it wouldn’t fit together straight away, which I think is a good thing, apparently it’s harder to put wood back on with a chisel than take it off, so if anything I’d tried to cut “inside my lines” As I’m not particularly good at holding the saw “square or plumb” or following the line.

I got out the chisel and pushed down, shaving the “sides” of the joint, particularly where I could see I was inside my marked line;


I kept doing this to see if the joint would fit and tried to look at which “face?” of the joint was wider. Whilst doing this I somehow remembered some good advice wot a “proper chippie” had told me ages ago. Instead of offering the joint, open hole to open hole;


I did each one at a time, offering the joint up to the “back” of the joint, i.e. the other side of the timber, where it was whole. With doing this I got the two to match up and they slid together as a firm sliding fit, but I did have to resort to the hitting stick to get it all the way in, but this was “tapping it” and not “bashing” it. The last time did this I think I offered the joints up face to face and ended up with somewhere to park my bicycle!

As I said, it went together with a bit of force and I’m quite chuffed with how it turned out. No big gaps;


That looks pretty square to me;


And the front faces seem fairly level;


Next up, putting the frame loosely together to check the joints against each other, before committing to more “butchery”;


I’d put a wee bit of effort into levelling the frame, with some (ahem) off-cuts (okay, they’re going to be the side beams and braces, but let’s not worry about mere details here). The bottom “beam” and middle “post” were fairly square so I used these as my “reference”. I put the top “beam” across and the side posts, trying to match tenons to mortice marks, this was a bit tricky as I haven’t followed standard practice here. Normally (or at least when building a house or barn!) the posts have tenons at each and the beams mortices. As I have little legs underneath the bottom beam (floor plate?) the mortices are in the bottom of the posts. This means I’ll have to slide the top beam across when checking each joint.

Once I’d sorted out where the bits went, I thought I’d just check the top beam for “square”;


I’m not sure how clearly the electric Daguerreotype shows it, but you can probably see that there’s something not right here and it looks like the top beam is bowed.

“Ladies and Gentlemen, we have another brief intermission, the feature will restart presently, young gentlemen in the back row, if Gladys comes in here once more telling me what you are doing, we will have to remove you from the theatre!”

I tried to use the square the other way round to check the beam too and then started to think the square wasn’t! So I went to check the square.

An Engineer told me (“before he died, tiddy boom, tiddy boom, tiddy boom!”), that a quick way to check a square was this, Get a nice straight bit of desk or something, hold the stock of the square to the edge of it, firmly and mark a line up the “blade,rule, long-bendy-thingy;


Flip it over and check to see if the blade-wotsit follows the line,


If it does, it’s fine, if not it’s time for them “fettling” files, or if you have a fixed square, you’ll need what I think AndyT refers to as a “Birmingham screwdriver”. This square seemed okay for government work, so I went off back to the “workshop”.

“Ladies and Gentlemen please regain your seats as the main feature is about to restart, YOU LOT IN THE BACK ROW GET OUT NOW OR I’LL HAVE THE ROZZERS ON YA!”

Just going out for a walk with the apprentice and his aunty. I’ve just had a chat with the neighbour over the fence, so I’d better get on with the work soon and stop blathering with you. See you later, byeee.
 
Hello again peeps! It’s all gone a bit quiet out there, have I bored you all or have you all gone to work or else found something useful to do instead?

Please just say hello now and again as it’s getting a bit lonely in the “workshop”. The only company I get is "the apprentice" and his aunty, and they don’t pop in much, and when they do they just end up shouting at the neighbours!

I’ve come on a bit since I last blathered on so let’s see where we are then Oh yes, tenons and lap-joint done. I think I laid the frame out again and this gave me the opportunity to check all the marks were lining up etc, I seem to find the more times I check, the more mistakes I find, I suppose that’s better than finding the mistakes after sharp thing hits wood!, I’d had a bit of a problem trying to square the top beam about the top of the middle post cos the beam was bowed and I found there was a bit of deformity in the post too. What I needed thought I was a big Austrian, so I popped out to the porch and found him hanging around in a corner behind several years worth of cobwebs, this is the big Austrian here;


I call him the big Austrian (TBA) because…well, he’s over six foot tall and from Austria. (He’s also fairly well built, spends most of his time leaning against walls and seems pretty quiet and miserable, but I don’t mention that to his face!)

I squared off TBA at the middle post;


and then lined everything up. I could now check the mortices against the end of the tenons and see whether I needed to adjust owt. This one seems okay, so I marked it with a tick (just need to remember what that means when cutting!);


I then started making chips and dust with the morticer as mentioned somewhere earlier, resulting in;


Just like wot a proper chippie might do with an auger and chisel, only rougher and about twice as slow, I might get quicker with practice!

I’m making the mortices three “chisels” long, cos the chisel is about a third of a timber-width square and I think there’s generally a “rule of thirds” or something when doing mortice and tenons, well it makes sense to me! The mortices at the end of the beam are two “chisels” long, as the end of the beam is going to be flush with the side of the post. I don’t want the end or “sides,edges?” of the tenons showing so all these mortices are “blind?” is that the word?, well they don’t go through the whole timber anyway. This doesn’t leave much “end grain” in the beam, but I’m hoping that won’t be a problem.

Brrrr, Graunch, Whizz, not many minutes later all the mortices are done. Next step, fitting the tenons into the holes, or is it fitting the holes around the tenons?

For this I was going to use two chisels, bevel edge ones. Here’s one I’d prepared earlier;


and one I hadn’t;


This is me realising the thinner one probably wasn’t up to todays job!;


The second one is essentially as it came when new (these had had the “secondary bevel” cut at the factory, possibly with a mill file!!) apart from where I’d been bashing some wood with a nail in it or something, I think that was when I was “easing” the old back door frame out a couple of years back. You can also see how well I keep my tools from this shot!!

And this is it after a couple of swipes across a sharpening stone (or two!);


I think the glint of sunlight off the “fettled” bit means it’s approaching “sharp enough” Here’s a shot in the shade showing it’s not quite as “polished as it could be;


Next step was fitting the mortices to the tenons. Both chisels were reasonably sharp so only needed a firm push to shave the sides of the hole. I didn’t need to do much wiggling and took a little bit off at a time. As the auger in the morticer chisel was a bit proud of the edges of the chisel it had left ridges down the holes, so I only really needed to shave these plus a bit extra on some, depending on how badly I’d butchered the tenon. I felt it better to shave the holes than the tenon as there was more wood in the mortice lump of wood than in the tenon, though someone who knows what they’re doing may wish to chip in here with better advice.

Most of the mortices were “long?” enough to not need the “ends” shaved, which was lucky, as the thin/narrow? Chisel was a very tight squeeze in the hole. (eight Swedish chisels, all in metric! All exactly the wrong size for any proper work!!!).

I’m making a rustic store, so I’m letting most of the tenons go full width of the timber. If I was more concerned with neatness, I might make the holes (mortices) less long/wide? And shave a tad off the “edges?” of the tenons. I think this might make the joint look a bit better.

“Oh! You’re here then!!” This is the “apprentice” again;


He’d taken me for a walk round the park earlier, found one of his balls he’d lost in the fight yesterday and was most pleased to have a pair again! And then, like most apprentices, mooched off when he was needed and couldn’t be found (I’m sure any trades-people here know exactly what I’m talking about!). This photo was approaching lunch-time and he’d come to the workshop looking for some Hobnobs. I’d just asked him to clamp summat up with the handy clamp, he looked down at it, then up at me and said “Wot! Me! With my thumbs, you know I aint gonna be doin’ that!!”

I think it’s time to rest my eyes again, I’ll be back a little later, remember to say hello if you’re still interested.
 
The Eriba Turner":3jol9rbm said:
Hi Ross
This is by far the most amusing WIP I've read. Did you by any chance write for The Two Ronnies? :lol:

Regards Keith

Thanks Keith, boy do I wish I had written for them! I think I watched too many episodes of the Two Ronnies, saw too many Carry On films and listened to too much Sorry I Haven't a Clue, for my own good!!

Ross
 
Spooky :shock: , I too have 'chisels' that look like that... I too have an aldi morticer hidden in the garage that has never been taken out of the box... I too... err... well that's it really.
 

Latest posts

Back
Top