WIP: Beginner's first box

UKworkshop.co.uk

Help Support UKworkshop.co.uk:

This site may earn a commission from merchant affiliate links, including eBay, Amazon, and others.

Keefaz

Established Member
Joined
18 May 2006
Messages
107
Reaction score
0
Hey, all.

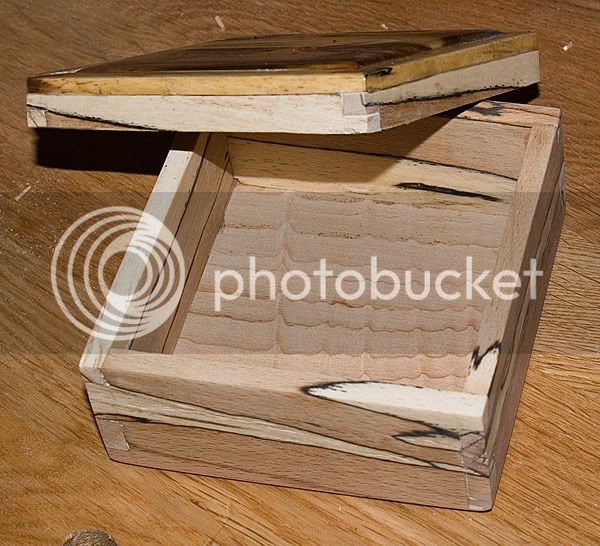
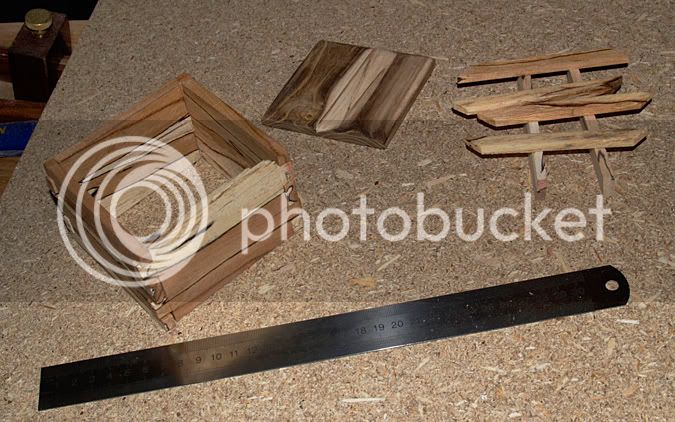
I'm struggling making a little box out of spalted beech. It's going slowly, but OK. It's not going to be perfect, but I'm learning a lot anyway.

box1.jpg


I have two problems:

1. I've no idea what to use for the bottom of the box. As you can see, it's not very large and I'd ideally like something 2-3mm thick that will look nice. I've tried making a thin piece of beech but I can't get the thickness right with my hand tools (mostly due to the 2nd problem) and I managed to put the router right through it when I tried with that. What would someone who knows what he's doing use?

2. My main problems so far have been working out how to hold pieces while I work on them. At the top of the photo, you can see the top of the box that I curved slightly with the block plane. I've no idea how I was meant to clamp this thing down. It kept sliding all over the place. I tried using one of the those anti-slip mats the you put under rugs but that didn't really work, either. What's the best way to hold something like that down? I've had some terrible trouble trying to plane off saw marks and the like.
 
Keefaz":2a0pjg24 said:
I've no idea how I was meant to clamp this thing down. It kept sliding all over the place.

Clamping small pieces is always a problem and you often have to make up something to suit the particular piece. For the top of your box you could probably pin three pieces of hardboard (or something similar as long as it is thinner than the finished thickness of the wood) to some chipboard or MDF, so that the work is supported on each side and the far end, then clamp the chipboard or MDF to the bench and plane away :wink:

Hope this is clear.

Paul
 
Lookin' good.

Keefaz":3m1jqjau said:
1. I've no idea what to use for the bottom of the box. As you can see, it's not very large and I'd ideally like something 2-3mm thick that will look nice.
I use birch ply from the model shop for this sort of size thing - expensive, but you don't use much. For a nice appearance I swiped an idea from a FWW article - Japanese paper glued in and varnished. It's sort of textured and comes in lots of colours. Erm... yeah, here's an example.

As far as holding stuff goes, that's where my tail vice and bench dogs earn their money. Alternatively you can do a lot with double-sided tape (the strong stuff for carpet laying) but you have to watch out you don't a) put too much on so you can't get the workpiece off again, DAMH..., and b) that you can remove it again without doing damage. Or, as Paul says, a jig of thin stuff round the edges.

Cheers, Alf
 
I like the grain on that wood, very nice. What are the 4 pieces for in the top right of picture?

Andy
 
WHat about those router mats? I've never tried one and you might find they're as useless as the carpet underlay but then again not. Was thinking about getting one myself but meant to gather opinions first. Members here do have them - I've seen the pics (Alf?).

ps This sort of thing http://www.rutlands.co.uk/cgi-bin/psProdDet.cgi/DKRMAT
 
Router mats have their uses but I've had very little success trying to plane something on one. Just too much sideways force compared to downwards, I think.

BTW, look out for matting sold for car boots in Woolworths - same stuff, half the price and sometimes even less. I also use the thinner kind sold for household use - can be much handier when you don't want so much cushioning effect as the other type gives you.

Cheers, Alf
 
Alf":3n5ihkpd said:
Router mats have their uses but I've had very little success trying to plane something on one. Just too much sideways force compared to downwards, I think.

BTW, look out for matting sold for car boots in Woolworths - same stuff, half the price and sometimes even less. I also use the thinner kind sold for household use - can be much handier when you don't want so much cushioning effect as the other type gives you.

Cheers, Alf
Or try Lidl's and pound shops if you have any near you as I have picked them up for between £3-£1, if you keep an eye out for them :D
 
dedee":2lsttbw6 said:
I like the grain on that wood, very nice. What are the 4 pieces for in the top right of picture?

Andy

They're a small afterthought I had. The top of the box, although it's quite pretty, seemed a bit too different in comparisont to the rest of the box. So I took the same spalted beech and made those four small pieces. They're mitred so they'll glue nicely as a border around the top and hopefully make the box look a bit less of a mismatch.
 
Nice looking timber, have you decided on the base yet?
Perhaps instead of routing a dado around the inside base you could glue ledge pieces and then drop a base on top of the ledge.
 
I quite often use 2mm MDF for box bases, veneer the underside then cover the iner face with baise or fabrick. As the panel is small and held in a groove there is little chance of cupping due to only veneering one side. Homebase sell the 2mm MDF in small sheets or you may be able to get it from a picture framers as it is often used to back picture frames.

Jason
 
Hi, all. Thanks for your comments. Just a minor update as work has taken most of my spare time, and football the remainder. :oops:

I found a thinish (4mm) bit of cedar of Lebanon that I thought might serve (and it smells amazing!) I created the most idiotic clamping system, but sadly forgot to take a photo. Basically, a square made up of 2x1s nailed down to a bit of chipboard that prevented the wood from moving around that allowed me to put the dado in with the router. So, I finished the surfaces, stuck the whole thing together and left it overnight.

The next day I sawed off the top off with a Japanese pullsaw. It wasn't a total success, and I needed to tidy it up with a chisel, but I got there in the end.

And that's the stage I'm at at the minute! I'm waiting on some small 3/4" hinges. It still needs a clean up here and there, and no doubt I'll make a total mess of the hinge mortises and ruin the whole thing at the last minute, but that's all part of the learning process!

box2.jpg
 
Last post, I swear! I finished the box! My first, absolutely 100% completed project*!


*(Actually, the inside needs to be waxed and the lid needs a final coat of polish and some buffing up, but it's done enough for the timebeing!)
 
Back
Top