Trimming Lippings with a Router

UKworkshop.co.uk

Help Support UKworkshop.co.uk:

This site may earn a commission from merchant affiliate links, including eBay, Amazon, and others.

BradNaylor

Established Member
Joined
17 Oct 2007
Messages
2,311
Reaction score
2
Location
Turning MDF into gold in a northern town
I've posted this before but not on the Jigs & Tips forum. This is unbelievably useful.

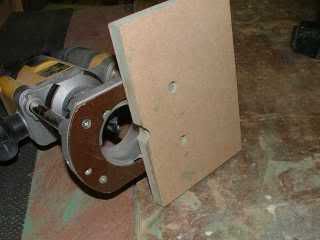
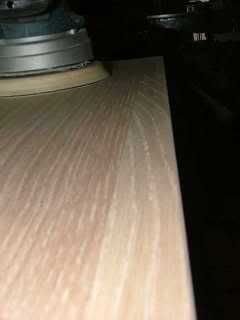
To turn a standard router into an effective lipping trimmer simply bolt on a piece of MDF or plywood to the router base like this. On my DeWalt it simply involves removing the short bolts which hold the plastic base in place and replacing them with longer ones through the MDF.

Detailofrouter.jpg


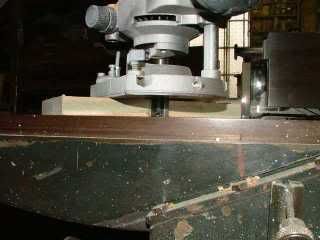
Then install a 20mm (or thereabouts) flat-bottomed cutter into the router and adjust the height setting so that the bottom of the cutter is exactly level with the MDF sub-base. The best way of dong this is to plunge the router down onto a flat surface such as the cast iron bed of your planer or table saw. With the router turned off, of course!

SettingCutter.jpg


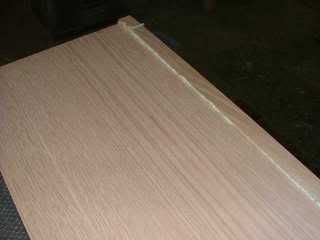
Lip your board with a good couple of millimetres step on each side.

LippedBoard.jpg


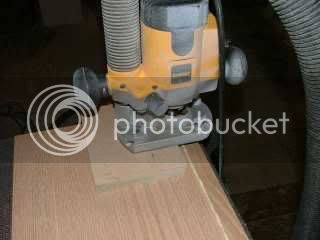
Then very carefully rout away at the lipping making sure that the router doesn't tip at all. Best results are obtained if you pull the router towards you with everything set up as in the photo. That way any break-out is avoided.

Routing.jpg


Then a very light sand and the process is complete.

Sanded.jpg


Try it - you'll be amazed!

Cheers
Dan
 
Dan - excellent. One the biggest problem IMO with using routers is the dreaded 'tip' and by effectively extending the base this is avoided. It should be added though (not sure if you said this, apologies if you have) that in use, all the downward pressure is exerted onto the mdf via the left hand, the right hand does little except steady the machine and hold the 'on' switch (at least on my router). I use a similar sort of technique to cut mortises with the router - Rob
 
Quite right, Rob.

In fact, on my latest version I've used a bigger piece of 25mm thick MDF as the sub-base. The extra weight helps to balance the router and prevent 'tip'.

I guess it would be a good idea to add a knob or handle to the upper side of the sub-base so that instinctively you would hold that with your left hand while guiding the router and holding the switch on with your right.

I'll try that tomorrow!

Cheers
Dan
 
Great jig Dan, thanks.
I`ve an Oak dining table to make which will have a 26mm Oak faced mdf veneered top edged with Oak lippings.
In the past i`ve carefully planed the lippings with a low angle block plane, but your router jig will speed things up no end.
Cheers.
 
Nice to see. There was a post not long ago to buy a 1/4 or 1/2 router. I use a 1/2 heavy router for hand work like you have done. Less tilt problems and kickback is almost eliminated. But there is a use for 1/4 router at times.
 
Is it possible to remove the lippings from a board that is lipped on all 4 sides. It seems to me that the jig would foul on the edges. I presume you would have to lip 2 opposite sides rout them flush and then apply lippings to the other 2 sides and rout them off.

jon
 
That is brilliant, Dan. I think I remember you posting it a long time ago but, I'd totally forgotten about it. I was lipping some MDF for my router table top a few weeks ago and had to plane it all down by hand - oh well, I'll get it right next time now! :roll: :wink: :D
 
JonnyD":1wc336qt said:
Is it possible to remove the lippings from a board that is lipped on all 4 sides. It seems to me that the jig would foul on the edges. I presume you would have to lip 2 opposite sides rout them flush and then apply lippings to the other 2 sides and rout them off.

jon

Well done, that man!

To trim the lippings around all 4 sides of a board you need to make a sub-base that is 'V' shaped allowing you to get the router cutter into the corner. I do use this method but find that the router is more likely to tip, so generally I glue two opposing sides, trim them, and then do the other two sides.

It doesn't actually take any longer - you've just got to be organised.

Cheers
Dan
 
Thanks for that! - makes sense now!!

Another silly question though :roll: Why not use a flush trim bit with the bearing at the bottom ?

The obvious thing is your work is now vertical to the bit but I would imagine that you could also build a jig (or use the router depth guides with added support) to so the same kind of job?

Cheers
Wayne.
 
planetWayne":cqd5djl8 said:
Another silly question though :roll: Why not use a flush trim bit with the bearing at the bottom ?
That requires you to balance the router on the edge of the board, not an easy task, it could be done in a horizontal router table. This would give more support to the work but trimming a large table top would still be a difficult task.
 
DaveL wrote:
That requires you to balance the router on the edge of the board, not an easy task
Almost impossible to do without serious router 'wobble' This is one of the biggest problems with using a router and anything that can be done to eliminate 'wobble' or 'tip' has got to be good news. It can be done, but it needs a very, very steady hand - Rob
 
Back
Top