Template/bearing guided router bit question

UKworkshop.co.uk

Help Support UKworkshop.co.uk:

This site may earn a commission from merchant affiliate links, including eBay, Amazon, and others.

DangerousDave

Established Member
Joined
18 May 2008
Messages
245
Reaction score
0
Location
Norn Iron
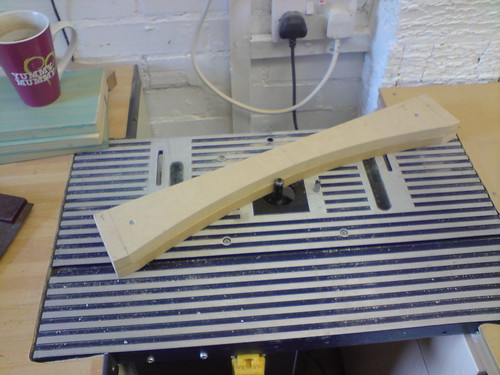
Evening all, quick question; I'm using a template to cut shaped top rails for a face frame. I made the template by removing the bulk at the bandsaw and sanding to the line. I now want to use a bearing guided straight cutting bit in the router table (freehand with pin) to trim the piece to the template (after bandsawing the bulk). Question is, what do you use to stick the template to the piece? I'm loath to use brads. Is double sided sticky tape strong enough to hold? What does everyone else use?

Also, is it better to rout the profile (i.e. round over or ogee on inner edges) on the face frame using a hand held router after assembly of the frame or using the router table before assembly on each rail and stile (apart from the shaped top rails) and then mitre the profiled bit?

Cheers for any help. I seem to have been asking a lot of dumb questions lately :? Maybe one day I'll actually be able to offer someone advice on something :D
 
I have just recently completed a motorbike rocker and there are a few duplicate pieces in that all I used to hold template was double sided tape and had no problems
 
Be careful with this operation Dave. I nearly lost a finger doing it.

Double sided tape from Axminster will stick like chocolate mouse to a blanket. You'll have a job to separate the parts. So it's ideal.

Cheap 'carpet tape' from B&Q won't work at all.
 
Thanks chaps. I'm just worried about any slight slippage, but I'll give the DS tape a go. I'm wondering would it be safer to use the router hand-held with the bearing guided bit, given that Tom nearly lost a finger... Also maybe the downward pressure of the router would help resist any movement... :? I'll maybe try it on a scrap piece first :D
 
I recently used double sided carpet tape from Focus. Worked fine but I had to replace the tape every second use otherwise it lost its stick. If you do not fancy working in a routertable with a guide pin then a handheld router will be ok as long as the cutter is not large.
The problem with a hand held router is it tipping off your template. Also make sure the work is secure on a flat surface
 
Honestly, with proper DS tape that Axi sell, the part will not move away from the template. My error was that I routed the end grain of some very hard and brittle wood and inexperience meant I wasn't prepared for what happened. Obviously the basic advice is to use a guard, which you can do. We see the Americans doing this with no guard in place and it seems like a safe task. Even that WoodWhisperer guy got caught in a similar way to myself. All that said, there are instances when it's just better to do it with a router table. In some cases the router can be unstable and tippy when used HH.

I've had a lot of time to think about this ;) I'm reminded every time I want to use the lathe. That finger is useless for running along the rest because it has no feeling.
 
Hi, Wizer

Put that pic in this thread to remind us to be carefull, it certainly made me loads more wary of the spinny things.

Pete
 
This is a face frame? top arches? If so cut the wood a bit longer and use screws, that's what i do, I never even heard of using sticky tape before but i'll certainly look into it now i've heard of it.
 
Thanks guys, I don't think HH is the way to go. The rail is only 90mm in width, the radius of the cut out is 40mm at its max, the chance of the router tipping is pretty high. I've done a bit before with a guide pin on the router table and it's hairy enough. Max concentration at all times. Unfortunately I don't have a ring guard... The material is 18mm MDF so no issues with grain etc... I'll try DS tape and see how I go. Only thing is I'll have to order some, wait for it to arrive etc... :roll:

Any opinions on routing the profile on the inner edges of the face frame? My thinking is that the FF is the same as a framed panel without the panel. Obviously when routing the rail/stiles on a raised panel door the moulding is done prior to assembly, as the panel means the frame can't be routed once it's assembled. But as the FF doesn't have a panel is it easier just to rout HH around the inner edge (with e.g. a bearing guided ogee bit) once it's assembled (so I don't have to mitre the moulded bit). Hope that makes sense. :D
 
Crazy/Dicktimber sorry; you both posted while I was writing the speil above. Yep, its the top arches of a face frame. Unfortunately it's cut to final dimensions (homer) Doh!
 
I use DS tape for a lot of tasks and have spent many a happy hour? removing the damn stuff, then recently I found the perfect remedy, entirely by accident though.
Instead of trying to pick up one corner then peeling it off the wood I simply cut a small piece of DS tape and stick the end onto the tape I wish to peel off.
Works like a dream!
Mine comes from Aldi in 30 mtr reels, like I said, I use it a lot!

Roy.
 
In terms of "quality" the best way is to machine the individual components before assembly. That way you avoid the rounded corner look on profiles which is so common in low-class joinery.

DangerousDave":2syz8kn6 said:
I'm loath to use brads.
Brads can be somewhat safer than sticky tape, I'd say. What we often do is to make-up bridge template which straddles the work and is offset so that we can use a plain cutter. They're cheaper and the bearings never jam. The work is then guided by a guide bush in the base of the router. The "difficult" bit is working out the offset. The better bit is avoiding bumps in the routed edge where the template has been bruised. In the case of a bridge template the work sits on a piece of MDF with small screws driven from the underside and filed into a chisel shape. Being on the back they often can't be seen when the piece is completed. I make-up one-time bridge templates from 6mm MDF and find that they work as well with top bearing cutters. Are you table routing, though?

To avoid the router tipping with overhead routing make yourself a sub base from something like 6mm MDF. Screw and glue blocks to one edge of the sub base equal to the height of the material + template + support. Screw your router onto the top of this.

One piece of extra advice I'd offer is to try and avoid sanding anything before putting an edge tool to it, be that a carbide router cutter or a plane iron. Sanding always deposits some grit in the surface of the material and that stuff will eventually knock a bit of the edge off your tools

Good luck
 
FatFreddysCat":1y1n31ql said:
In terms of "quality" the best way is to machine the individual components before assembly. That way you avoid the rounded corner look on profiles which is so common in low-class joinery.

DangerousDave":1y1n31ql said:
I'm loath to use brads.
Brads can be somewhat safer than sticky tape, I'd say. What we often do is to make-up bridge template which straddles the work and is offset so that we can use a plain cutter. They're cheaper and the bearings never jam. The work is then guided by a guide bush in the base of the router. The "difficult" bit is working out the offset. The better bit is avoiding bumps in the routed edge where the template has been bruised. In the case of a bridge template the work sits on a piece of MDF with small screws driven from the underside and filed into a chisel shape. Being on the back they often can't be seen when the piece is completed. I make-up one-time bridge templates from 6mm MDF and find that they work as well with top bearing cutters. Are you table routing, though?

To avoid the router tipping with overhead routing make yourself a sub base from something like 6mm MDF. Screw and glue blocks to one edge of the sub base equal to the height of the material + template + support. Screw your router onto the top of this.

One piece of extra advice I'd offer is to try and avoid sanding anything before putting an edge tool to it, be that a carbide router cutter or a plane iron. Sanding always deposits some grit in the surface of the material and that stuff will eventually knock a bit of the edge off your tools

Good luck

Cheers FFC, some good tips there. I'll make up a large sub base with blocks to the height of the work to keep the router stable and do it hand held. Was thinking I could screw into the material; the screw holes will be on the back of the FF and as it will be painted I could fill them in... That'll get round the DS tape issue...
The only bit I sanded was the template which only the bearing will (hopefully) touch so grit on the cutting edge shouldn't be an issue...

All will become clear whenever I (finally) post the WIP pics. It's a long way from completion tho :roll:
 
For this headboard (look at the 4th picture)I used a template attached with double sided carpet tape, a bottom bearing cutter, a guard, and no guide pin. Worked fine. The piece was 19mm MDF, 1.8 meters long,
 
Krysstel":1454ogxp said:
no guide pin. ,

This is an interesting point. I'm really not sure the guide pin does much to help you. As long as you're sensible and don't ram it into the spinning bit, then you don't need that pin to get you started. If you bring it into the bit whilst moving slowly in the direction of travel, then you'll get a smooth cut. Just be thinking where you're fingers are the whole time and don't rush. Don't have any distractions either. It wasn't til a while after my incident that I realised I was expecting a call from my Dad and had one eye on the phone. Completely stupid of me. Nether the less I was lucky and it's made me uber safety concious in the WS.
 
Right, got the rails cut this morning. I decided to just screw the template into the rails (the holes will be hidden) and it worked a treat. Took great care when routing, very careful of where fingers are at all times as Tom pointed out. I only use the guide pin to get the piece started on the cutter, then the top bearing takes over. A fairly swift pass ensures no burn marks and as I had bandsawed to within a couple of mm of the line there wasn't much material to remove.
Here's a pic of the template screwed to the piece (I didn't rout it this way round!!! It's only so that you can see the cutter :D )

3485258887_24c7cd725e.jpg


Cheers for the advice on this one, chaps
 
wizer":2weebigs said:
This is an interesting point. I'm really not sure the guide pin does much to help you.

I don't like to say this :oops: but, you can get away with out one if you're using a fairly small diameter cutter (chamfer or ovolo, for example). As you say, Tom, you have to be very careful when starting the cut. Once it's against the bearing though, you should be okay (as long as you don't keep stopping, trying to go backwards or have left too much waste on! :shock:).

If you have left too much waste on, you can very carefully use the lead-on pin to 'control' the amount of material you're removing, without having to go back to the bandsaw. If I'm only trimming or moulding a straight edge, I just use the straight fence to start the cut. Dust extraction is the added bonus there also! :wink:

If it wasn't large raised panel cutter or something though, I certainly wouldn't chance it without a lead-on pin or a guard. :?

Job looks good though, Dave. Interesting to see that you haven't cut your tenons before doing the shaping... Will you be cutting them by hand? :)
 

Latest posts

Back
Top