You are using an out of date browser. It may not display this or other websites correctly.
You should upgrade or use an alternative browser.
You should upgrade or use an alternative browser.
Router table.
- Thread starter Digit
- Start date


Help Support UKworkshop.co.uk:
This site may earn a commission from merchant affiliate
links, including eBay, Amazon, and others.
Aled Dafis
Established Member
Very nice Roy. That's pretty much how I did mine also, but I've left the base on my Triton router, just in case I'll need to use it freehand sometime.
If you don't mind me asking, who did the machining for you? Machine shops in this part of the world are few and far between, and it's always good to know that there's a place down the road to get jobs done.
Cheers
Aled
If you don't mind me asking, who did the machining for you? Machine shops in this part of the world are few and far between, and it's always good to know that there's a place down the road to get jobs done.
Cheers
Aled
Mike Pearce runs an engineering business and sales on the local estate mate.
Nuts, bolts, steel, drills, bearings etc etc.
That casting was 'cased' and ended up costing me £35 for the machining, which was expensive based on his normal charges.
I bought that router S/H with a damaged base, it had been dropped, and with no speed control it was a bit of a beast free hand with large cutters, hence my decision to table mount it permanently.
Roy.
Now that's some useful info in that few words . One to be bookmarked , Cheers ! Dave.DaveL":6p1qjhyc said:white_sw":6p1qjhyc said:I have been looking to add a variable speed controlled to my lathe for a long time. I hadn't even thought of
an old vacuum cleaner speed controller.
Sam,
I think you need to check the type of motor you have on the lathe. :-k
Most lathes use induction motors, while vacuum cleaners and router have universal motors. An induction motor runs at a speed that is determined from the number of poles in the motor and the frequency of the supply, universal motors don't take any notice of the supply frequency, in fact they are really DC motors with brushes. The speed controller will vary the the average applied voltage to control speed of a universal motor, this will not work on an induction motor. ](*,)
jimi43
Established Member
Excellent work there Roy. I have a purpose built router table and recently modified it to incorporate a motorised lift. I am still playing with some issues though and want to incorporate a digital vernier into the baseplate to indicate raise height. So far my research indicates that dismantling a cheap Chinese one from Maplin (£9.99) is eminently feasible....just got to get the port coding sorted out.
This is the prototype:
I will post a separate thread when I get this working perfectly if people are interested enough...
Cheers
Jimi
This is the prototype:
I will post a separate thread when I get this working perfectly if people are interested enough...
Cheers
Jimi
mikec
Established Member
Hi Jimi,
I also would be very interested in more details of the router lifting project.
Thanks for posting your work so far.
Regards,
Mike C
I also would be very interested in more details of the router lifting project.
Thanks for posting your work so far.
Regards,
Mike C
jimi43
Established Member
Mike, Roy.....
Sure thing...will post something maybe this evening in the Jig forum if I get through with a project I am in the middle of today....
This is still "work in progress" and ideas pinched from others who have done similar but I am trying to get over the issues of torque and even lift as well as the digital display I mentioned.
Cheers
Jimi

jimi43
Established Member
Hi Roy
Yes...at the moment I use a Mercer dial gauge (another bootfair find for a squid) which gives me accuracy down to a zillionth of an inch...set up exactly as you have your block...although I like your aluminium block better! I might just dig in the "junk metal" box to see if I have a bit that big today!
My fiddling is just that...the remote gauge is so I can do some fiddle research into the i/o port on these cheap digital verniers....to remote the actual sensor from the LCD display itself. The great thing here is the simplicity of use - press button - zero...raise bit....relative reading instantly. No - it is the raiser that is the head scratcher.....I can easily see why the complicated (read expensive) ones have chain driven ganged raisers to balance the lift torque to two or more sides!
I will post the project so far in a separate thread so as not to adversely hijack your one....thanks for letting me mention it though.
Couple of questions....firstly tell me the reasons behind the dovetail fence opening idea....and secondly where did you get the raiser crank knob in the top pic....the ones you find on table saws?
Cheers mate
Jim
Sorry Jim but I don't understand your question about the fence mate.
The raiser handle was from an old saw with a burnt out motor, I collect them from our re-cycling centre for the NVRs.
Strangely enough the matter of the router rising evenly, though I understand the concerns of the makers of raisers, doesn't seem to be a problem.
Roy.
The raiser handle was from an old saw with a burnt out motor, I collect them from our re-cycling centre for the NVRs.
Strangely enough the matter of the router rising evenly, though I understand the concerns of the makers of raisers, doesn't seem to be a problem.
Roy.
jimi43
Established Member
Hi Roy
The question relates to this photo:

What was the reasoning behind making the two adjustable sub-fences angle backwards giving the impression of a dovetail in this shot?
I have phenolic plates on mine...which are angled backwards too...just curious.
Jim
The question relates to this photo:
What was the reasoning behind making the two adjustable sub-fences angle backwards giving the impression of a dovetail in this shot?
I have phenolic plates on mine...which are angled backwards too...just curious.
Jim
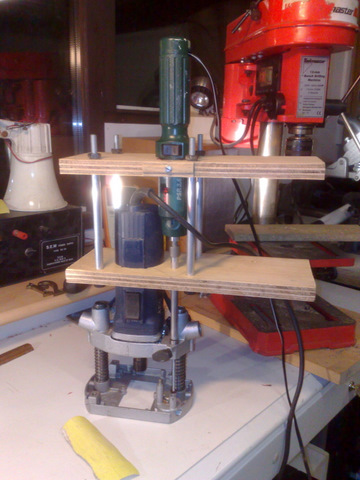
Earlier I posted some pics of my new router table here. Lord Nibbo suggested that the mounting might be better nearer to the T/S's T slot. I explained that I was reserving that for the mounting point for my new over head router, and here it is!


Originally the mounting was part of a photographic copying stand that I obtained from my re-cycling centre. It has been modified by shortening the shaft and removing a boss from the underside so that it would mount flat on the T/S.
The more eagle eyed may notice the spanner for raising and lowering the head, when I salvaged the stand the knob was missing and I haven't as yet come up with an alternative, hence the spanner!
For those people who kindly offered to read my literary efforts, this is why you haven't received anything yet, plus coming to terms with a new computer.
A computer whizz kid I am not!
Roy.
Chems
Established Member
That great Digit, I've been following this with great intrest. You may not be a computer wiz-kid but you are a router mounting wiz-kid.
Whats the advantage of having an overhead router to an under the table jobbie? I always imagined if you could move it about on an limited axis hand held then it would have great pluses but yours is literally an inverted under-slung model. Will you be using the same fence arrangement for over and under routing?
Whats the advantage of having an overhead router to an under the table jobbie? I always imagined if you could move it about on an limited axis hand held then it would have great pluses but yours is literally an inverted under-slung model. Will you be using the same fence arrangement for over and under routing?
Hopefully yes I will be using the same fence arrangements Chems. The main advantages to over head routing, I find, are when producing such things as mouldings.
Imagine trying to produce a half round on a normal router table, it's a bit like sawing the branch you are sitting as the contact area with the table gets less and less as the machining progresses. Machined on the overhead the timber is moved along on a flat base.
Also think of anything where you need to watch carefully what you are doing, stopped grooves for example are much simpler, then of course there's pin routing.
I probably use the overhead more than the table.
Roy.
Chems
Established Member
Ah yes I can see how it would be useful for things like stopped dados etc. What you need really rather than the spanner is a big 3 handle like you have on a drill press.
Similar threads
- Replies
- 2
- Views
- 671
- Replies
- 12
- Views
- 3K
- Replies
- 9
- Views
- 1K