Rootball No3: Critque welcome

UKworkshop.co.uk

Help Support UKworkshop.co.uk:

This site may earn a commission from merchant affiliate links, including eBay, Amazon, and others.

Bodrighy

Established Member
Joined
6 Jan 2007
Messages
5,818
Reaction score
1
Location
Bromham, Wiltshire
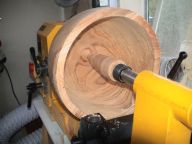
3rd rootball from my beech tree. This one is 12" dia. 4" deep and approx 5mm thick. It has 2 bark inclusions and a small void at the top of one of them. Finished with sealer & wax with CA glue poured in around the edge of the bark as it was a bit loose in some places when I had finished turning. Turned at slowest speed needless to say


Also pleased with the photos, a bit better than my usual rubbishy images. :lol:

Pete
 
Best one yet,Pete - finish looks great,and the size/style/proportions of the whole piece just look right;don't know exactly what or why,but it does :D

Andrew
 
Looks like you made the most of that piece Pete, shows off the figuring well and I doubt you could have gone much thinner with the body and retained the bark inclusions.

Personally I would prefer the rim to be a little thinner but that may not have been possible or worth the risk, only the turner could know how far to push it.

Like the photography.
 
Thaks guys,

I wondered about going thinner but the sound at the rim was getting such that I chickened out if that makes sense. The bark was a bit loose right at the edge and I didn't want to lose it.

Pete
 
That is beautiful

I would love to have that in my house

Very well done

john
 
Wot... no holes! :lol:

(I did note the void but that's not really a hole :wink: )

Nice work Pete! (Don't know how you manage to afford these exotic timbers :p )
 
oldsoke":2uhjaksb said:
(Don't know how you manage to afford these exotic timbers :p )

It's tough finding the cash but I manage somehow. We all have to suffer for our 'art.' Now I have to save p to try and make some miniature versions. :lol:

Pete
 
An item that inspires me to keep learning !

Something about this that just looks great.

Well done !

As a learner can I ask how long this has taken to make ?

Thanks.
 
santiniuk":1ngw7vcg said:
An item that inspires me to keep learning !

Something about this that just looks great.

Well done !

As a learner can I ask how long this has taken to make ?

Thanks.

Thanks, I have only been turning myself since January this year and I have a lot of pretty naff stuff to my credit. :( This one took just under two hours including the finishing. I was lucky and got a pretty good finish from the tools as the wood was quite hard apart from the bark
Often takes me a lot longer

Pete
 
Mornin' Pete, luv the colours and figure in the root ball. Nice curve and finish on the piece. =D> Will make a nice centrepiece for someone.

Was the timber dry when you turned it? If not and it was still wet you may have been better using an oil finish, and you could still have waxed on top.

Once again only my personal preference and likes, I would have preferred to have seen the bark removed. [-X My likes and dislikes don't take away from a nice piece of work though. A piece you have every right to be proud of. =D>
 
Very nice piece. The only thing that struck me is that the angular and deep chucking point is quite jarring against all the smooth curves everywhere else. I'm not saying that it needs removing but perhaps some decoration inside the recess would have distracted from it.
When I use a recessed chucking area I often leave a raised section in the centre which can be decorated.

Did you manage to save any of the centre to make something else? It was interesting woods like this that made me buy the Sorby slicer.

Duncan
 
Cracking piece of work there Pete :D
Love the grain and colour of it.
Just a thought though with the bark.Won't it eventually fall off anyway :?
Paul.J.
 
Tam:
If I had removed the bark I would have a totally different piece as it would have had two big voids in the side. My original idea had this in mind but it (the bark) was uch a lovely deep colour I left it.

Duncan:
I had exactly those thoughts when cutting out the waste from the centre and did wonder about using Chas's method with the parting tool but as it was a bit off balance sort of bottled out. I agree about the recess and should have done something with it. I keep meaning to make a doughnut chuck so that I can reverse bowls and clean up bottoms. Can't afford cole jaws at present.

Paul:
It shouldn't, as you know I have used a fair bit of wood with bark over the last 6 months and have not had any fall off yet. If it is still on after being battered around at speed it seems to be pretty safe. Iif there is a loose bit I would either take it off or as in this case impregnate with CA glue to make it secure.

Pete
 
Like it a lot, Pete - can you describe (presumably you don't have pictures) of how you went about mounting a large, irregular lump of rootball and then getting it round. I do it from time to time and it generally scares the pants off me for a while.
 
I usually use a worm screw and bring the tailstock up to hold it in place. I then cut a tenon reverse into the chuck and again bring the tailstock up. I turn the centre out leaving a small central piece of wood until the very end. By then I know whether it is safe to brin the tailstock away to sand it or whether I have to do ajuggling act before cutting it off. If I remember I'll do a WIP of the next one.

Pete
 
Bodrighy":29lko35p said:
.... I turn the centre out leaving a small central piece of wood until the very end. ...

Something like this I presume Pete:

smDSC01009.JPG
 
OH, I think the penny has finally dropped what you mean . DOH! #-o

BUT you DO know it ieasier to buy plastic 'wood effect' bowls out of Woolies don't you? :roll:
 

Latest posts

Back
Top