Question about table top buttons

UKworkshop.co.uk

Help Support UKworkshop.co.uk:

This site may earn a commission from merchant affiliate links, including eBay, Amazon, and others.

Sawdust=manglitter

Established Member
Joined
14 Feb 2016
Messages
863
Reaction score
653
Location
Nr Cross Hands, South Wales
With table top buttons should i be drilling an oversized hole through the wooden button itself to allow for the button to turn freely (allowing for wood movement), or should it be just a pilot hole so the screw threads catch in them and keep them firmer? (If that makes sense)

fb676dbfc35ecac5c99d8c637d8e7767.jpg
 
The forces on it from wood movement are entirely across the grain, so there will be no rotational force to allow for. Even if there were such forces, they would win over the holding power of a screw. I wax the meeting faces, but screw everything down as tight as I can.
 
Good point, thanks Mike. It’s my first time making ‘traditional’ buttons, so I wanted to make sure. Once these are done then this cabinet/sideboard will be moving into the house pretty much permanently, so i’ll have the doors and drawers left to do before it’s complete :D
 
As Mike says.
You definitely don't want a pilot hole in the button (though you might want one in the table top). If you did, then any gap between the button and the table top would be maintained, which is not what you want.
The button should have a hole to fit the screw (not oversized, just so that the tightness of the button is not compromised). So a 4mm hole for a 4mm screw. That way the button tightens down (up?) to the top.
 
Steve Maskery":3o8ijd53 said:
.......a pilot hole.... in the table top..........

Either have a depth stop, or, better still, use a hand-drill for any such pilot holes. You wouldn't be the first person to drill all the way through their new table top!!
 
MikeG.":1eene2vf said:
Steve Maskery":1eene2vf said:
.......a pilot hole.... in the table top..........

Either have a depth stop, or, better still, use a hand-drill for any such pilot holes. You wouldn't be the first person to drill all the way through their new table top!!

Good point! :)
 
Yes, no need for elongated holes.
One should keep in mind that the amount of space left in the groove for expansion is
not universal. Over the course of a year, a flatsawn 1m wide Oak tabletop may expand/ contract up to 2cm, depending on the annual EMC fluctuation in your area.
(leave more space in summer months and less in winter)
 
dzj":34f4c79v said:
Yes, no need for elongated holes.
One should keep in mind that the amount of space left in the groove for expansion is
not universal. Over the course of a year, a flatsawn 1m wide Oak tabletop may expand/ contract up to 2cm, depending on the annual EMC fluctuation in your area.
(leave more space in summer months and less in winter)

Hmmm. I think that's pretty extreme. I've got a 1 metre wide oak worktop on my island unit, fixed at the front edge and allowed to float at the rear, and the max gap I've observed is about 2 or 3mm. Maybe if you live in a house without central heating, with single glazing and draughts everywhere, you might get cross-grain movements of the sort you describe, but even that would strike me as extreme.
 
Steve Maskery":2x5j4m3u said:
So a 4mm hole for a 4mm screw. That way the button tightens down (up?) to the top.
Surely you mean a 4.5 mm hole for a 4 mm screw, don't you? You don't want the screw to bite on the hole in the button, to eliminate any chance of bridging aka spanning, all based on the old order of clearance hole, pilot hole and countersink (where appropriate). Slainte.
 
MikeG.":xjl3dqe4 said:
Hmmm. I think that's pretty extreme. I've got a 1 metre wide oak worktop on my island unit, fixed at the front edge and allowed to float at the rear, and the max gap I've observed is about 2 or 3mm. Maybe if you live in a house without central heating, with single glazing and draughts everywhere, you might get cross-grain movements of the sort you describe, but even that would strike me as extreme.
I agree, although 20 mm of shrinkage is possible in tangentially sawn European oak if the moisture content drops by about seven percentage points, from say 14% to 7% MC. Thereafter, assuming the panel experiences an annual cycle of moisture content varying between 7% and 14% MC it would tend to float between about 980 and 1000 mm.

However, there are several caveats to that theoretical expansion and contraction, such as:
* Due to a hysteresis effect wood becomes less responsive to changes in RH over time, i.e., it expands and contracts less in response to changes in moisture content.
* Even with the use of tangentially sawn boards to make up a panel the end of each board shows grain orientation that's typically a mixture of truly tangentially sawn and parts of each board that are on the way to radially sawn, e.g., rift figure.
* Finally, the application of polish delays the adsorption and desorption of water into and out of the wood fibres.

Your reporting of observing a similar sized oak panel only changing in width by two or three mm per year is fairly typical, although in building a similar oak panel I would normally allow for about five or six mm of movement in a typical habitable building here in the UK, just to be on the safe side. I'd allow probably twice that amount for a panel expansion and contraction in more extreme environments, similar to what you described. Slainte.
 
MikeG.":2acd19nd said:
Hmmm. I think that's pretty extreme. I've got a 1 metre wide oak worktop on my island unit, fixed at the front edge and allowed to float at the rear, and the max gap I've observed is about 2 or 3mm. Maybe if you live in a house without central heating, with single glazing and draughts everywhere, you might get cross-grain movements of the sort you describe, but even that would strike me as extreme.

Depends where live. In some places EMC fluctuates more than 8%.
Also, QS stock moves ~50% less.
Of course, if you have year round constant humidity and temperature, you can disregard wood movement (and buttons) all together.
Traditional WW methods and theory stem from a time when all furniture was exposed to the whims of seasonal change.
 
Sgian Dubh":3crmpfw4 said:
Steve Maskery":3crmpfw4 said:
So a 4mm hole for a 4mm screw. That way the button tightens down (up?) to the top.
Surely you mean a 4.5 mm hole for a 4 mm screw, don't you? You don't want the screw to bite on the hole in the button, to eliminate any chance of bridging aka spanning, all based on the old order of clearance hole, pilot hole and countersink (where appropriate). Slainte.
Yes, you are quite right, 4mm could be a bit tight for a 4mm screw. I'll edit my original post.
 
Manglitter, that button looks a bit strange to my eye, a bit too tall and not quite long enough.

I'm sure it'll work fine, but I'd expect a buttons to look more like this for simple, functional variants,

Buttons-&-Pull-02.jpg


Or like this for something more elegant

Tiger-Oak-Table-3.jpg


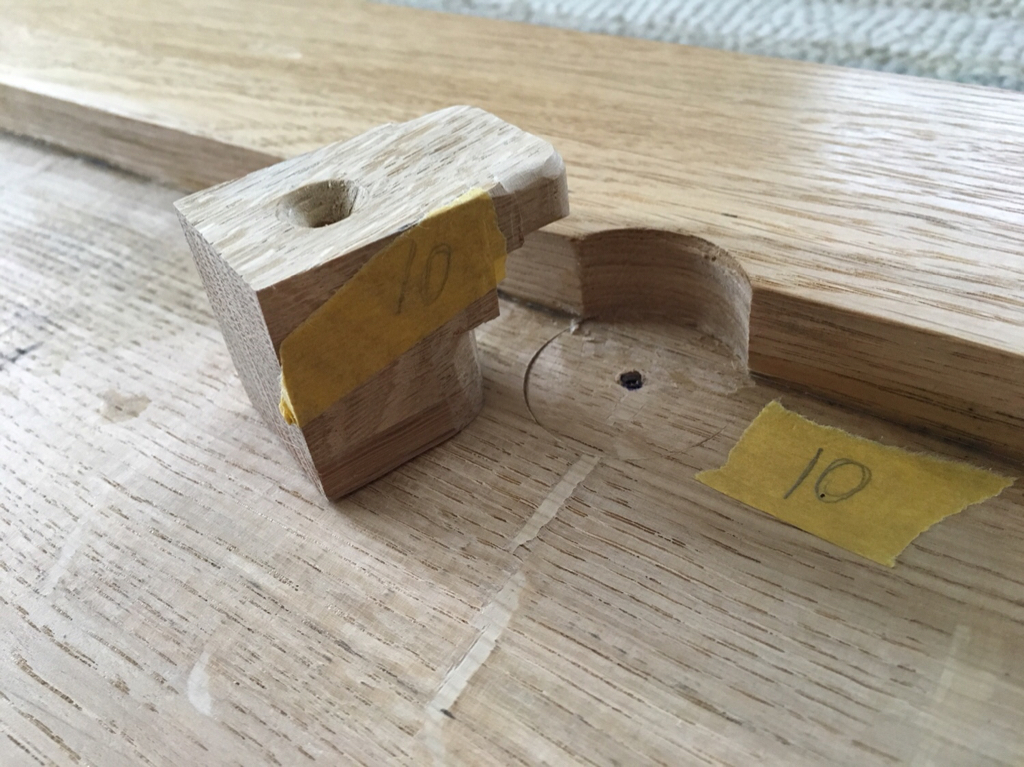
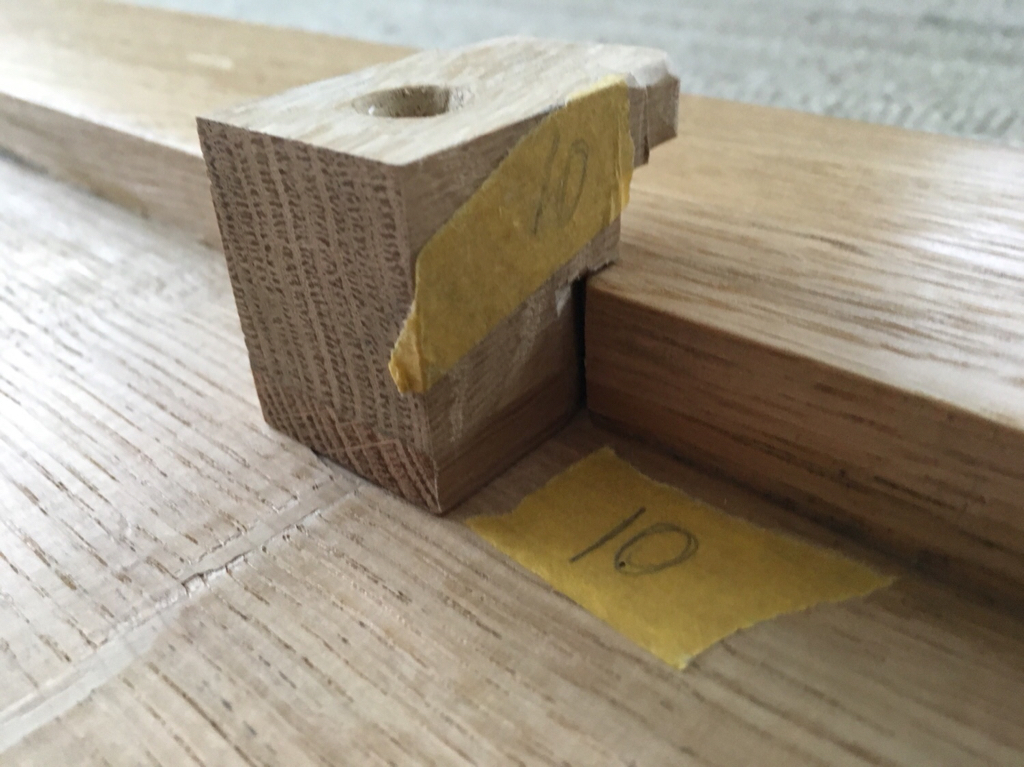
However, both of these buttons would be cut from a board that's say 14mm thick, the bottom edge of the button mortice would be about 14.5mm or 15.0mm from the top edge of the apron rail, the button itself would be around 35 or 40mm long and about 20mm wide. The mortice would be about 25mm wide (so 5mm of play with a 20mm wide tongue on the button) and 6-8mm both high and deep. The net result is that the button rests both on the tongue and on it's heel, but the screw is attempting to "bend" the button ever so slightly to impart some small spring pressure to hold the top reasonably snug against the apron rail.

I'd also ensure that some buttons had been pushed out as far as possible towards the legs in the corner. In almost every case, over time the top will try and cup upwards at the corners, and this applies no matter what you do with the grain arrangement of the top boards. There's been a few different theories about why this is the case, but if you look at antique furniture, or even any exposed floorboards in your home or the decking in your garden, you'll see this effect in action. Consequently buttons need to be arranged to resist this, just as much as they do to accommodate shrinkage and expansion.
 

Attachments

  • Buttons-&-Pull-02.jpg
    Buttons-&-Pull-02.jpg
    67.1 KB · Views: 196
  • Tiger-Oak-Table-3.jpg
    Tiger-Oak-Table-3.jpg
    129.5 KB · Views: 197
Here's a photo of the floorboards in my workshop that clearly demonstrates this almost universal "cupping up" effect.

Cupping-Up.jpg


I guarantee the end grain of these floorboards will be random, with some showing the "smiley face" end grain pattern and some showing the reverse. But it doesn't make any difference, virtually all the floor boards will eventually cup upwards, and so will virtually all the tops of your solid wood furniture!
 

Attachments

  • Cupping-Up.jpg
    Cupping-Up.jpg
    57.5 KB · Views: 195
Thanks everyone for the advice!

I know the buttons are a bit strange looking Custard, thats because i was a bit stuck for space as my top is thicker around the outside, so the only way i could sensibly attach them to the top was to fix the buttons to the thinner area of the top...

70e92aaaf733d11fe7c411be2657c024.jpg


955a1a348fcdc42255aaa9e93e5c91ac.jpg


So i did the best i could due to what i have. And they protrude around 10mm into the pockets of the carcass with another 5mm spare for expansion, so hopefully they’ll be ok.

In terms of buttons at the ends/corners i thought i was just being paranoid and being over the top with the number of buttons at the ends, so hopefully i’ve got that covered with my layout...

b27a34f1a2b7b6231470363b95db1e45.jpg
 
Er............yeah........that should be enough!! :D :D

ETA......the choice is yours, but in a small table like that I would certainly fix the front edge completely by screwing it directly through the rails, or by screwing through a corner-brace thingie whose name I've forgotten, and allow the rear edge only to float with buttons. This is particularly so if the front edge has only a small overhang, as it sometimes does, but I can hardly think of an exception to this principle regardless of overhang. Not only does this save a bit of work, but it also means the front overhang remains a constant, and the rear overhang, which probably isn't seen, is the one which moves a little.
 

Latest posts

Back
Top