please help me with process to fix warping

UKworkshop.co.uk

Help Support UKworkshop.co.uk:

This site may earn a commission from merchant affiliate links, including eBay, Amazon, and others.

marknotts

Established Member
Joined
13 Mar 2015
Messages
21
Reaction score
0
Location
nottingham
20160229_114522_by_mahgnitton-d9tja2h.jpg


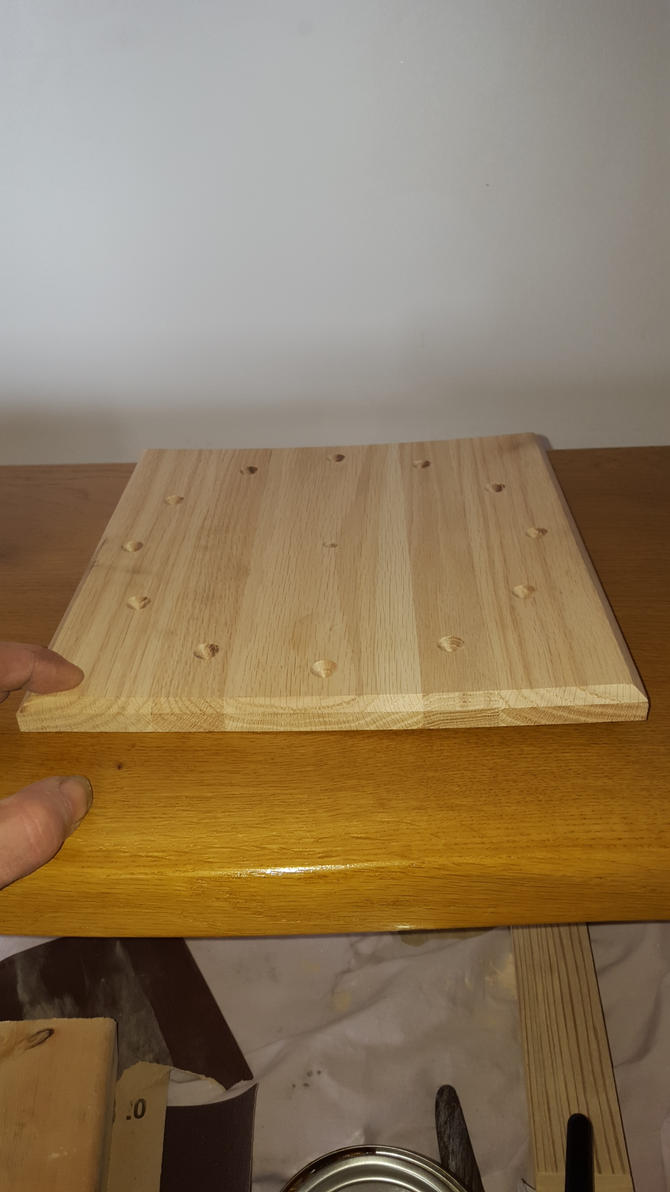
As you can see there is severe warp, this is a clock face which i was going to finish then fix the clock movement today ready for my mums birthday, now im going to have to remake the damn thing..

The process I followed was to cut down the oak offcuts which i aquired a while back into length and width, then shaved the bandsaw marks off 1 face on all lengths.
Then I edge amd face jointed on a router table and glued up the panel good faces down.
This panel was left for a day then clamps off and rested for a lot longer than planned, about a month!
Yesterday as i dont have a 12" jointer or even any jointer or thicknesser I jigged up my router with a wide 1/2" intumescent? Bit to skim the good face then flipped and skimmed the bad face, this took the thickness down from 23mm to 15mm.
After that i used the router table and a chissel to put the profile around the face and chisel out a rebate to the rear so the movement seats in deep enough for the hand spindle to poke out the front, plus routered the indents for the hour marks.

Then comes the problem, the face was dead flat and i moved it from the shed into the nice warm house overnight as i was danish oiling today, the pic is the result of only 12h indoors!

Now I know the heat and humidity change from the wood being in the shed for about 3 months over winter then having a shock of 22c indoors is enough to make millions of little wood fiber toes and fingers uncurl and relax!! , but wood has to come out of a workshop and indoors at some point so what do I have to do to stop this happening?

Sorry about the long winded post but I added the full process so anyone reading it can advise me at anypoint of the process instead of guessing what I did.

Mark.
 
Did you leave it that way up, so that the concave surface is the one that dried first? If you turn it upside down and leave it longer it will likely straighten.

When timber dries, it does so in a way that straightens the growth rings. So on further drying it should flatten out, maybe even go curved the other way!

Whatever, I'm afraid it will take a couple of weeks to equilibrate, and I should leave it on its edge to do so.

Don't cut it any more as yet - it will change again.

Keith
 
Thanks Musicman, yes the clock face side was pointing up so ill try leaving it facing down for the next couple of days to see what happens, maybe even try clamping it down flat if it doesnt flatten over the next couple of days.

I forgot to mention though that the panel was rectangular with the idea of making 2 clocks, the best square was worked on and the other was used in the end for experimenting with router speeds so the indents did not burn and to see effects of the edge profiling on edge and end grain, this piece was left in the shed overnight and that also has new warping but minimal, When 1 side depressed the other side raises by about 1mm which across 260mm to me is not too bad, but it worries all the same that no matter how i plane a panel there will always be a warp.
 
If you do it again, Invert alternate boards so the end grain curves in opposite directions, at least then you a wavy surface rather than a very badly cupped one.
Also if your workshop is cold and damp, keep your wood indoors except when you are working with it. When thicknessing, many people recommend taking wood off both sides to even out stresses, I think the mileage on this will vary depending on how curved the end grain is to start with.
 
Thanks swb i wont clamp, mind_the_goat thanks for the advice also, lucky as i didnt think of the ends but in the pic theres only board 2 and 3 that has end grain curving the same way as each other but ill alternate all boards in the future.

ill rough cut some more just incase the clock does not straighten out enough, leaving 1mm on all sides then tape them up and bring them in the house to aclimatize, at the weekend ill take back in the shed and edge joint to make square again then bring them all inside to glue up and do all work inside, keeping all shed work to a minimum, im making it as 15mm thick and it can go down to 12mm thick if needed once its glued up if i get some variation between planks when glue dries.

Just a thought but if the clock does not straighten enough would it be an idea to soak it in water or danish oil then lay it down again on 2 lengths of wood to let both sides get air and dry?
 
I feel for you Mark, we've all had this problem and unfortunately there isn't a silver bullet solution.

Personally I'm less convinced by the "alternating heart and bark side" route. It doesn't hurt, but it won't guarantee success. The route I tend to favour is leaving the boards to acclimatise in an environment as close to the final destination for as long as possible, certainly a couple of weeks. Then progressively taking a board down to final thickness, maybe in two or three stages for 23mm to 15mm, and at each stage being scrupulous about taking equal amounts from each side and allowing the air to circulate all around the board in the "resting" stages.

In this particular case I'd leave the workpiece in the house, but propped up to allow the air to circulate. You might find it straightens out a bit over the next few days. After that I'd flatten off with a hand plane, bearing in mind you may (I say "may" because I don't know how the face will joint into the remainder of the project) only need the front show face to be truly flat (plus a circle on the inside face, where the movement will mount, to be co-planar).

Don't be despondent, your jointing and chamfering looks really good and as I said, it's a problem that every woodworker faces at some time.

Good luck!
 
The only way to really minimise warpage is to use quarter-sawn timber, that is, with the planks sawn radially away rom the centre. Clearly this is wasteful compared with the usual method. But for a critical piece it might be worth selecting such planks (the growth rings will go straight across the thickness), as closely as you can.

Behaviour is further complicated when the wood contains internal stresses. These arise mainly through non-vertical growth for trunks, and always for branches - it is how the tree holds them up. Technically called reaction wood, it occurs as compression wood on the underside of a branch or inclined trunk in softwoods and in boxwood, and as tension wood on the upper side for most hardwoods. If your section contains such stresses, then there will be distortion immediately wood is cut out of the piece, e.g. by planing. Then there will be a slower movement, over a day or so, as the moisture in the wood and the stresses reach a new equilibrium. These motions occur even on well-seasoned wood, and removing material symmetrically from either side will not help, as the reaction stresses are (virtually by definition) not symmetrical.

What you are getting is more probably ordinary shrinkage on drying and for this the advice to plane equally off both sides is good advice; as is creeping down on the dimension, allowing a day or so to settle between planning.

Keith
 
Thanks everyone for all the help, musicman as soon as I read your first post about turning the piece face down i went over and turned it, befire leaving for work I had a look and the middle of the board has sunk already! , its only taken about 8h from moving to checking to be nearly flat, there is some equal warp from top to bottom aswell which I didnt notice before so along the lengths of the slats but across the whole hight i can press down on say the bottom and the top of the clock face raises by approx 1mm.

I am at work now and have left the project still resting face down and temp at 21c so hopefully the warping from both x and y axis will be as near to zero as it can be for the morning ;) if 1mm or less i wont worry about it concidering, the face wont have a box to the back its just having 2 slats and a hook to hold it off the wall by 15mm so the clock movement doesnt tilt the face, the horizontal slats fixed to the back will also do a job of holding the virtical slats straight aaswel hopefully for when hung ( although sealed with finish ) in a kitchen ;D

Thanks again all and have a good night

Mark.
 
This seems to be a bit of a FAQ. It seems a pretty important one to me too, because one of the fundamental challenges of working in wood is making a stable finished article from a material that has significant but predictable movement.

A flat piece of wood won't ever stay perfectly flat on its own without something to hold it flat. Cleats, breadboard ends or something. I salvaged some old wooden drawing boards once, and they were a great example of how to keep a board flat. Cleats on the back running perpendicular to the grain of the board, held on with round head screws sitting on brass washers. A snug round hole in middle of each cleat, and the rest slotted to allow the board to expand/contract with the seasons. Even had oval slotted brass washers.

Hopefully your clock will be small enough to stay acceptably flat once it's settled down.
 
It looks to me like it may be the centre board is the culprit. It only takes that one board to cup a bit to cause a significant curl.

A bit of heat to the convex side can often sort out a warped laminated board. It certainly does on kitchen worktops.
 
RobinBHM":3jv7t1hc said:
It looks to me like it may be the centre board is the culprit. It only takes that one board to cup a bit to cause a significant curl.

A bit of heat to the convex side can often sort out a warped laminated board. It certainly does on kitchen worktops.

As Robin says, It looks like the centre board is the culprit.
I have made several sofa tables with wide (8") rails which after cross cutting and settling tend to do this "cupping" no matter how much I try and pick the grain.
I bought a small and very thin trimming blade a while ago and I just cut the piece in 2, or 3 shoot the edges square and re join, checking for flat after cramping, job done!
Regards Rodders
 
Back
Top