


Hello all,
The time has come to post a few pictures and some commentary for my shoe polish box which I have been working on over the last few months.
See what uses all think.
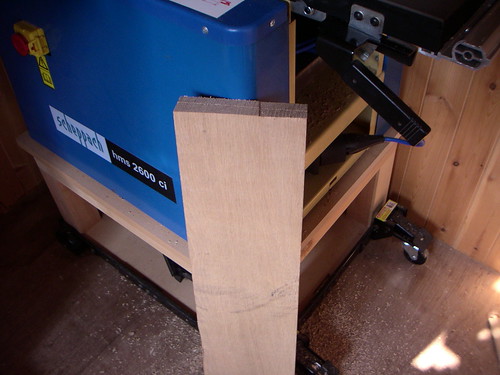
I started with a plank of oak, just like this one. It was part of a pallet load I bought through the ebay from a firm called Henry Venables.
I resawed, planned and thicknessed the oak to make four pieces for the sides of the box. I had a rough drawing with some measurements and some inspiration from a box I had seen in Mays F&C mag.
I worked out the dimensions by laying out the box contents shoe brushes and polishes to make sure they would fit. This process helped in determining the overall measurements given the constraints of the plank and with a thought to the maximum size of my planner.
I kept the pieces safe for a couple of weeks indoors to account for any movement. (a top tip from Woody Alan). They did warp a bit but a couple of passes through the thicknesser solved this. I lost a bit of thickness but not too much and not enough to spoil the overall design.
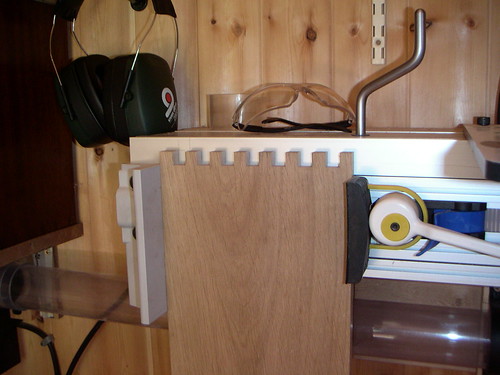
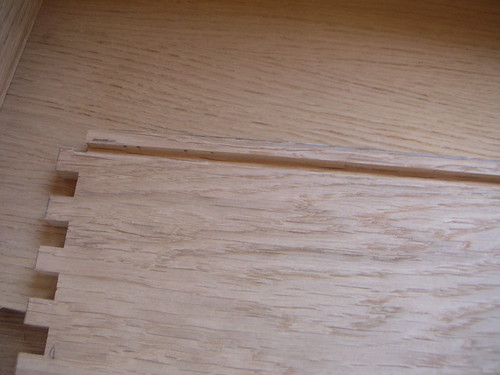
The next stage was to cut the box joints using my woodrat. This was tricky as the sides are taller than the front and back, to accommodate the lid (part of the design). I made a botch of a couple of joints, the tiny error replicated down the hole joint which was very annoying at the time. In any event I knew I could make this good.
Some more action pics.
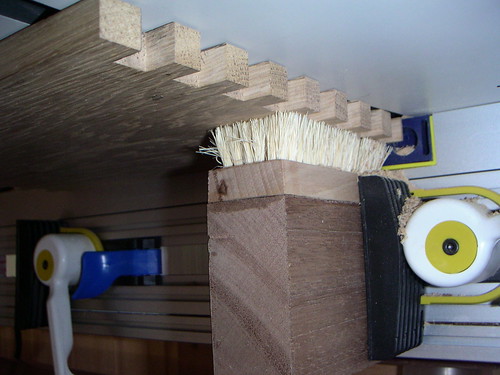
First assembly
The next stage was to cut a groove in the sides for the bottom. I used a 6.4mm bit and 6mm oak faced mdf. I had to stop the groove so it didn't show on the outside of the box.
I found cutting the grooves easy on the rat and they lined up perfectly.
Inside the box I planned a removable sliding tray to hold the brushes and polish, with a storage area underneath for cloths, etc. I also had room for a taller compartment for polish bottles and other foam brushes etc.
I needed a divider to seperate the compartments and this involved trenching a groove across the front and back to fit a peice across the box.
The next job was to make the tray for the inside. A small box in effect using the same techniques outlined above.
Here I was trying to get all the sides the same size.
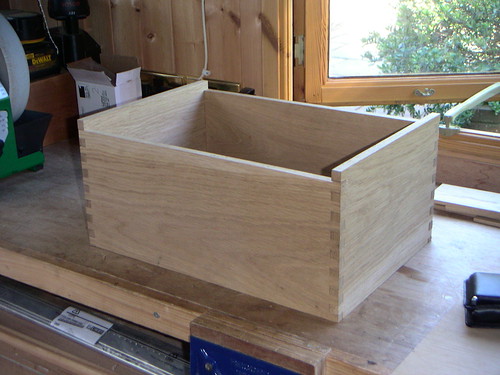
Once I had made the inner tray I fitted some rails for this to sit on, using the divider as a support this formed the end compartment. I glued the rails to the sides and gave the box a light sanding before glueing it together.
I made good my poor joint by cutting some thin wafers on my bandsaw and glued these in place before sanding flush.
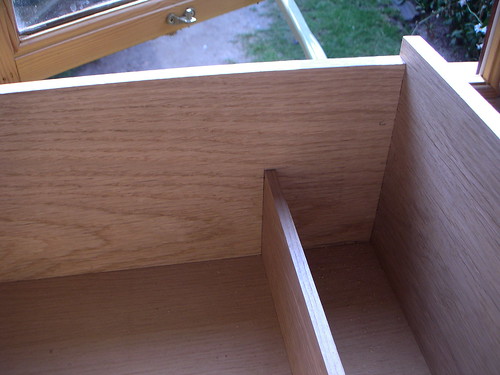
Here is a picture of the inner tray in place and the rail system. The tray slides to the right and can then be lifted out.
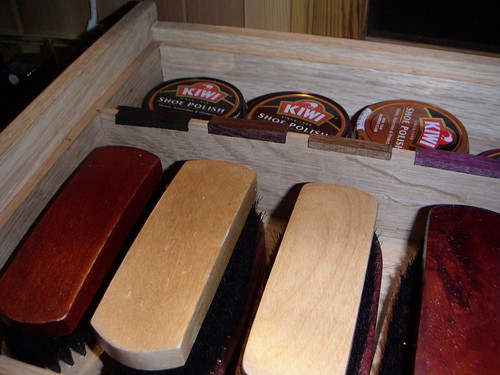
I had a brain wave to inlay some little tabs of wood to identify the different colours of polish brushes. Ebony (black) Cocobolo (dark tan) Brown oak (mid tan) and Purpleheart (oxblood).
Hope this progress report is formative. I have enjoyed making this project. Next I will get ready to glue up the tray, finish my work on the inlays, and turn my attention to the lid.
I am mulling over fitting some handles (military brass ones) to the sides.
Cheers, Esc.
By way of an update on progress, having just edited the above post to restore my pictures.
I have been having trouble with the lid to my box. The original lid cupped badly and had to be scrapped.
I made another and then hit problems with my choice of hinges.
I neatly cut for the hinges and realised that they were not man enough to hold the lid. I have been looking for some bigger hinges but have found this problematic as I am limited by width to only 12mm and have to work within the area I original removed (depth particularly).
I have an idea that may save the day. Once this issue is resolved I can move to final finishing.
I may add some handles to the box but these can not be military style as the inlay depth will be too deep.
It is frustrating having these issues at the end of a project but to keep quality and standards up it is better to reflect and take the necessary time.
I will post some more pictures soon.
Cheers, Esc.
The time has come to post a few pictures and some commentary for my shoe polish box which I have been working on over the last few months.
See what uses all think.
I started with a plank of oak, just like this one. It was part of a pallet load I bought through the ebay from a firm called Henry Venables.
I resawed, planned and thicknessed the oak to make four pieces for the sides of the box. I had a rough drawing with some measurements and some inspiration from a box I had seen in Mays F&C mag.
I worked out the dimensions by laying out the box contents shoe brushes and polishes to make sure they would fit. This process helped in determining the overall measurements given the constraints of the plank and with a thought to the maximum size of my planner.
I kept the pieces safe for a couple of weeks indoors to account for any movement. (a top tip from Woody Alan). They did warp a bit but a couple of passes through the thicknesser solved this. I lost a bit of thickness but not too much and not enough to spoil the overall design.
The next stage was to cut the box joints using my woodrat. This was tricky as the sides are taller than the front and back, to accommodate the lid (part of the design). I made a botch of a couple of joints, the tiny error replicated down the hole joint which was very annoying at the time. In any event I knew I could make this good.
Some more action pics.
First assembly
The next stage was to cut a groove in the sides for the bottom. I used a 6.4mm bit and 6mm oak faced mdf. I had to stop the groove so it didn't show on the outside of the box.
I found cutting the grooves easy on the rat and they lined up perfectly.
Inside the box I planned a removable sliding tray to hold the brushes and polish, with a storage area underneath for cloths, etc. I also had room for a taller compartment for polish bottles and other foam brushes etc.
I needed a divider to seperate the compartments and this involved trenching a groove across the front and back to fit a peice across the box.
The next job was to make the tray for the inside. A small box in effect using the same techniques outlined above.
Here I was trying to get all the sides the same size.
Once I had made the inner tray I fitted some rails for this to sit on, using the divider as a support this formed the end compartment. I glued the rails to the sides and gave the box a light sanding before glueing it together.
I made good my poor joint by cutting some thin wafers on my bandsaw and glued these in place before sanding flush.
Here is a picture of the inner tray in place and the rail system. The tray slides to the right and can then be lifted out.
I had a brain wave to inlay some little tabs of wood to identify the different colours of polish brushes. Ebony (black) Cocobolo (dark tan) Brown oak (mid tan) and Purpleheart (oxblood).
Hope this progress report is formative. I have enjoyed making this project. Next I will get ready to glue up the tray, finish my work on the inlays, and turn my attention to the lid.
I am mulling over fitting some handles (military brass ones) to the sides.
Cheers, Esc.
By way of an update on progress, having just edited the above post to restore my pictures.
I have been having trouble with the lid to my box. The original lid cupped badly and had to be scrapped.
I made another and then hit problems with my choice of hinges.
I neatly cut for the hinges and realised that they were not man enough to hold the lid. I have been looking for some bigger hinges but have found this problematic as I am limited by width to only 12mm and have to work within the area I original removed (depth particularly).
I have an idea that may save the day. Once this issue is resolved I can move to final finishing.
I may add some handles to the box but these can not be military style as the inlay depth will be too deep.
It is frustrating having these issues at the end of a project but to keep quality and standards up it is better to reflect and take the necessary time.
I will post some more pictures soon.
Cheers, Esc.
")