fezman
Established Member
Hi All,
I'm currently planning to build some custom office furniture as my first major project. My current office is a bit haphazard in furniture terms and I would like have a modern but classy type look, with plenty of storage and desk space.
The images below show my current thinking, and I have a few questions. I'd also appreciate any critique forum members may have on the design and/or approach I plan on taking.
Desk View

Bookcase view

Pedestal close up

The triangle at the top is the light path from a ceiling mounted projector - the screen being the square box over the window. So this cannot be interrupted e.g. moving the bookcase into the corner would stop about 15% of the image showing on the screen.
The white box around the LHS wall is power trunking.
Approach
Units:
4 pedestals - 2 of which will form the desk.
AV Rack - needs to be open at the front (and possibly the back) for heat dissipation
Cupboard
Bookcase
Wood. I'm planning on using 20mm Cherry for all the carcasses, so will likely purchase 25mm rough sawn and stick through the P/T, rip width on the T/S and cut to length on SCMS. The joinery will all be 6mm x 40mm dominoes (just treat myself to a new DF500 set") from axi).
from axi).
Panels. Should I resaw and join the panels or use MDF/Plywood veneered sheets? The (limited) research I've done sees prices of Cherry veneered sheets pretty expensive (but about a 1/3rd the price of Cherry /m3) apart from one place, which sells in about the right sizes for the panels I require, and is marginally cheaper than the full sheet prices I have seen. Also delivery is only £7.80. These are from https://www.kitronik.co.uk/materials/la ... inish=1110 . Has anyone used these before - they seem reputable and aim their products at schools and makers. I'm planning on ordering a few samples of these to test quality and service.
For the bookcase, I am planning on having a fixed middle shelf, with 2 ply or mdf panels at the back to stop racking.
Tops. These will be 25mm thick all round. Duffields usually have 32mm cherry which I can P/T down to 25mm , then join together. Desktop is 1500mm long and this will be the largest piece in the whole build (see space below).
Finish. I've just got some Osmo 3011 PolyX oil - the glossy one. I've done a sample piece of cherry with 3 as-thin-as-i-can-apply coats (wiped on, ragged off), then Fiddes supreme (?) clear wax applied with 0000 steel wool and buffed to a finish. The result is very much like a shellac finish, but really easy to apply / complete. Any alternate finishes people might offer? I'm not the best at finishing, so needs to be as easy as poss.
Drawer Runners. I've bought a pair of these from Screwfix - https://www.screwfix.com/p/ball-bearing ... pack/20420 - has anyone used these / got an opinion on them / long term review maybe. Any others that people would recommend? The alternative is to insert wooden frames in the pedestals and just let the drawers sit on them.
Drawers. I couldn't do all of this without some hand wood working, so I am planning on making the drawers out of Ambrosia maple (as a little contrast to the cherry) and DT them. The bottoms will probably be 4 or 6mm (veneered maybe - depends on costs/sizes) MDF. Drawer fronts will still be Cherry.
Timescale. This is going to take me a while. I work 50/50 from home and out on site across the UK, so only get in the garage workshop when at home. I'll be happy if I've done in 6 months.
Space. My garage workshop is limited in space so buying all the timber in one go, storing it and having space to make and assemble all the units would be virtually impossible. So I have purposely designed this so I can make one piece at a time, move it into the office and dispose of the piece it replaces.
Installation. I'm ultimately planning on using something similar to these https://www.screwfix.com/p/inter-screws ... pack/65152? to connect the desk, av unit and pedestal together. The cupboard / bookcase combination will likely be screwed back to the wall.
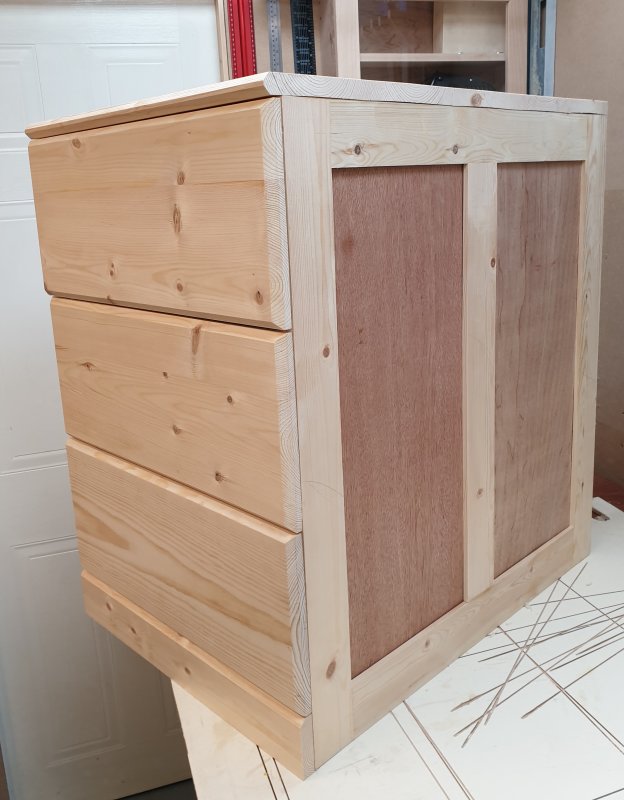
Prototype. This is a pretty major undertaking for me. I've been woodworking for coming up to 3 years. So I am reasonably accurate in measuring, marking, cutting etc. but this is my first go at cabinet making. It's also the first time I will have used the domino. So I've already started to make one of the pedestals from Pine as a prototype. It's already helped as the L-R alignment of the domino was about 0.5mm off, resulting in a 1 mm over or under hang on rail and stile joints (I sorted this out earlier tonight - so now it is flush). I dry fitted the first rear frame today and have to say Dominoes rock!
All feedback, advice, thoughts and critique welcomed. I've a couple of smaller furniture projects, some new windows to have installed, decorating after the window installation and a pile of the day job work to complete before I make a start on this, so should have time to incorporate any good suggestions.
Thanks
Ian
PS if anyone wants a copy of the sketchup file to pull apart let me know. I "think" I have drawn it all accurately to scale.
I'm currently planning to build some custom office furniture as my first major project. My current office is a bit haphazard in furniture terms and I would like have a modern but classy type look, with plenty of storage and desk space.
The images below show my current thinking, and I have a few questions. I'd also appreciate any critique forum members may have on the design and/or approach I plan on taking.
Desk View
Bookcase view
Pedestal close up
The triangle at the top is the light path from a ceiling mounted projector - the screen being the square box over the window. So this cannot be interrupted e.g. moving the bookcase into the corner would stop about 15% of the image showing on the screen.
The white box around the LHS wall is power trunking.
Approach
Units:
4 pedestals - 2 of which will form the desk.
AV Rack - needs to be open at the front (and possibly the back) for heat dissipation
Cupboard
Bookcase
Wood. I'm planning on using 20mm Cherry for all the carcasses, so will likely purchase 25mm rough sawn and stick through the P/T, rip width on the T/S and cut to length on SCMS. The joinery will all be 6mm x 40mm dominoes (just treat myself to a new DF500 set
from axi). Panels. Should I resaw and join the panels or use MDF/Plywood veneered sheets? The (limited) research I've done sees prices of Cherry veneered sheets pretty expensive (but about a 1/3rd the price of Cherry /m3) apart from one place, which sells in about the right sizes for the panels I require, and is marginally cheaper than the full sheet prices I have seen. Also delivery is only £7.80. These are from https://www.kitronik.co.uk/materials/la ... inish=1110 . Has anyone used these before - they seem reputable and aim their products at schools and makers. I'm planning on ordering a few samples of these to test quality and service.
For the bookcase, I am planning on having a fixed middle shelf, with 2 ply or mdf panels at the back to stop racking.
Tops. These will be 25mm thick all round. Duffields usually have 32mm cherry which I can P/T down to 25mm , then join together. Desktop is 1500mm long and this will be the largest piece in the whole build (see space below).
Finish. I've just got some Osmo 3011 PolyX oil - the glossy one. I've done a sample piece of cherry with 3 as-thin-as-i-can-apply coats (wiped on, ragged off), then Fiddes supreme (?) clear wax applied with 0000 steel wool and buffed to a finish. The result is very much like a shellac finish, but really easy to apply / complete. Any alternate finishes people might offer? I'm not the best at finishing, so needs to be as easy as poss.
Drawer Runners. I've bought a pair of these from Screwfix - https://www.screwfix.com/p/ball-bearing ... pack/20420 - has anyone used these / got an opinion on them / long term review maybe. Any others that people would recommend? The alternative is to insert wooden frames in the pedestals and just let the drawers sit on them.
Drawers. I couldn't do all of this without some hand wood working, so I am planning on making the drawers out of Ambrosia maple (as a little contrast to the cherry) and DT them. The bottoms will probably be 4 or 6mm (veneered maybe - depends on costs/sizes) MDF. Drawer fronts will still be Cherry.
Timescale. This is going to take me a while. I work 50/50 from home and out on site across the UK, so only get in the garage workshop when at home. I'll be happy if I've done in 6 months.
Space. My garage workshop is limited in space so buying all the timber in one go, storing it and having space to make and assemble all the units would be virtually impossible. So I have purposely designed this so I can make one piece at a time, move it into the office and dispose of the piece it replaces.
Installation. I'm ultimately planning on using something similar to these https://www.screwfix.com/p/inter-screws ... pack/65152? to connect the desk, av unit and pedestal together. The cupboard / bookcase combination will likely be screwed back to the wall.
Prototype. This is a pretty major undertaking for me. I've been woodworking for coming up to 3 years. So I am reasonably accurate in measuring, marking, cutting etc. but this is my first go at cabinet making. It's also the first time I will have used the domino. So I've already started to make one of the pedestals from Pine as a prototype. It's already helped as the L-R alignment of the domino was about 0.5mm off, resulting in a 1 mm over or under hang on rail and stile joints (I sorted this out earlier tonight - so now it is flush). I dry fitted the first rear frame today and have to say Dominoes rock!
All feedback, advice, thoughts and critique welcomed. I've a couple of smaller furniture projects, some new windows to have installed, decorating after the window installation and a pile of the day job work to complete before I make a start on this, so should have time to incorporate any good suggestions.
Thanks
Ian
PS if anyone wants a copy of the sketchup file to pull apart let me know. I "think" I have drawn it all accurately to scale.