Need assistance again re geometry

UKworkshop.co.uk

Help Support UKworkshop.co.uk:

This site may earn a commission from merchant affiliate links, including eBay, Amazon, and others.

devonwoody

Established Member
Joined
11 Apr 2004
Messages
13,493
Reaction score
25
Location
Paignton Devon
Want to start another tissue box as per pattern below.

Image1w.jpg


The measurements shown are minimum and taking into account 10mm timber thicknesses throughout.

They can be slightly larger and would prefer that angles used to create design are the regular used ones if possible.

This time I want to set the top into carcass (45% mitred edges all round to achieve this) and match patterns.
I will need to accommodate the aperture for tissues in this pattern.

Anyone got the time please to do me a working drawing?
 

Attachments

  • Image1w.jpg
    Image1w.jpg
    79.4 KB
John,

The dimensions all interact making it very difficult if not impossible to get all the angles say in 5 degree increments.

I think you will be best served by making templates of each of the three sizes of dark triangles in terms of base length and height for each face and then use those to set you saw to cut the parts. In this way you will avoid all need to know the angles.

hth

Bob

PS enrol for a basic maths evening class perhaps for you general interest?
 
Hi John,

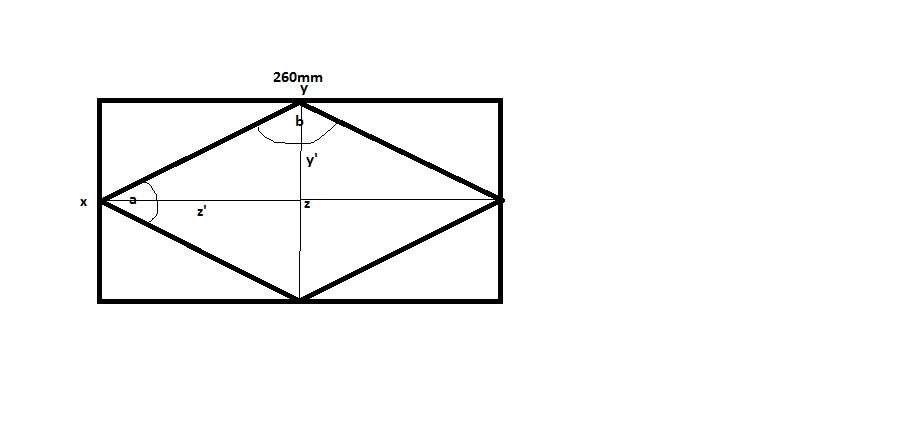
as Bob says, all of the dimensions are linked, if you want to work with "simple" angles then you will need to work with accurately calculated lengths as follows:

john.jpg


First work from a fixed box length - 260mm

Then set the included angle "a" for the top to (say) 60 degrees.

Then y' = 130 X Tan(60/2) = 75.05 therefore the width of the top = 75.05 X 2 = 150.1mm

Similarly, set the angle "a" for the side to 40 degrees and the height of the side calculates as 47.32 X 2 = 94.64mm

These dimensions (260 X 150.1 X 94.64) are close to those required and allow you to use "simple" angles (40 and 60 degrees).

Remember that within a parallelogram the sum of the internal angles = 360, thus you can calculate the remaining angles easily.

But, as Bob suggests it is probably easier to work from templates!

HTH

Dave
 

Attachments

  • john.jpg
    john.jpg
    26 KB
Many thanks for your helpful replies and your time given.

I knew there must be complications, interesting to see the calculations, and they do give guidance in setting up templates.

So I will finish up the last three boxes on the bench and get stuck in.

However I did misdraw the diagram :oops: of what I wanted, so next time for that one perhaps.

What it should have been.

2w.jpg
 

Attachments

  • 2w.jpg
    2w.jpg
    64.4 KB
Hi John,

the new design makes it a little simpler - if you can make the width of the box exactly half the length - eg 140mm and 280mm, then the "length" of all of the diamonds will be the same. :lol:

However, the height of the diamonds on the four sides will be different to those on the top - unless you make the height of the box the same as the width of the top - I sense the proportions of the box will then look rather strange though! and all of the diamonds will have become squares! :cry: :cry:

Ah well - onwards and upwards ....

Dave
 
Thanks Dave, yes some of those dimensions are a problem, but thanks again. I shall have to wake up earlier in the night and think up some more patterns. :wink:
 
Hi John,

just noticed that if you are making the first plan - then my reply only addressed the sizes/angles of the sides, top (and bottom) but not the ends. For these you would need to calculate the necessary angles (if you stick to the calculated dimensions!).

I do think that making a full-size drawing of each face, marking out the diamonds, and then making templates is less likely to lead to error! and would ensure that the proportions are acceptable.

Good luck

Dave
 
Back
Top