My curreent weekend work in Progress

UKworkshop.co.uk

Help Support UKworkshop.co.uk:

This site may earn a commission from merchant affiliate links, including eBay, Amazon, and others.

Stimpi

Established Member
Joined
8 Mar 2014
Messages
94
Reaction score
0
Location
East Sussex
Weekends since last year have been helping my daughter on her allotment. This year started by repairing wind damage not helped by the continuous rain.

The greenhouse I built survived well until the high winds of Valentines Day when it was hit by a part from shed from elsewhere on the allotment.

A lot of the sheds and greenhouses suffered damage mainly due to poor foundations or lack of and poor repair. Hence a Dunkirk spirit prevailed and a big clear up was the order of the day. The long and short of it all is we acquired enough parts to build our own shed with the exception of a floor.

I levelled a suitable area, selected an aspect that gave the best light, collected sufficient paving slabs and bricks resulting in building a solid support for the shed floor. 4” x 2” was salvaged for the joists with the intention of spacing them at 16” centres but I could not find sufficient for this so decided on 24” centres. DOH! I was purchasing new floor boards from Wickes who have a special offer on at present. I had forgotten about waste and the rule “The cut board is the next one to lay” the resultant waste on 24” centres amounted to an extra pack of boards. I had noticed a skip on the way in (after purchasing the flooring). Spoke to the owner who let me take some redundant 4” x 2” which saved the day..

20140309_143852-1.jpg


I find it easier in levelling a base to level four corners with two stretchers and then put cross joists at right angles, lay the floor to its exact size trimming any excess. I then placed paving slabs at 32” centres packing up with two course of bricks and if required some slate packing. The boarded floor could be lifted with a fulcrum point and the tile slipped in.
The following weekend the sides and roof all erected, bolted up and the jobs a gudun. What I need now is a door.

20140318_120121.jpg


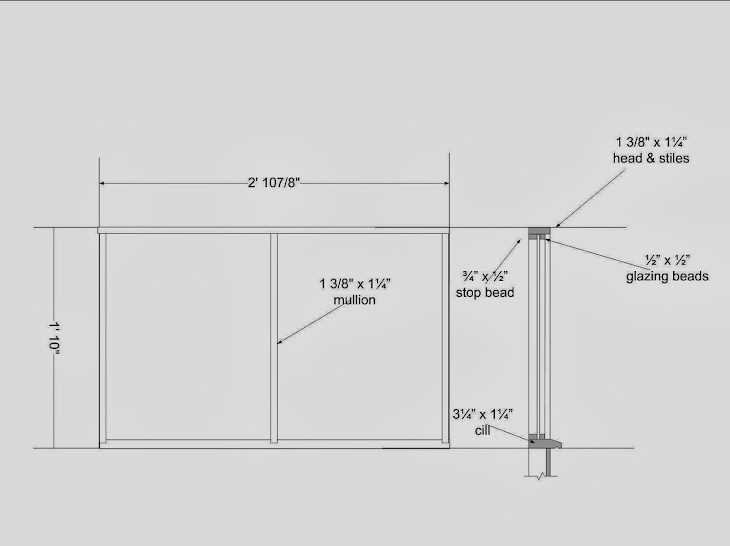
A visit to the local Garden Centre to see what’s on offer. £800.0 for a potting shed makes for expensive carrots. I new this, I was more interested in what doors they supplied. The deluxe model was advertised as a Frame Ledged and Braced door but in my opinion its not. Shed door construction has been a re-occurring post and would be of interest to other woodworkers. Despite what it is will it be fit for purpose as it would be relatively easy to make? There are other issues. Do I make a door frame so it opens inwards?

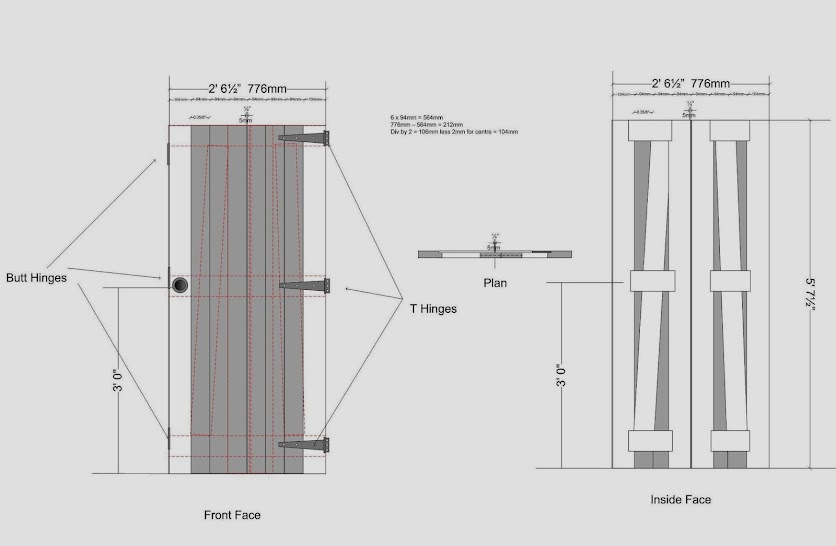
Here is the inside view.
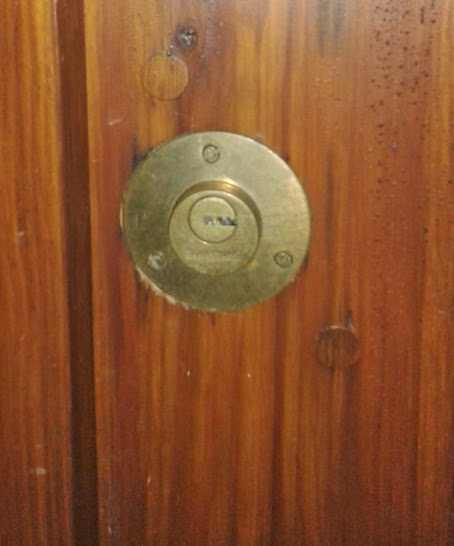
20140318_120046.jpg


And the edge view.

20140321_151740.jpg


The+Doorvsd.jpg
 
My two garden sheds have functioned perfectly for years with simple ledged and braced doors, but adding a frame would make the door stronger and allow you to fit a better mortice lock (as in your photo) if security is an issue. You wouldn`t want the door to open inwards on a small shed, surely, due to loss of useable space.

Ian
 
Also, an outward-opening door is inherently more secure as they can't be easily kicked in, and with a bit of forethought can be made very hard to force open e.g. hinge bolts, and a deliberately flimsy outer handle that would give way long before the locks - basically what I have on my workshop door.

Pete
 
A couple of mortice locks and a "D" handle gives the toe rags something difficult to fiddle with. You can pick up ones with euro cylinders quite cheaply, and they are easy to fit. As Peter said, watch what sort of hinges you use.
 
Its all change. The client (my daughter) wants an outward opening door that opens in two leaves but looks like a single door. What are today's kids like ? I fancied copying the deluxe garden center door to see how it stood up to allotment wear and tear?
 
I put a temporary door on this weekend, one I found that was worse for wear but will do till I decide what to do with a new one. On closer inspection the cill to the window is rotten so this weeks task is to make a new window. Will make the same except a larger cill and wider stiles & head.
Not a big lover of glazing beads on agriculture buildings so think will leave them off.

Replacement+window.jpg
 
Made the replacement window today selecting the timber from some salvaged roof beams and ripping to size.

20140324_100136.jpg


Surfacing on the planer.

20140324_103519.jpg


Forming a capillary groove to underside of cill.

20140324_111157.jpg


20140324_111254.jpg


Cutting rebate and run off slope of cill,

20140324_131404.jpg


Finished cill.

20140324_133627.jpg


Remaining stock ready for jointing and assembly.

20140324_151047.jpg


Assembled frame. Will give a coat of primer tomorrow before fitting glazing beads later on in the week.

20140324_162813.jpg
 
Hi Stimpi,

Regarding windows and security, I removed mine and boarded up the opening as I think a window is the weak link for break-ins. Iron bars of course are another option. Another plus for doing away with the window, it gives me more wall space for hanging tools etc.

Cheers,

John
 
The plan is to fit a 3/4" ply board over the windows as we did on the site huts bolted through to the inside. Being primarily a potting shed which requires natural light.
 
After some thought I have put my ideas on how to make the Potting shed door a double opener while looking as a single

Picture+of+door.jpg


I will need to produce a rod as cutting/machining the stiles for width is critical as is the actual width and thickness of the match boarding. I have taken the section sizes straight from the Wickes catalogue. My local timber yards matchboard measures 4 3/8” x 3/4” and the Wickes is 3 11/16” x 3/8” which helps me with forming the joints.
 
Silverbirch":ximpstx2 said:
My two garden sheds have functioned perfectly for years with simple ledged and braced doors, but adding a frame would make the door stronger and allow you to fit a better mortice lock (as in your photo) if security is an issue. You wouldn`t want the door to open inwards on a small shed, surely, due to loss of useable space.

Ian

Take it from me, inward opening doors, given quality Chubbs, are more resistant to jemmying. I'd rather lose a bit of space, than my tools! Added precautions are angle iron around the door frame, and interior shutters for the windows.
 
My thoughts exactly John and the trouble with allotments is they go for substantial periods when no one is around. I will be starting on the doors late next week.
 
With an outward opening door, I suppose you could always fit an interior sliding door as well. Depends on how much space there is to either side of the door frame. :?:
 
Hi John again,
Have you used one of these locks before? I used them when I worked at the council particularly for blocking off passageways at the back of terraced gardens. We would give the tenant a key for own use but It is impossible to get other keys made even from the manufacturer. Plenty of keys come with the original but no extras. They have to be removed from inside the garden with a special screwdriver and almost impossible to jemmy.

20130909_094432.jpg


It looks like a Yale from the face of the door.
 
Stimp.

Now, that might save me fitting a Yale type lock on my side entrance gate, next to my shop. I store my trestles and ladders in the side entrance so I need something I can lock and unlock from 'street-side'. If these are fitted to communal entrances, they will be lockable from the outside. Hence my thoughts on Yale, or maybe a heavy Chubb type. I want to save myself a regular traipse around my house perimeter each morning and evening. Okay in the summer, but it puts the side entrance out of use in the snowy weather.

I hope you can work out my 'scenario' of course! :mrgreen:

Ahhh. Now I see the footnote under the pic! :oops: :oops: :oops:
Are these available retail?
 
Hi John,
Here’s a picture of the external face of the lock. They are retail I buy mine from a large Fencing supplier in the village though there is an ironmonger in Brighton who stocks them £30.00 a time. Two sizes relating to the thickness of the door, one for a standard ledged and braced and the other for a framed ledged and braced.

close+up+of+lock.jpg
 
Thanks Stimpi.

I am going to use decking to make my gate. So I'll have to work out the thickness of any framing to suit. Worst comes to worst, I can always apply a packing-out piece I suppose.

If I can't find a local supplier, I might be sending you a PM... :mrgreen:

One more query which you can answer at your convenience. Can you put these on the 'snub', as with a Yale?

Cheers. Off to knock out some Zzzzzzzzzzzzzzzzzzzzzzzzzzzzzzzzzzzzzsss :D

Take care.
John (hammer)
 
Busy day to day, thankfully thank fully fine weather. As it Mothers day tomorrow only today is available. Felted the roof, completed the potting bench and fitted the window including glazing. Not enough time to cut more glazing beads so they will be completed on another visit.
The old window is definitely rotten.

its+definately+rottenjpg.jpg


The new one went in like a dream.
New+window+in+and+glazed1.jpg


Internal view of window including bench.

from+the+inside.jpg
 
Back
Top