You are using an out of date browser. It may not display this or other websites correctly.
You should upgrade or use an alternative browser.
You should upgrade or use an alternative browser.
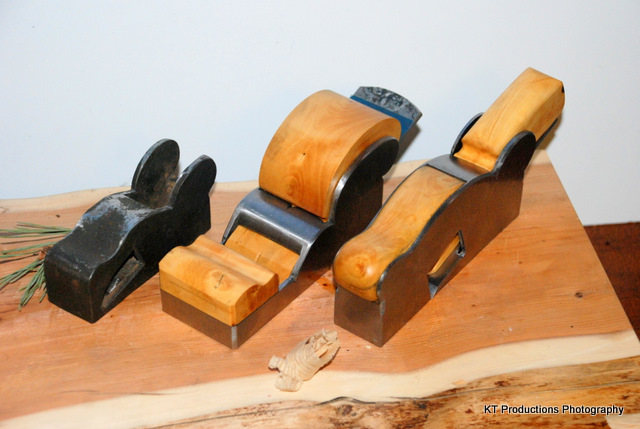
More Infills not Landfills...Somebody stop me PLEASE! ;o)
- Thread starter jimi43
- Start date


Help Support UKworkshop.co.uk:
This site may earn a commission from merchant affiliate
links, including eBay, Amazon, and others.
Alf
Established Member
Not until now, no. :lol:
Looks good, Jim. =D>
Looks good, Jim. =D>
Scouse
Established Member
AndyT":bbo6pc81 said:Anyone else reminded of Thunderbird 4 tucked safely inside Thunderbird 1?
Twas Thunderbird 2; Thunderbird 1 was the rocket powered plane.
I'm just off to have a look for a life on ebay...

jimi43
Established Member
Thanks for the feedback guys and gals!
Having stared at the wedge for a while and following other PM feedback...I think I need to round the tail a bit to more closely follow the curves of the metal casting....
It's something that can be done later but can't be put back, so I will think about it for a while...
I'll have to be careful though...getting too close to that knot!
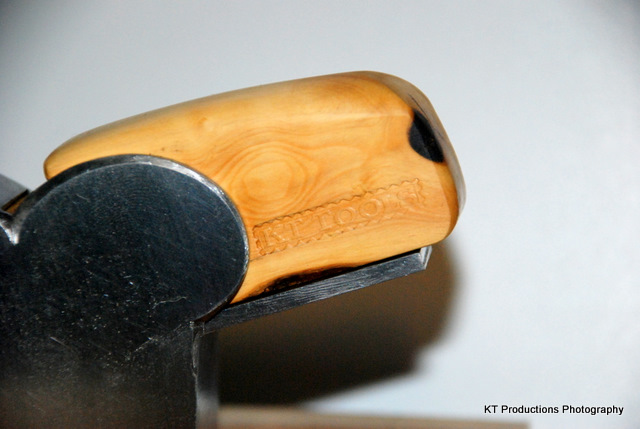
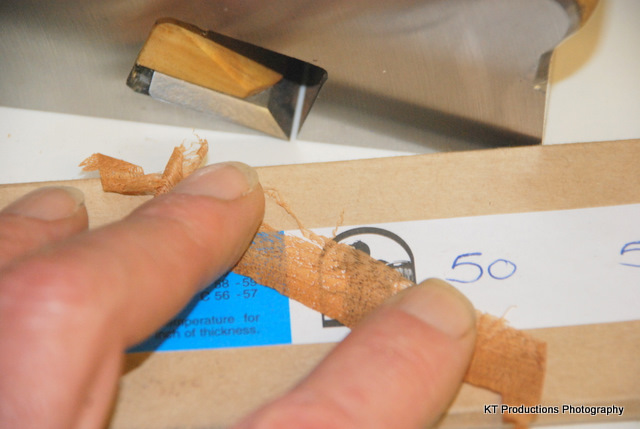
Once the linseed oil has taken effect though...the boxwood takes on a beautiful patina with real character and is really tough stuff...the amount of pressure required for the stamp was incredible..I was worried about it cracking!
Now that little bullnose is teasing...but must be patient....got to get the iron hardended first and make some shavings with the shoulder!
Jim
Having stared at the wedge for a while and following other PM feedback...I think I need to round the tail a bit to more closely follow the curves of the metal casting....
It's something that can be done later but can't be put back, so I will think about it for a while...
I'll have to be careful though...getting too close to that knot!
Once the linseed oil has taken effect though...the boxwood takes on a beautiful patina with real character and is really tough stuff...the amount of pressure required for the stamp was incredible..I was worried about it cracking!
Now that little bullnose is teasing...but must be patient....got to get the iron hardended first and make some shavings with the shoulder!
Jim
Dangermouse
Established Member
- Joined
- 23 Dec 2010
- Messages
- 714
- Reaction score
- 0
Fantastic work Jim, Great to see those planes put into such amazing shape. I bet they are a joy to use.
George
George
bugbear
Established Member
jimi43":1a3x0s9t said:is really tough stuff...the amount of pressure required for the stamp was incredible..I was worried about it cracking!
You say pressure - were you hitting the stamp with a hammer, or using a press of some kind?
BugBear
Looking great Jim - fantastic work shown off by equally impressive photos.
But looking at those finely sculptured forms, I'm sure I'm not the only one who wants to pick them up and hold them, and feel how the shapes fit the user's hands.
So if we all ask nicely, can you organise a WH-style passaround? I'm sure there's no risk at all of any of these lovelies getting lost in the post, so I'll volunteer to put my name at the top of the list!
=P~
jimi43
Established Member
Oh, 'eck! Oh, fiddle! Oh, ca-rumbs!! DM! Thank you!
BB...."press" mate. I am looking for a hydraulic one....or a fly press and I have seen some pretty superb DIY designs involving a bottle jack and an H frame. But for now I use a very big Record vice clamped in my bench vice. A Heath Robinson fence prevents movement and the wedge lays on the fixed jaw, the stamp is placed on top of a guide line and pressure exerted by the moving jaw.
I tried hitting with a hammer and with softwood that is ok but the side grain or even end grain of boxwood does not impress enough to get it deep enough.
Andy...are you going to Ye Olde Kent Bashe? I could bring them to that but not sure I trust the Royal Mail enough to make multiple postal risks....unless you can think of a guaranteed way of doing it? :lol:
Jim
jimi43":9tefqynz said:Andy...are you going to Ye Olde Kent Bashe? I could bring them to that but not sure I trust the Royal Mail enough to make multiple postal risks....unless you can think of a guaranteed way of doing it? :lol:
Jim
- I only meant it as a compliment, not a serious suggestion! Keep them all safe indoors!
jimi43
Established Member
Hi Andy
I wasn't quite sure there mate...but thank you for your compliment...
I will bring it to the YOKB II so you can play with it if you are coming...?
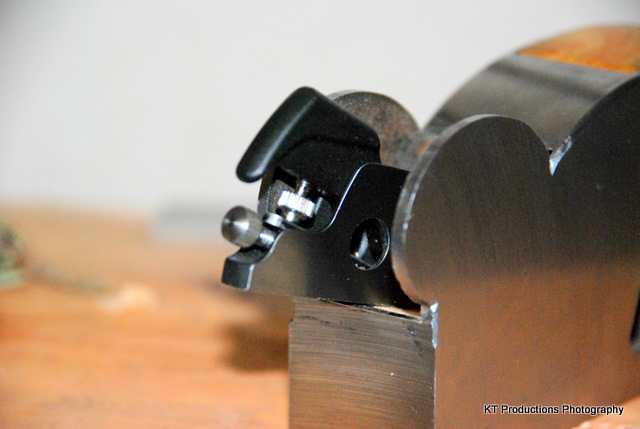
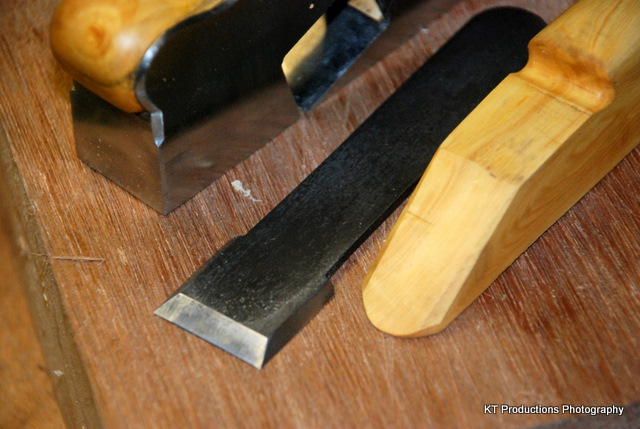
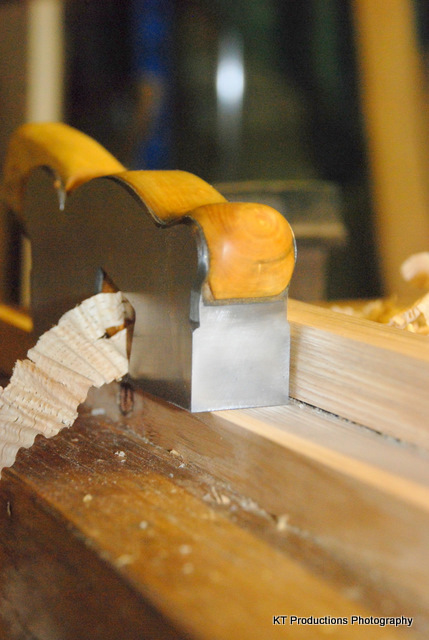
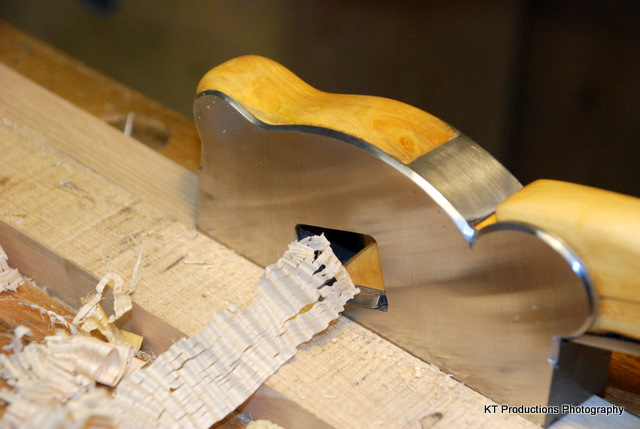
Well...I am really happy today...firstly because this hardening business with the kiln is now becoming second nature to me and the temperature control and tempering are getting done with far more accuracy and evidenced by the resultant hardness and keeness of the edge...here is the iron...
One thing with the 01 steel that I get is that it is textured and dipping it in oil causes blackening which is a nightmare to get out of the grain. However...in order to create an apparently aged look...this is a bonus as a quick whip on the wire wheel and then the buffer makes it look antique...which is just what I wanted...and it sits beautifully in the mouth...
So...how does it shave? Well there is only one word for it...superbly!
Here is a piece of rough-sawn cherry that I chose to test it with a rebate...
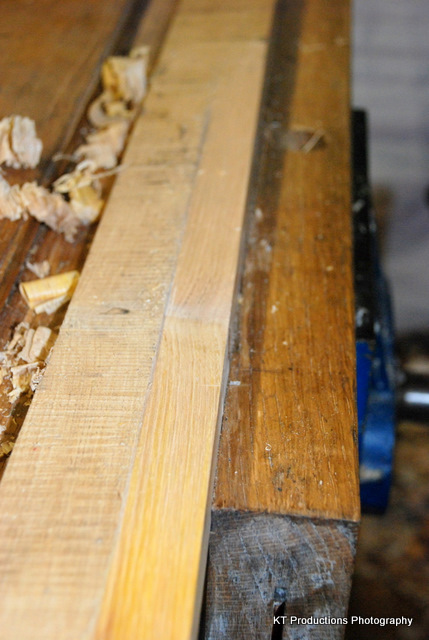
Before is on the left :roll: and after on the right :mrgreen:
It makes that whizzing noise....and this was deep set so if I were to fiddle with it I could get a MUCH finer cut but I wanted to play so...
....the finish is like silk....
...this is FUN!
Well....I'm really happy with this little baby...the iron taps in really well...I might put a bottom sneck on it but not sure yet...it's fairly easy to set well...and once set for a job needs no adjustment at all.
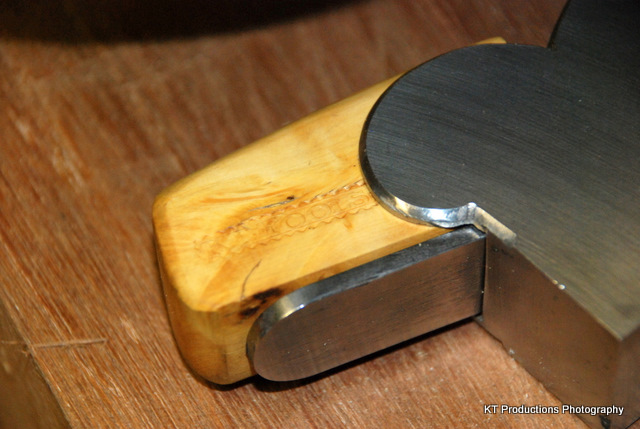
So...now off to fiddle with the toe of the wedge to prevent shaving bunching with my favourite plough pattern...polish off the bevels and generally tidy it up to remove scratches but I'll leave you all with this...
More later!
Jim
I wasn't quite sure there mate...but thank you for your compliment...
I will bring it to the YOKB II so you can play with it if you are coming...?
Well...I am really happy today...firstly because this hardening business with the kiln is now becoming second nature to me and the temperature control and tempering are getting done with far more accuracy and evidenced by the resultant hardness and keeness of the edge...here is the iron...
One thing with the 01 steel that I get is that it is textured and dipping it in oil causes blackening which is a nightmare to get out of the grain. However...in order to create an apparently aged look...this is a bonus as a quick whip on the wire wheel and then the buffer makes it look antique...which is just what I wanted...and it sits beautifully in the mouth...
So...how does it shave? Well there is only one word for it...superbly!
Here is a piece of rough-sawn cherry that I chose to test it with a rebate...
Before is on the left :roll: and after on the right :mrgreen:
It makes that whizzing noise....and this was deep set so if I were to fiddle with it I could get a MUCH finer cut but I wanted to play so...
....the finish is like silk....
...this is FUN!
Well....I'm really happy with this little baby...the iron taps in really well...I might put a bottom sneck on it but not sure yet...it's fairly easy to set well...and once set for a job needs no adjustment at all.
So...now off to fiddle with the toe of the wedge to prevent shaving bunching with my favourite plough pattern...polish off the bevels and generally tidy it up to remove scratches but I'll leave you all with this...
More later!
Jim
Kalimna
Established Member
- Joined
- 18 Nov 2009
- Messages
- 1,275
- Reaction score
- 1
Inspirational stuff yet again
Adam
Adam
jimi43
Established Member
Cheers Adam....
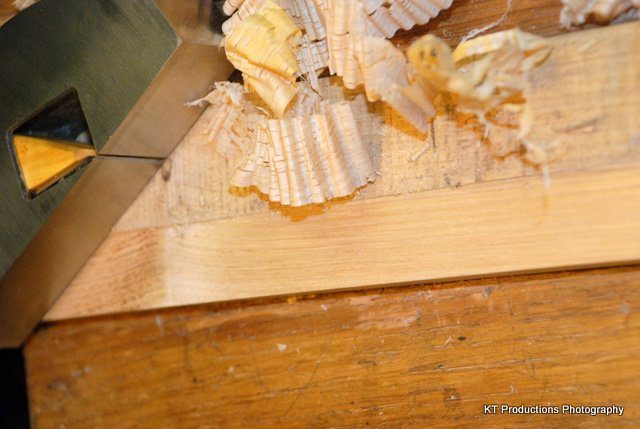
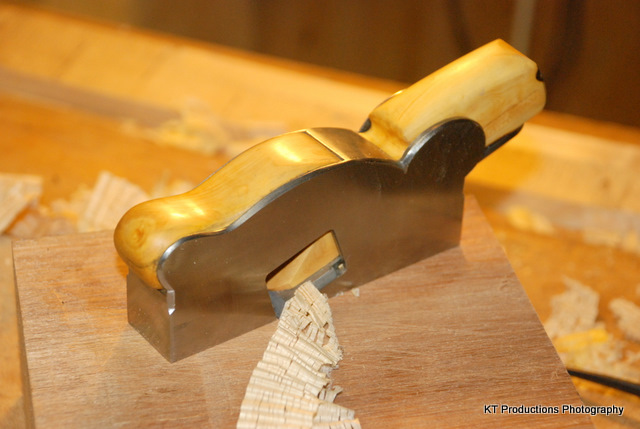
I decided to test out how fine a cut I could achieve and backed the iron off a smidgen....on a previously rough cut scrap of mahogany the finish rendered was nothing short of perfect...
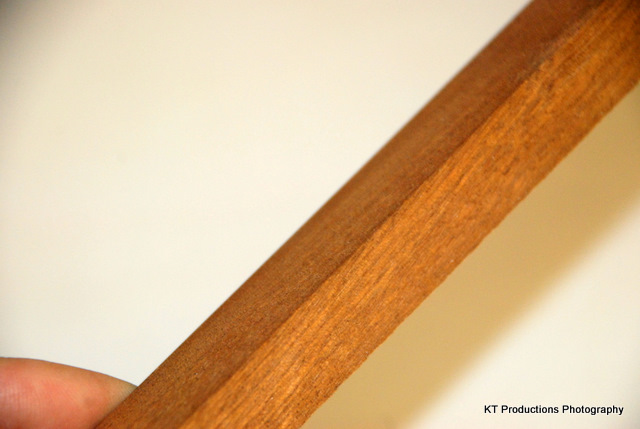
Indeed, the edge was so fine on the final piece of wood I cut the end of my finger on it...like a paper cut! (homer)
And how thin are the shavings....well the're this thin...
So this little shoulder plane should prove quite a handy tool in my infill arsenal!
Now....where IS that little bullnose...... :mrgreen:
Cheers lads and lasses....
Jim
I decided to test out how fine a cut I could achieve and backed the iron off a smidgen....on a previously rough cut scrap of mahogany the finish rendered was nothing short of perfect...
Indeed, the edge was so fine on the final piece of wood I cut the end of my finger on it...like a paper cut! (homer)
And how thin are the shavings....well the're this thin...
So this little shoulder plane should prove quite a handy tool in my infill arsenal!
Now....where IS that little bullnose...... :mrgreen:
Cheers lads and lasses....
Jim
Richard T
Established Member
Cracking job Jim.
I was wondering if the O1 steel you bought was annealed or just normalised?
I have great trouble annealing as to do it properly I would need a very well insulated environment - which, out in the barn, ain't going to happen any time soon. People who do it professionally would use a kiln to get up to non - magnetic then to cool down very slowly indeed (24hours +) still in the kiln. If you could do this with yours, you could give any blade the best treatment by thoroughly annealing prior to hardening.
Just a thought. I have them occasionally.
jimi43
Established Member
Hi Richard
Thanks for you kind words mate. How is your infill smoother coming on?
Do you know...I hadn't considered the annealing part of the job...the label just talks of hardening and tempering...
This will be the third iron I have made so far with this steel and each has had extensive testing on various hardwoods and the smoother and large shoulder get used every time I need a plane for that purpose..so far the edges have stayed keen and razor sharp.
So I can only assume that it is pre-annealed...or if not..raising the temperature to hardening from room to maximum does the trick. With the kiln there is infinitely more control than with a forge or blowlamp.
I might try annealing the next one to see if it makes any difference. Anyone know where I can test the hardness figure?
Jim
Thanks for you kind words mate. How is your infill smoother coming on?
Do you know...I hadn't considered the annealing part of the job...the label just talks of hardening and tempering...
Hardening
From a 500deg (930F) preheat, raise pieces to 790deg - 815degC (1450-1500F) according to size, hold sufficient time for temperature to become uniform, but do not soak longer than necessary. Quench into oil which should be conveniently placed to avoid heat loss.
Tempering
150 - 300 degF Rockwell C62
Hold at tempering temperature for about 1 hour per inch of thickness
This will be the third iron I have made so far with this steel and each has had extensive testing on various hardwoods and the smoother and large shoulder get used every time I need a plane for that purpose..so far the edges have stayed keen and razor sharp.
So I can only assume that it is pre-annealed...or if not..raising the temperature to hardening from room to maximum does the trick. With the kiln there is infinitely more control than with a forge or blowlamp.
I might try annealing the next one to see if it makes any difference. Anyone know where I can test the hardness figure?
Jim
jimi43
Established Member
Ah...that's confirmed my suspicions then Pete...thanks mate.
Jim
Jim
Richard T
Established Member
Aha. That's good to know Pete. I'd assume (hope) that steel sold to be hardened would be.
I was thinking with my blacksmith head on that if you (Jim with kiln that is) wanted to seriously change a tool that was already hard, chisel, plane iron etc; you could normalise it to do the majority of the work with saw/files/grinding before annealing it then hardening and tempering again.
I normalise by slowly heating to non magnetic then cooling to black on top of rather than in the fire.Though letting it cool on a pre warmed metal or ceramic surface works. Just so long as those whizzing molecules are allowed to come to a slow, gradual rest in a relaxed way. It's best to do this three times but I find that once leaves most things quite workable.
Work on my dovetailed smoother came to grinding halt when I woke two Sundays ago to find some some charitable 'sole had pinched the bumper + winch orf the front of my Land Rover - long story, but to bring it back on topicish, I've made frames that I have cold riveted over the bolt heads in the new bumper. Even when not working on the plane slope I'm still practising peening ...
jimi43
Established Member
The other day I was thinking about what to do with the leftover 01 steel bits..and then I thought...floats!
I had a really thin bit...so I thought...let's play with that...try to get the teeth right and then harden it...and see what happens.
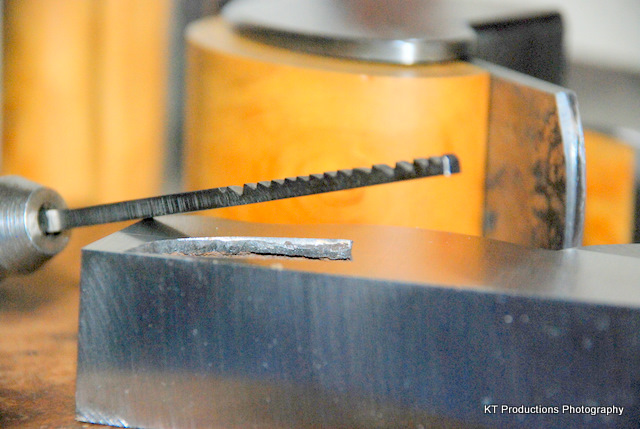
Clearly I have to practice a bit to get the teeth right...but it hardened beautifully and even cuts the casting...I used it close to the mouth to get the bed to bullnose transition near to breakout...
More pictures later when it breaks out...but if it cuts like this on metal then I think I shall be making a float collection for all sorts of stuff to do with plane making...these things are great!
Jim
I had a really thin bit...so I thought...let's play with that...try to get the teeth right and then harden it...and see what happens.
Clearly I have to practice a bit to get the teeth right...but it hardened beautifully and even cuts the casting...I used it close to the mouth to get the bed to bullnose transition near to breakout...
More pictures later when it breaks out...but if it cuts like this on metal then I think I shall be making a float collection for all sorts of stuff to do with plane making...these things are great!
Jim
jimi43
Established Member
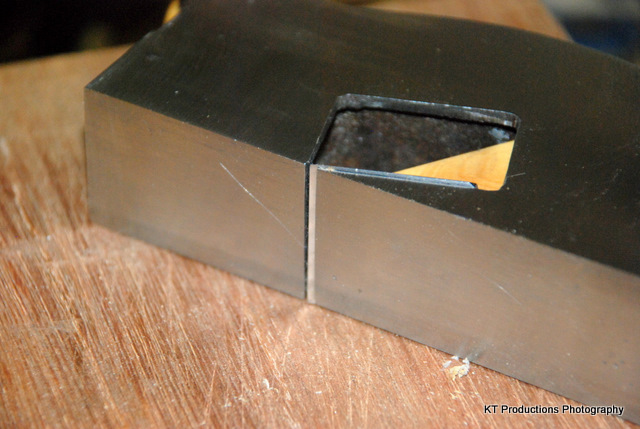
Just before I hit the sack...I thought I would share that magic moment....
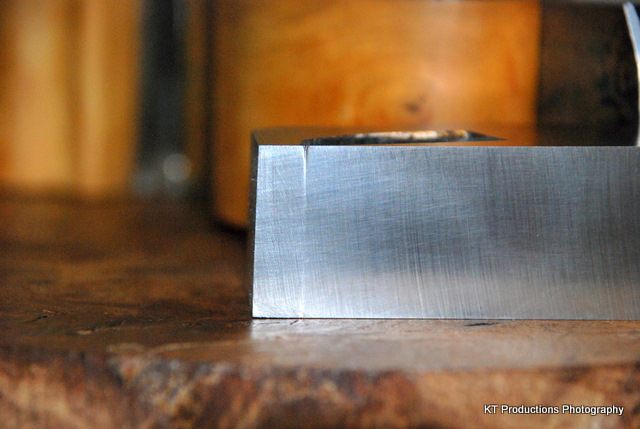
....when you know with a flat edge, flush to the bed...slowly cutting...it breaks through all at the same time across the sole.....
It's the big grin moment!
So...tomorrow...(perhaps) another iron in the kiln...another bit of boxwood and we should be done...by the end of the week I hope.
It's been a tough journey...
Jim
Similar threads
- Replies
- 5
- Views
- 2K