You are using an out of date browser. It may not display this or other websites correctly.
You should upgrade or use an alternative browser.
You should upgrade or use an alternative browser.
More Infills not Landfills...Somebody stop me PLEASE! ;o)
- Thread starter jimi43
- Start date


Help Support UKworkshop.co.uk:
This site may earn a commission from merchant affiliate
links, including eBay, Amazon, and others.
jimi43
Established Member
Hi Mick and Ali
Yup...I promise that very soon I will start whittling steel and bronze from scratch. I already have the peining experience with the Aled shoulder and now I am getting to grips again with steel....although I must say it is not my most favourite medium...I enjoy the wood bits much more...makes nicer mess too!
As I make the final touches to the chariot (I might refine the front infill a bit)...I thought I would knock down the shoulder to see how much work is necessary.
The sole is working fine...(more on that later)....and the sides are coming together...I just need to change my abrasive wheel again...so the most critical bit again is the bed...and that has my attention now...
There is a rather large amount of steel to be removed from the bed...which is a nightmare as it is not exactly accessible...but some new Nicholsons may sort that out...just waiting for them to arrive.
I also need to get some more 01 steel as I have run out...and I want to move up to a higher gauge for these last two...
More later...
Jim
jimi43
Established Member
pedder":1gl7qben said:Hi Jimi,
I somehow missed the box wood plane. My 5 Year old ist sitting with me and said: Wow ist der Hobel schön! (Wow is that plane beautiful!)
I can not say it better!
Cheers
Pedder
Hi Pedder...I think that for all the nice "reactions"...that is one I will cherish for a long time.
I was going to fiddle (tweak) the design but I will leave it as it is now! Tell your son "thank you" from me!
Jim
jimi43
Established Member
The shoulder is coming along nicely...
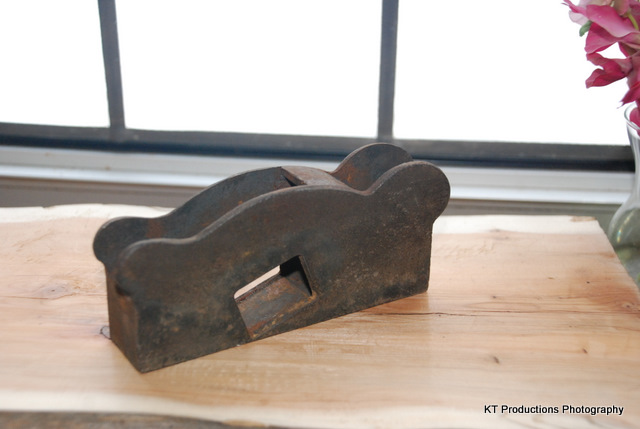
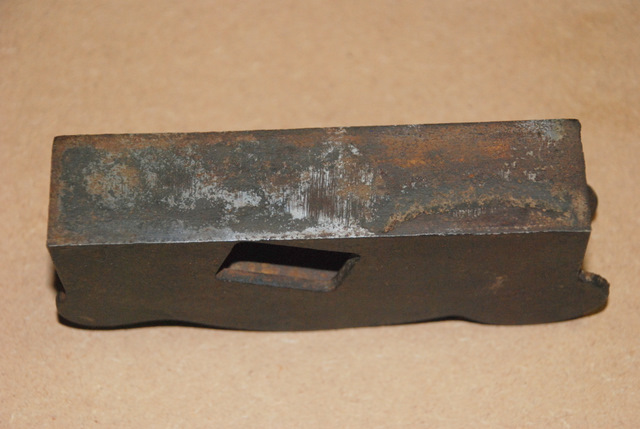
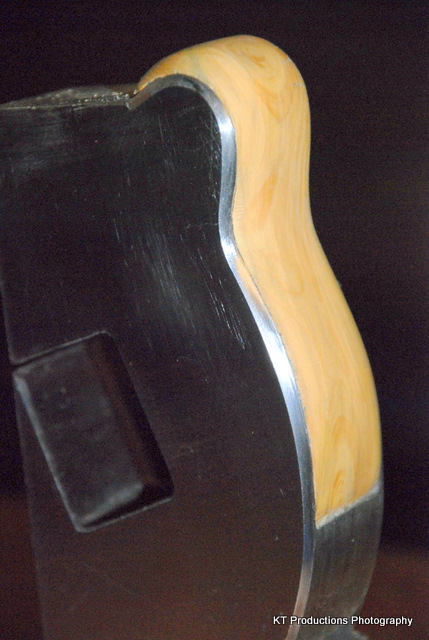
Whilst fettling the steel though...I noticed two things...firstly that the casting is very thin on the near front ear...and secondly the bed has a raised platform with ridges about 1/8" into both sides....
This won't affect the mouth...which worked out quite nicely...
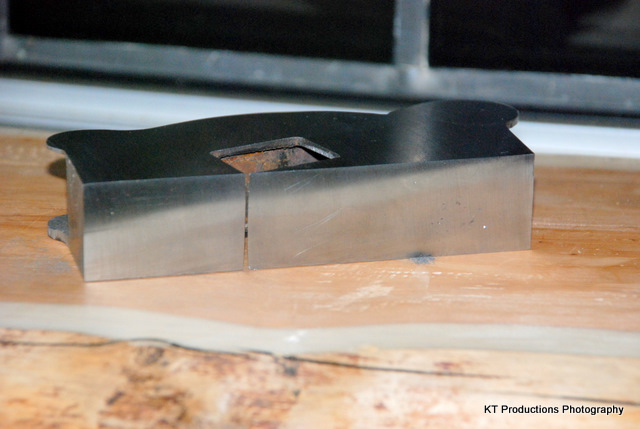
The latter I can cope with..it just means more work in a rather tricky place but the front ear is another problem
It means that the infill is going to have to overstuff the ears or it will show...
I am trying to find a vintage example where this is done but I am not doing very well on Google...
Any ideas chaps?
Jim
Whilst fettling the steel though...I noticed two things...firstly that the casting is very thin on the near front ear...and secondly the bed has a raised platform with ridges about 1/8" into both sides....
This won't affect the mouth...which worked out quite nicely...
The latter I can cope with..it just means more work in a rather tricky place but the front ear is another problem
It means that the infill is going to have to overstuff the ears or it will show...
I am trying to find a vintage example where this is done but I am not doing very well on Google...
Any ideas chaps?
Jim
jimi43":thj63l0m said:but the front ear is another problem
It means that the infill is going to have to overstuff the ears or it will show...
I am trying to find a vintage example where this is done but I am not doing very well on Google...
Any ideas chaps?
Jim
I've had a bit of a look around - you probably found most of these.
Norris used a similar sort of shape:
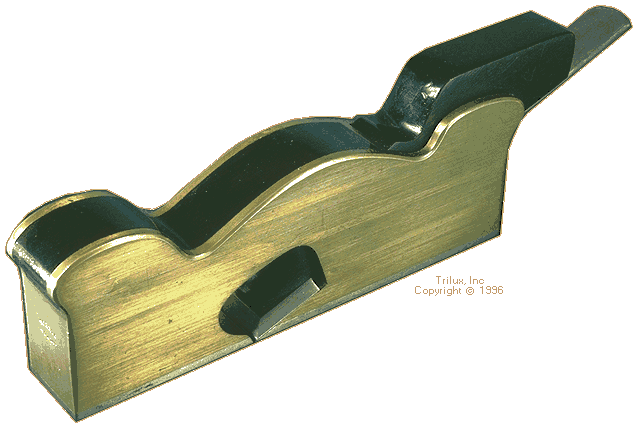
(image from the Museum of Woodworking Tools at http://www.antiquetools.com)
Sauer and Steiner have used a similar shape - especially neatly done I think:

(from their blog at http://sauerandsteiner.blogspot.com/2010_03_01_archive.html
Some examples raise both ends people making a practical shape for pushing or pulling - this one is a nameless one for sale at Old School Tools: (http://www.oldschooltools.co.uk/index.php?p=1_8_Infill-Planes

while this more extreme one is from Peter McBride
(from Peter McBride's gallery at http://www.petermcbride.com/planemaking/gallery/)
TheTiddles
Established Member
If that ear is uniformly thin, then you might be able to solder a slip of steel to the inside, as it's only cosmetic then you don't need to worry about a perfect mechanical joint, just enough that when cleaned back it looks like a solid piece of steel. For that matter, even metal loaded opoxy could work
aidan
aidan
jimi43
Established Member
Hi Andy/Aidan
Yes....it's been a bit of a journey but the uniformity of the sides was more down to the casting irregularity on the thicker ear than the thinner one. It needed grinding inside to bring the entire edge together correctly. There was still a difference but it is marginal now...something I think that one has to expect with such old castings.
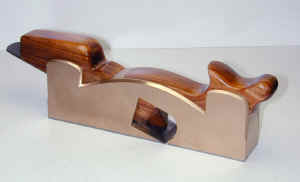
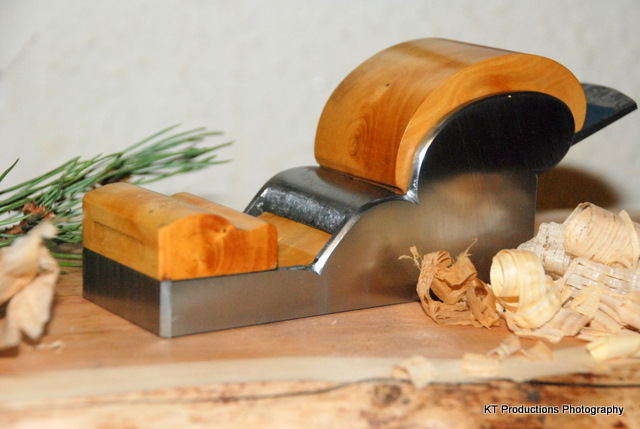
The infill that I am testing is working out quite well...this one will be overstuffed...something which is remarkably difficult to do and requires quite a bit of hand work. I am about 50% done so far but enough to show you the work in progress...

There is some levelling out to do...but I am getting there...
Against my better judgement...I am doing all the carving with no iron yet to test it...the 01 steel does not come until next week.
I had thought of getting a Clifton 3110 from Matt but he confirmed today the dimensions and it is a tad thin in the tang region and the adjuster insert will modernise an otherwise antique plane.
I need to be more patient and wait until the steel arrives...brave the weather and drag the kiln out for a further firing!
It's coming on though....teaching me loads of things which will serve me well in the future!
Jim
Yes....it's been a bit of a journey but the uniformity of the sides was more down to the casting irregularity on the thicker ear than the thinner one. It needed grinding inside to bring the entire edge together correctly. There was still a difference but it is marginal now...something I think that one has to expect with such old castings.
The infill that I am testing is working out quite well...this one will be overstuffed...something which is remarkably difficult to do and requires quite a bit of hand work. I am about 50% done so far but enough to show you the work in progress...
There is some levelling out to do...but I am getting there...
Against my better judgement...I am doing all the carving with no iron yet to test it...the 01 steel does not come until next week.
I had thought of getting a Clifton 3110 from Matt but he confirmed today the dimensions and it is a tad thin in the tang region and the adjuster insert will modernise an otherwise antique plane.
I need to be more patient and wait until the steel arrives...brave the weather and drag the kiln out for a further firing!
It's coming on though....teaching me loads of things which will serve me well in the future!
Jim
Pvt_Ryan
Established Member
As always stunning craftsmanship Jim.. Keep up the good work, looking forward to more pics.
jimi43
Established Member
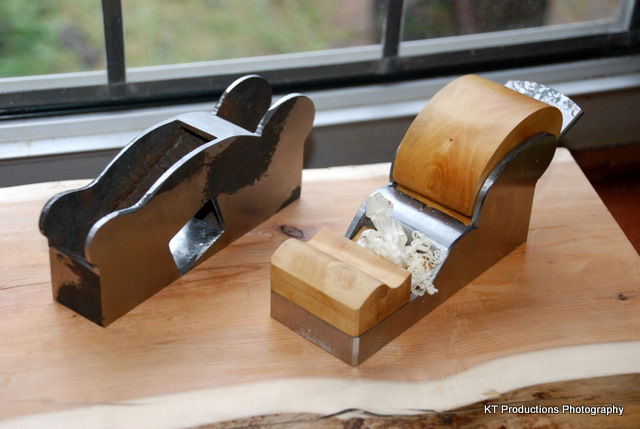
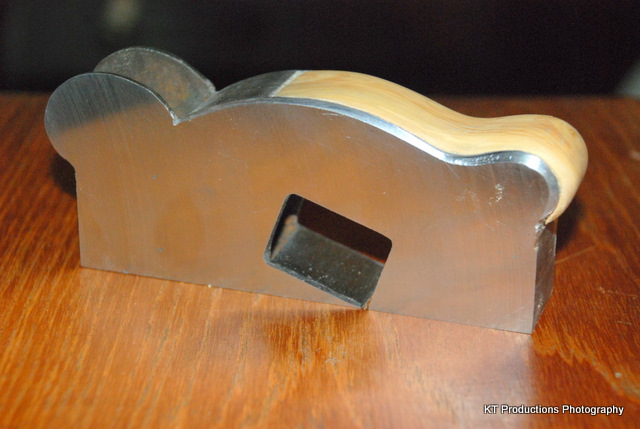
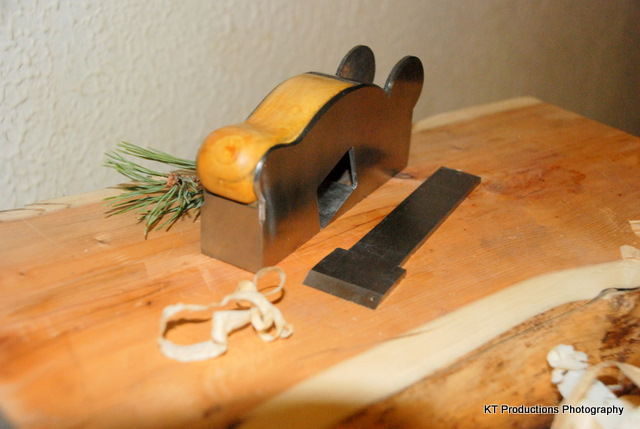
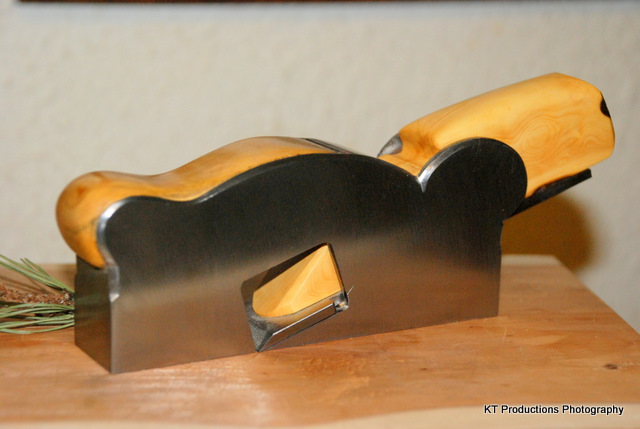
Just a quick update...
STILL waiting for the 01 steel! It has not arrived and I am pulling my hair out wanting to finish the shoulder plane! Oh well...patience Jim, patience!
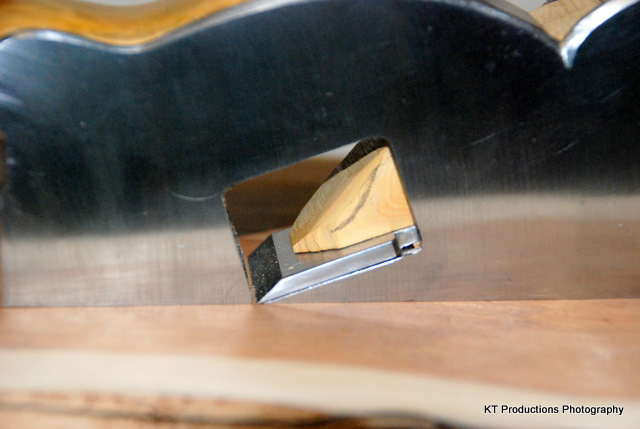
So I fiddled around with the iron for the chariot today...I still need to regrind it a tad as it is a little too far off square for the available adjustment but it's nearly there. I thought it was about time I made some test shavings so here ya go...
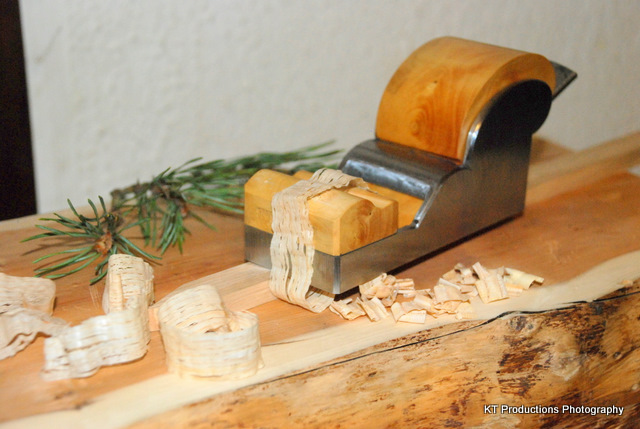
This little darling performs beautifully!! I know I will mostly use it for end grain and it actually sliced that with no problem at all...(the little shavings...to point this stick of cherry...)
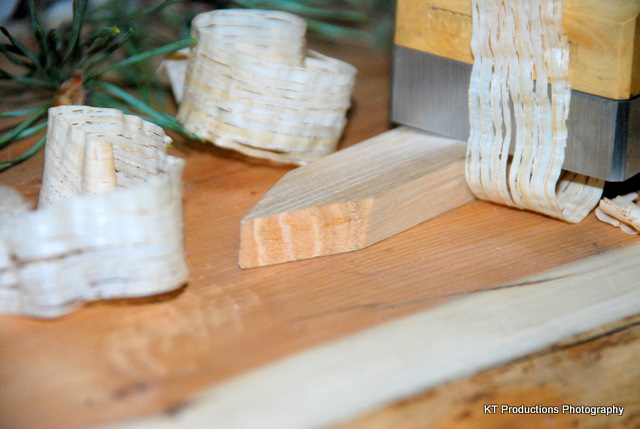
...but I couldn't resist some long grain...and the shavings were easily made...continuous and wafer thin...
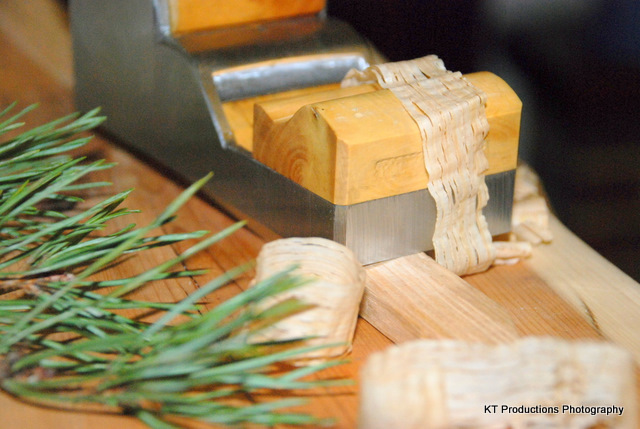
...still working on the bevelling....
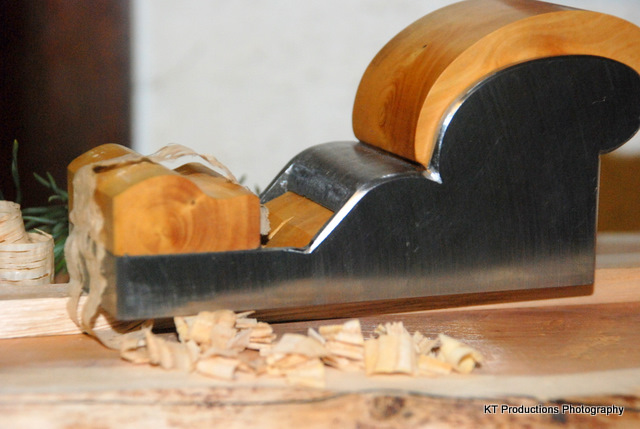
So tomorrow I shall square off the bevel and try again...I think the mouth is just right...time to put the infill inside methinks!
Cheers all.
Jim
STILL waiting for the 01 steel! It has not arrived and I am pulling my hair out wanting to finish the shoulder plane! Oh well...patience Jim, patience!
So I fiddled around with the iron for the chariot today...I still need to regrind it a tad as it is a little too far off square for the available adjustment but it's nearly there. I thought it was about time I made some test shavings so here ya go...
This little darling performs beautifully!! I know I will mostly use it for end grain and it actually sliced that with no problem at all...(the little shavings...to point this stick of cherry...)
...but I couldn't resist some long grain...and the shavings were easily made...continuous and wafer thin...
...still working on the bevelling....
So tomorrow I shall square off the bevel and try again...I think the mouth is just right...time to put the infill inside methinks!
Cheers all.
Jim
Richard T
Established Member
So, good for end grain as well as long grain; sounds like the ideal plane for finishing er ..... infills. #-o
I don't think there can be another slope quite so self perpetuating.
Looking good there Jim
I don't think there can be another slope quite so self perpetuating.
Looking good there Jim
jimi43
Established Member
So, good for end grain as well as long grain; sounds like the ideal plane for finishing er ..... infills. #-o
I don't think there can be another slope quite so self perpetuating.
Looking good there Jim
HA!!! Yup...I think you may have hit the nail on the head there Richard!
Proof of this has to be the fact that the single most important plane in the construction of this one is using Isaac, my first infill and baby chariot!
Actually Richard....I think I am slipping back slowly to Victorian times....I pulled out my hand grinder (thanks ALF for reminding me about them!) yesterday and refurbished it....
It works fantastically! Brilliant! The major problem was that the handle release did not work...it was rusted up. Ten minutes and some remedial work later...it released and transformed the machine from a lump on the bottom shelf to a very useful machine!
More about that in another thread!
Cheers mate!
Jim
jimi43
Established Member
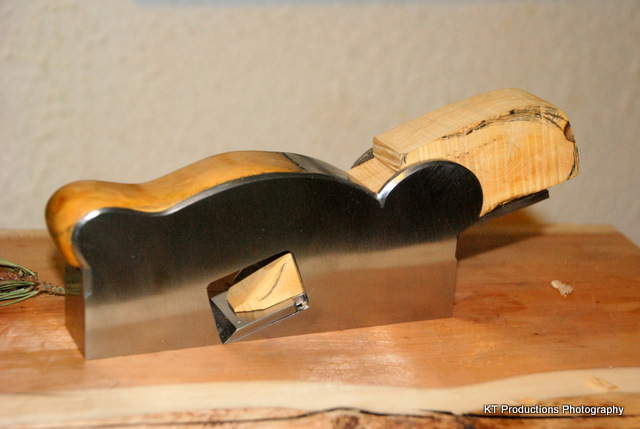
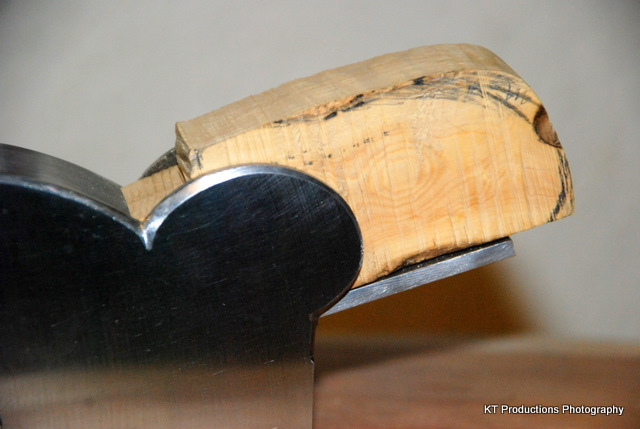
Finally reground the iron today so that it was square and I hit various wood samples....
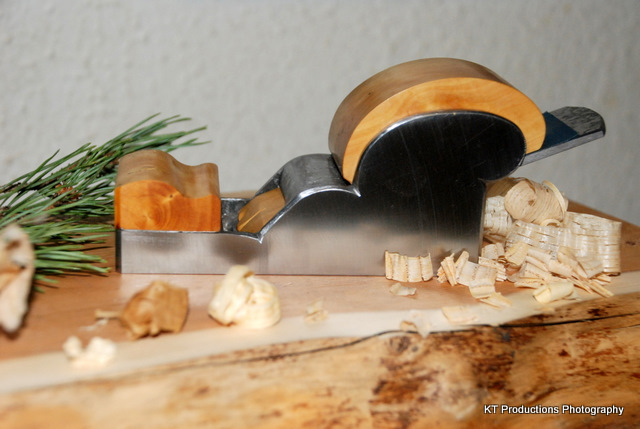
It cuts really well for a small plane and fits well in the palm of the hand.
I need to smooth off the tail end of the iron a tad as it was quite sharp in the palm but will do that tomorrow.
I also thought the front infill was a little high so brought that down a bit...I think I could go even further to make the look more balanced...
...but that's for tomorrow....
Cheers
Jim
jimi43
Established Member
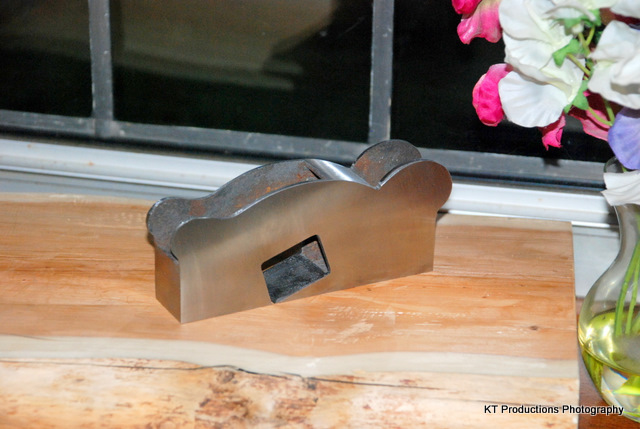
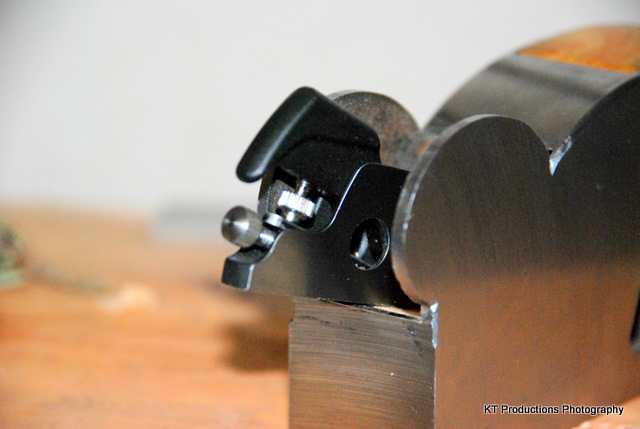
Ok back to the shoulder now that the 01 steel is here!
One of the more fun things I learned recently was the amazing cutting ability of the Dremel with cut-off discs....
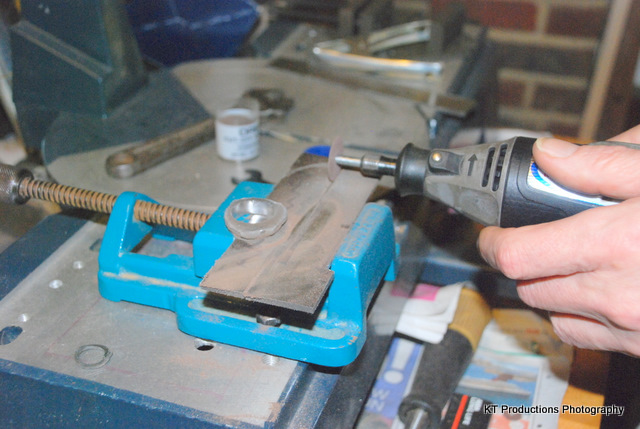
...and the use of a strong magnet to catch all the steel filings!
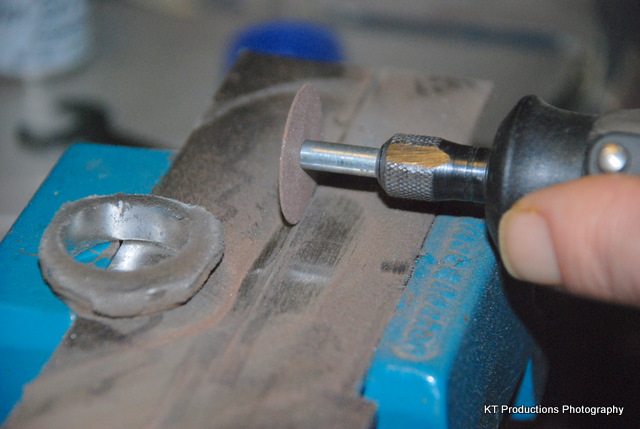
It's really amazingly easy to cut a straight line freehand once the initial groove is made with little need for filing at the end. The magnet does not allow any filings to escape so not horrible bits flying around either!
Ok the initial shaping done it was over to the Creusen wide white wheel to grind the 25 degree bevel...
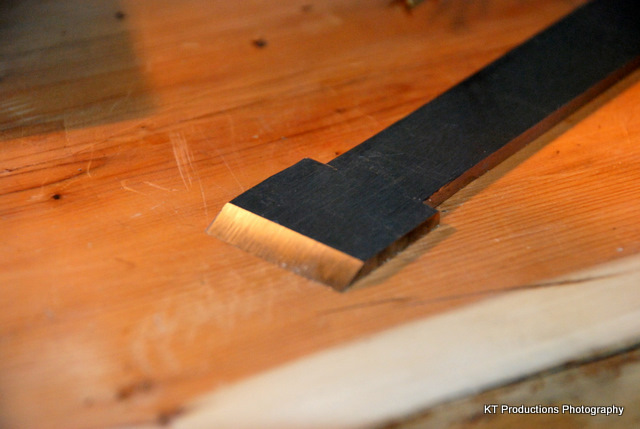
...leaving enough width to trim down when I am finished....the mouth turned out really tight and exactly right...
....and the bed is almost perfect....
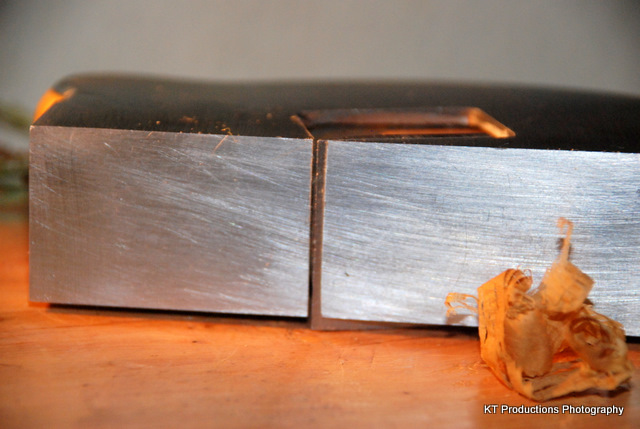
What I intend to do now is stick some graded abrasive lapping film to the back of the iron and then lap the iron into the bed so that it is perfect...although it's not far off now!
After that I will grind some side bevels on and then harden the iron on Wednesday...make the wedge and we are nearly done...apart from some tarting up of the metal finish a bit.
There is something hugely satisfying making your own irons!
More later!
Jim
One of the more fun things I learned recently was the amazing cutting ability of the Dremel with cut-off discs....
...and the use of a strong magnet to catch all the steel filings!
It's really amazingly easy to cut a straight line freehand once the initial groove is made with little need for filing at the end. The magnet does not allow any filings to escape so not horrible bits flying around either!
Ok the initial shaping done it was over to the Creusen wide white wheel to grind the 25 degree bevel...
...leaving enough width to trim down when I am finished....the mouth turned out really tight and exactly right...
....and the bed is almost perfect....
What I intend to do now is stick some graded abrasive lapping film to the back of the iron and then lap the iron into the bed so that it is perfect...although it's not far off now!
After that I will grind some side bevels on and then harden the iron on Wednesday...make the wedge and we are nearly done...apart from some tarting up of the metal finish a bit.
There is something hugely satisfying making your own irons!
More later!
Jim
Richard T
Established Member
Don't know if you've done the heat treat yet Jim, but would it be easier to get the width closer to right beforehand?
It's going to be ahellofalot tougher to grind afterwards.
And what quenchant are you going to use btw?
It's going to be ahellofalot tougher to grind afterwards.
And what quenchant are you going to use btw?
jimi43
Established Member
Richard T":3s5nswrv said:Don't know if you've done the heat treat yet Jim, but would it be easier to get the width closer to right beforehand?
It's going to be ahellofalot tougher to grind afterwards.
And what quenchant are you going to use btw?
Hi Richard....
Indeed...I shall be trimming it up in all areas and putting on a layered sneck before hardening.
I will harden at 780 degrees and quench in pure vegetable oil as usual.
Jim
xy mosian
Established Member
You probably know this already, if which case sorry  In the shoulder plane I have, Record jobby, the iron is slightly wider(0.5 - 0.75 mm) than the body of the plane to make sure it can cut into the corners. Just thought I'd mention it before you made yours narrower.
Another smashing job by the way.
xy
In the shoulder plane I have, Record jobby, the iron is slightly wider(0.5 - 0.75 mm) than the body of the plane to make sure it can cut into the corners. Just thought I'd mention it before you made yours narrower.Another smashing job by the way.
xy
jimi43
Established Member
xy mosian":3003ik8p said:You probably know this already, if which case sorry
Another smashing job by the way.
xy
Hi XY
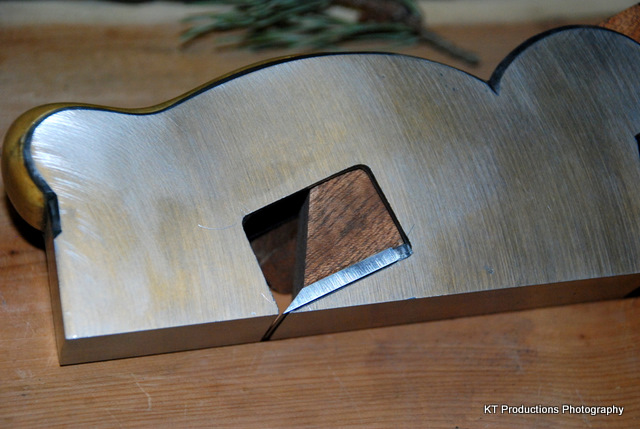
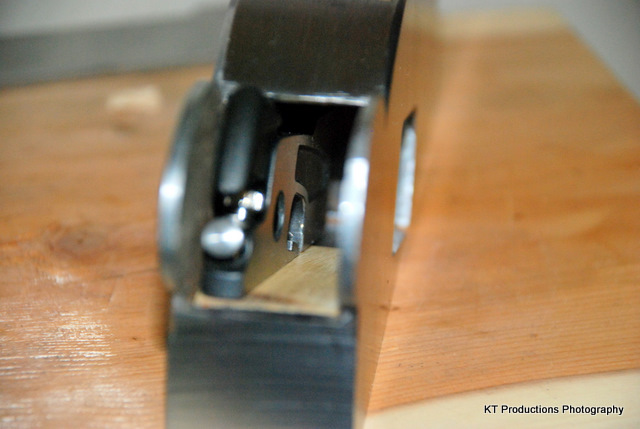
Thanks for the tip...it makes sense so I have made the iron exactly like you say...just a tad over the edge. I can trim it down later if it is oversized.
The infill in the bed is now in and I now need to make a float to fine tune it but that will be for later...it is close enough at the moment to start the wedge...leaving a little tightness to take up the play.
So to the wedge....
I have been quite lucky here as the remaining piece of stock I had rendered a nice little knot or two.....
...the bed is now tight....
Tomorrow I need to shape the back with a roundness to continue the "overstuffed" look.
Later....
Jim
jimi43
Established Member
Wonderful surprise this week...from a very dear friend of ours on this forum....a "little" gift:
The tiny miniature Veritas shoulder plane.
What a masterpiece of engineering it is!
Indeed...I put it to use straight away....the makeshift "float" that I made to line up and flatten the bed of the old shoulder plane....needed the very edges tidying up...and this little darling fits INSIDE the old one!
When I first heard about these little darlings I thought it was a bit of a gimmick and to be honest, it would not have been on my list of necessary purchases....
But as a gift....I got to try it and I must say...it would go where other planes have not been before and work just as well as any of its big brothers from the Canadian stable!
I will do a mini review later...but for now...a HUGE thanks to my forum buddy who shall remain nameless...you have shown me one tool that has surprised the hell out of me!
Jim
jimi43
Established Member
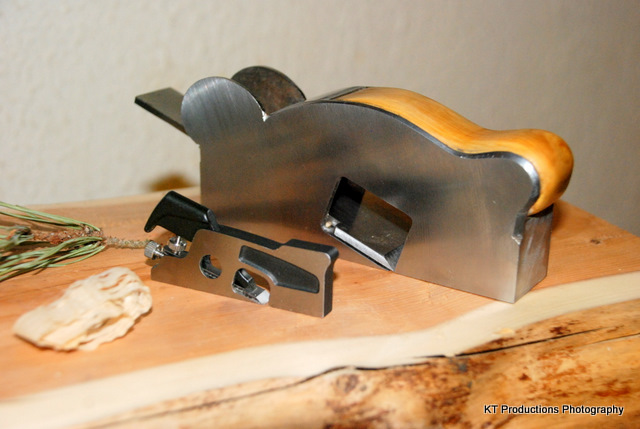
Further fiddling with the wedge this evening:
I made the decision to make the wedge overhang the tang of the iron because, in my experience, shoulder plane irons can dig in to the palm at this size where single handed use is common.
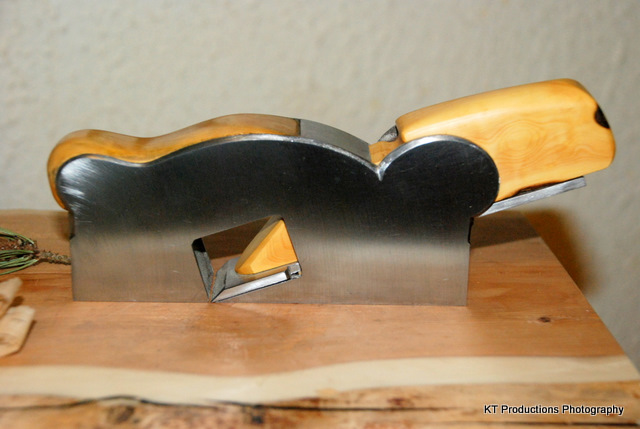
It needs more raw linseed oil....and to darken it up but that will be for later....
I will probably fiddle with the shape a bit more and also the toe but for now I am quite happy with the vintage square shape and it is very comfortable in the palm.
I have to harden and temper the iron next probably over the weekend...and then I can cut some shavings....
Later...
Jim
I made the decision to make the wedge overhang the tang of the iron because, in my experience, shoulder plane irons can dig in to the palm at this size where single handed use is common.
It needs more raw linseed oil....and to darken it up but that will be for later....
I will probably fiddle with the shape a bit more and also the toe but for now I am quite happy with the vintage square shape and it is very comfortable in the palm.
I have to harden and temper the iron next probably over the weekend...and then I can cut some shavings....
Later...
Jim
Similar threads
- Replies
- 5
- Views
- 2K