I have started to make an oak case, i planed it all to the proper dimensions and cut the mitres at 45 on my sliding mitre saw and not one of the cuts are true.Do i need to tidy them up on a disc sander or should it have cut it clean and true, the saw is square to the fence,it cuts smaller pieces more accurately but not the pieces at 50mm wide iam begining to wonder if there is some play in the saw.This is extremely frustrating has anyone had the same problem? 
You are using an out of date browser. It may not display this or other websites correctly.
You should upgrade or use an alternative browser.
You should upgrade or use an alternative browser.
mitre cutting
- Thread starter srt
- Start date

Help Support UKworkshop.co.uk:
This site may earn a commission from merchant affiliate
links, including eBay, Amazon, and others.
andersonec
Established Member
You're going to struggle to cut perfect mitres on a cross-cut saw, if it is half a degree out on the 45 then multiply that eight times, one for each mitre cut, then you are going to have an overall difference of four degrees if they were butted end to end the timber would not be straight. The saw needs to be set exactly at 45 deg. with some sort of angle finder such as this http://www.onlinetoolreviews.com/review ... egauge.htm and the blade set exactly 90 deg. to the fence, you can check that by cross-cutting a piece of straight timber as wide as the saw will handle, flip one piece over, butt them together and see if the wood is still straight with a straight edge, if not then the fence is not 90 deg to the blade.
If you have a disc sander then that would be the way to finish them but you would still need to be spot on accurate setting the angles, but then the lengths may differ unless you use a stop block on your cross-cut, I would recommend one of those digital angle finders, I use mine every time I set the table saw and band saw.
Andy
RogerP
Established Member
I would suggest cutting the mitres as best as you can with the saw then use a shooting board to get them perfect.
Jeff Gorman
Established Member
- Joined
- 1 Aug 2007
- Messages
- 145
- Reaction score
- 0
RogerP wrote:
I would suggest cutting the mitres as best as you can with the saw then use a shooting board to get them perfect.
There are some drawings of a shooting board at: http://tinyurl.com/yevhfx9
Jeff
http://www.amgron.clara.net
I would suggest cutting the mitres as best as you can with the saw then use a shooting board to get them perfect.
There are some drawings of a shooting board at: http://tinyurl.com/yevhfx9
Jeff
http://www.amgron.clara.net
andersonec
Established Member
srt":2es8nfhc said:how do you set the saw at 90i also cut 120mm oak and it would be a different cut each time i take it there must be a fair bit of play with these saws,i understand what you mean about the sander though.
Don't know if it is a portable machine or fixed, if it is a portable then the bed should be able to turn and locked with the handle at the front, the other type of digital angle finder is like this http://www.warco.co.uk/digital-measurin ... -rule.html which could be more useful as it will set horizontal angles as well as vertical.
If it a fixed machine and you have a wooden bed/table, then the back fence will have to be reset, unscrew it, put a screw in one end, adjust the angle till you have a perfect 90 deg with the blade, clamp it then put in another screw, test it and make any adjustments before screwing it down properly.
Andy

£16.59
£25.00
Woodworking Joinery by Hand: Innovative Techniques Using Japanese Saws and Jigs
Amazon.co.uk

£24.99
Facemoon Reusable Masks,Safety Masks,Dual Filter Masks, Paint, Dust, Epoxy Resin, Construction, Welding, Sanding, Woodworking, Chemical Reusable Gas Masks
ShenZHEN CIRY MINGYANG LITIAN ELECTRONIC ECOMMERCE

£10.95
£15.48
Portwest Browguard with Clear Visor, Size: One Size, Colour: Clear, PW91CLR
Amazon.co.uk

£12.50 (£1,250.00 / kg)
£14.45 (£1,445.00 / kg)
JSP M632 FFP3moulded Disposable Dustmask (Box of 10) One Size suitable for Construction, DIY, Industrial, Sanding, dust protection 99 Percent particle filtration Conforms and Complies to EN 149
Amazon.co.uk

£19.99
Respirator Mask,Safety Dust Face Cover,Dust Face Cover Paint Face Cover,Gas Mask With Filter,For Paint,Dust And Formaldehyde,Sanding,Polishing,Spraying And Other Work
ShenZHEN CIRY MINGYANG LITIAN ELECTRONIC ECOMMERCE

£238.91
£360.17
Trend Portable Benchtop Router Table with Robust Construction for Workshop & Site Use, 240V, CRT/MK3
Amazon.co.uk
RogerP
Established Member
Having both types I think the one on the link I gave (see my first post above) does a better job on long box sides.Jeff Gorman":1opizk8e said:RogerP wrote:
I would suggest cutting the mitres as best as you can with the saw then use a shooting board to get them perfect.
There are some drawings of a shooting board at: http://tinyurl.com/yevhfx9
Jeff
http://www.amgron.clara.net
Webby
Established Member
http://www.rutlands.co.uk/cgi-bin/psProdDet.cgi/DKD54
there is also this one in uk dont know whether link will work ..... :|
there is also this one in uk dont know whether link will work ..... :|
Paul Chapman
Established Member
RogerP":7ppzyydm said:I would suggest cutting the mitres as best as you can with the saw then use a shooting board to get them perfect.
+1. I don't think a sliding mitre saw will ever be sufficiently accurate for what you are trying to do. You can achieve very high levels of accuracy with a shooting board.
Cheers :wink:
Paul
RogerS
Established Member
+2...either use a shooting board or a mitre trimmer from Axminster.
Eric The Viking
Established Member
- Joined
- 19 Jan 2010
- Messages
- 6,599
- Reaction score
- 76
The 'angled rule' type of digital gauges don't appear to be reliable. I bought one recently, and it's miles off - complete waste of money. I have one "Wixey," angle-box type too (mine is GemRed), and that does work well.
If it helps, I made my own mitre shooting board recently, with the aid of an A3 laser printer. At 600DPI, it can print a _very_ accurate reference angle for you. I simply drew something like this:
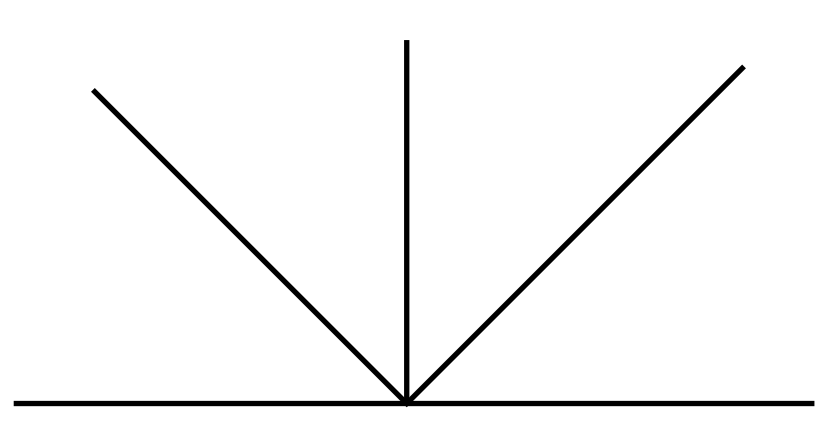
and stuck it down with spray-mount onto the surface of my shooting board. The 'focal point' needs to line up exactly with the edge the blade cuts to, and the bottom line parallel with it, but the "V" gives you the exact lines to set up the stops.
I've made the lines too thick in the image above. In practice, if you stick to hairlines (the thinnest you can see), you'll keep the accuracy. It's easy to do, it works really well and it should be OK with almost any printer, although the bigger the better, obviously.
I used Corel Draw, but any package, including SketchUp, would do, as long as it's a vector (drawing) package, NOT a picture editor.
HTH,
E.
If it helps, I made my own mitre shooting board recently, with the aid of an A3 laser printer. At 600DPI, it can print a _very_ accurate reference angle for you. I simply drew something like this:

and stuck it down with spray-mount onto the surface of my shooting board. The 'focal point' needs to line up exactly with the edge the blade cuts to, and the bottom line parallel with it, but the "V" gives you the exact lines to set up the stops.
I've made the lines too thick in the image above. In practice, if you stick to hairlines (the thinnest you can see), you'll keep the accuracy. It's easy to do, it works really well and it should be OK with almost any printer, although the bigger the better, obviously.
I used Corel Draw, but any package, including SketchUp, would do, as long as it's a vector (drawing) package, NOT a picture editor.
HTH,
E.
Attachments
Steve Maskery
Established Member
A saw will never give you the accuracy and precision that you need. The shooting board will.
Don't forget, though, that is is not sufficient (although necessary) for the mitres to be 45 degrees. In order for all to fit well, opposite sides must also be exactly the same length and straight. If they differ, or are not straight, your mitres will never fit, even if the ends are truly 45 deg.
Mitres are difficult!
S
theturner
Established Member
If you are going to do a lot of angle cutting then I would suggest
investing in a precision mitre gauge. I have a Kreg system and it
is very accurate. It costs around £130 ish but it is money well spent.
Roger.
investing in a precision mitre gauge. I have a Kreg system and it
is very accurate. It costs around £130 ish but it is money well spent.
Roger.
RogerS
Established Member
theturner":ttufhzkw said:If you are going to do a lot of angle cutting then I would suggest
investing in a precision mitre gauge. I have a Kreg system and it
is very accurate. It costs around £130 ish but it is money well spent.
Roger.
To be honest, Rog, if I was going to spend that sort of money I'd get the Axminster mitre trimmer instead ......for as Steve says, 45 degrees isn't the end of the story and the mitre trimmer lets you sneak up on the perfect length as well as getting the angle spot on.
woodbloke
Established Member
+3. Shoot them in on a mitre shoot of some denomination, it doesn't really matter what sort you go for as long as it's accurate and will give you the result you're looking for:RogerS":3a431z7u said:+2...either use a shooting board or a mitre trimmer from Axminster.
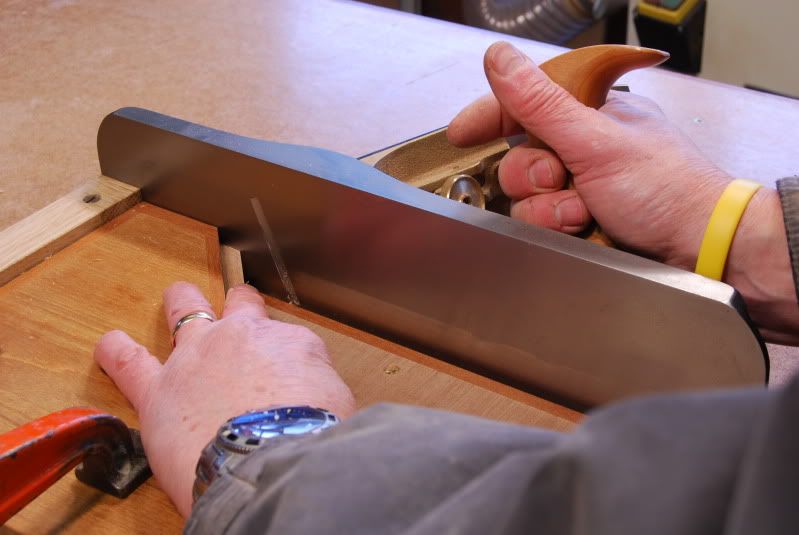
This is a straight forward shooting board with a mitre attachment cramped to it. I'm shooting fairly small pieces here but it will easily cope with much larger bits of wood. Bit of drive-by tool gloatage as well :mrgreen: (hammer) (hammer)
These little bits happen to be the lipping for the top and bottom of my current job:
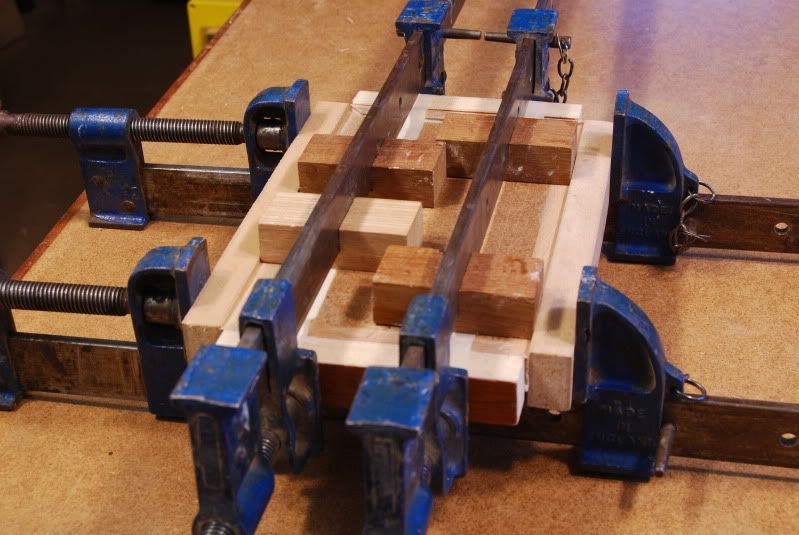
...where they're glued round the outside of the substrate. The first pair have been done but need to be supported as the shorter ends are glued in position. If they're not supported, the mitres will 'spring' under pressure :evil: and the joints will never close - Rob
Steve Maskery
Established Member
You know, I've never really got on with mitre guillotines. My mate Brian has one for picture framing, and even though the blade is set very accurately, it still doesn't always cut to 45.000 deg. Why? Because when trimming, the forces on each side are different and the workpiece can easily be moved a tad. Even a micro-tad will make a difference and it always shows. I was watching someone trying to use a similar machine only last week. They gave up. Maybe a posher guillotine would give better results, I don't know.
For me it is a shooting board every time.
Rob said "Bit of drive-by tool gloatage as well"
We'd noticed!
S
For me it is a shooting board every time.
Rob said "Bit of drive-by tool gloatage as well"
We'd noticed!
S
Eric The Viking
Established Member
- Joined
- 19 Jan 2010
- Messages
- 6,599
- Reaction score
- 76
Sorry, did you say something, Steve?
I was trying not to dribble, looking at Rob's plane... :mrgreen:
I was trying not to dribble, looking at Rob's plane... :mrgreen:
RogerP
Established Member
woodbloke":39vxbxid said:+3. Shoot them in on a mitre shoot of some denomination, it doesn't really matter what sort you go for as long as it's accurate and will give you the result you're looking for:RogerS":39vxbxid said:+2...either use a shooting board or a mitre trimmer from Axminster.
This is a straight forward shooting board with a mitre attachment cramped to it. I'm shooting fairly small pieces here but it will easily cope with much larger bits of wood.
Rob
Neither this type of shooting board or the guillotine will cope with box sides (other than very small ones) That's why I reckon it's good to have one of these as well.
Paul Chapman
Established Member
One of the best shooting boards I've seen is the one made by Pete (Newt). You can shoot most things with that one
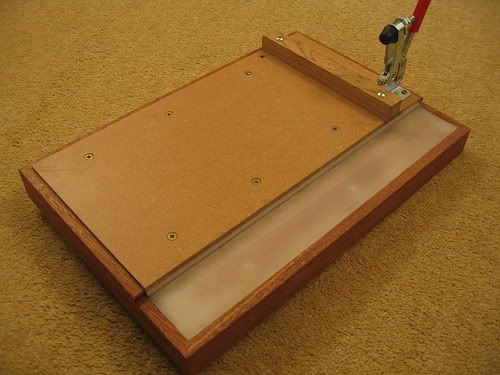
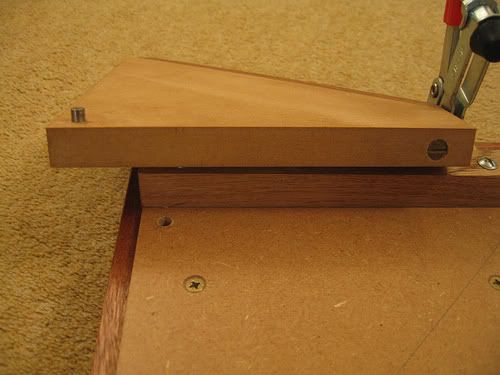
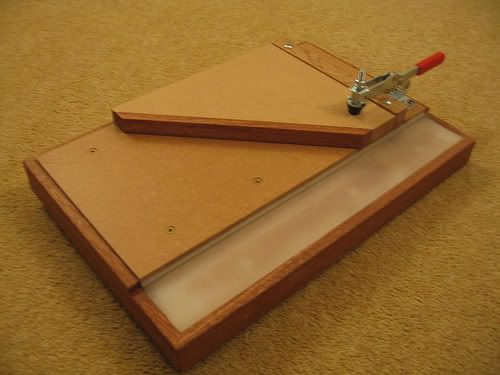
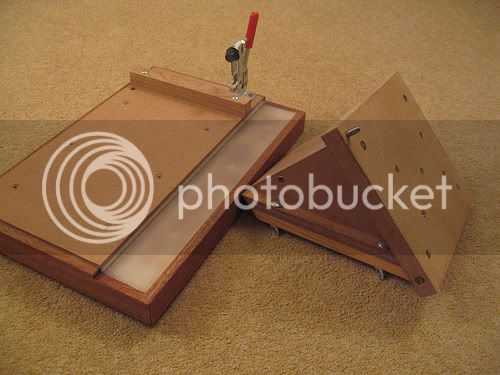
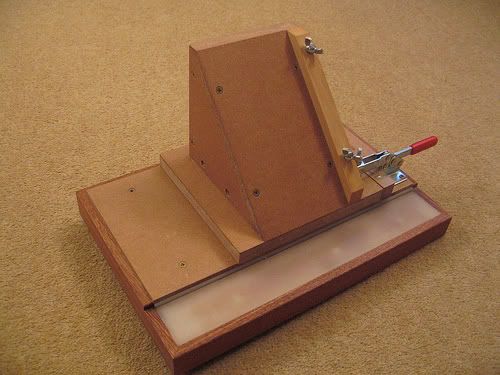
Cheers :wink:
Paul


Cheers :wink:
Paul
Similar threads
- Replies
- 14
- Views
- 1K
- Replies
- 0
- Views
- 420
- Replies
- 17
- Views
- 1K


