Marking Knives

UKworkshop.co.uk

Help Support UKworkshop.co.uk:

This site may earn a commission from merchant affiliate links, including eBay, Amazon, and others.

danmcl

Established Member
Joined
5 Oct 2008
Messages
19
Reaction score
0
Okay, I realise this may be a very silly question but here goes

What's the benefit of a proper marking knife (apart from looking absolutely stunning etc.) over a replaceable blade in a craft knife? :roll:

<DISCLAIMER>
Yes I do want a marking knife, one of woodblokes (they are beautiful)
I've given up on pencils as they are fine for rough outdoor wood butchery (refuse to call what I did outside joinery) but I want to make nicer things.
I also want a marking gauge Oh and a PONY
 
OLD":29gx6vnv said:
Single bevel its more accurate but you may need both left & right knives.

Damn, so now I need two of them...

Any instructions on how to make one yourself? or is it one to work out on your own?
 
Easy enough to make as in the the link above. To make them as I do though, a lathe is moderately useful :wink: - Rob
 
I made mine using a narrow paint scraper with a wooden handle (looks better) of about 30mm. Put an angle on it then ground an edge on one side. Took minutes and I find it works well.
 
One option is to use one of the excellent blades that Ron Hock makes, as I did for one of mine.

3040811627_0bfec629a0.jpg


Since I made this Ron released a narrower one. This type of knife is suitable for larger joinery, where a thin blade is not needed, such as marking our tenons for instance. It feels great to use and doesn't roll off the bench.

For dovetails I use a Blue Spruce small marking knife which is also excellent.

Cheers, Ed
 
As an alternative to the blade shown in Ed's pic, I used a bit of old HSS planer blade to make a knife, similar sort of idea with the side cheeks epoxied in place - Rob
 
For very careful work, the shape of the knife's incision can be important.

When striking a shoulder line, one face of the incision's vee should be at right angles to 'keep' part of the workpiece.

I suppose you can get this by sideways inclining a Stanley knife blade or some such, but it is better to have a thick blade with a wide bevel on one face. The wide bevel makes it easier to see how far to tilt the knife.

Most shop marking knives have the bevel ground on the right-hand side, but I argue for the left.

Jeff
 
Jeff Gorman":q7p5adn0 said:
For very careful work, the shape of the knife's incision can be important.

When striking a shoulder line, one face of the incision's vee should be at right angles to 'keep' part of the workpiece.

I suppose you can get this by sideways inclining a Stanley knife blade or some such, but it is better to have a thick blade with a wide bevel on one face. The wide bevel makes it easier to see how far to tilt the knife.

Most shop marking knives have the bevel ground on the right-hand side, but I argue for the left.

Jeff

I actually understand what you mean! :shock:

So this would be doubly important for a double bevelled knife?

Hmmm, am thinking about getting myself an old plane blade and chopping it up to make a few of there (or maybe just buying the Ron Hock ones and making a handle...)
 
EdSutton":21f3imre said:
One option is to use one of the excellent blades that Ron Hock makes, as I did for one of mine.

3040811627_0bfec629a0.jpg


Since I made this Ron released a narrower one. This type of knife is suitable for larger joinery, where a thin blade is not needed, such as marking our tenons for instance. It feels great to use and doesn't roll off the bench.

For dovetails I use a Blue Spruce small marking knife which is also excellent.

Cheers, Ed

I also use the Ron Hock marking knives, they come as blank blades with pre-drilled holes for a handle. I secured handle cheeks with 4BA bolts, going through a thin cheek, and threading into a tapped hole in a slightly thicker cheek on the other side. This means I can easily remove the handle, which makes sharpening that bit easier.
 
bugbear":1vbzgfnt said:
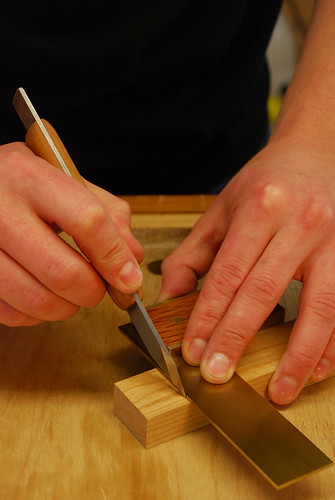
Nice photo!

BugBear

Thanks. It's one I took for an article in Furniture and Cabinetmaking a couple of years ago. As is usually the way with these things the photos I liked most didn't actually get used, so I find myself with an unusually large stock of pictures of my hands doing various woodworking operations.

Cheers, Ed
 
I did.

I usually use the self timer on these shots, although it feels very odd to be posing waiting for the shutter to click, they usually come out looking OK. Occasionally I use a remote control with my Nikon D80, but obviously you need a spare hand, or some other means of pressing the button, so its not that helpful.

The other complication is focussing the shot when your hands are not there, so I usually put something in shot where my hands will be and focus on that, before pressing the shutter release.

Cheers, Ed
 
EdSutton":26mbhhvk said:
I did.

I usually use the self timer on these shots, although it feels very odd to be posing waiting for the shutter to click, they usually come out looking OK. Occasionally I use a remote control with my Nikon D80, but obviously you need a spare hand, or some other means of pressing the button, so its not that helpful.

Hmm. It sounds like a foot operated release would be quite handy for these shots, although I'm well aware that Alf has managed rather splendidly on only a self timer.

BugBear
 

Latest posts

Back
Top