March Challenge - PLEASE POST YOUR ENTRIES HERE

UKworkshop.co.uk

Help Support UKworkshop.co.uk:

This site may earn a commission from merchant affiliate links, including eBay, Amazon, and others.
Status
Not open for further replies.

henton49er

Established Member
Joined
16 Sep 2010
Messages
1,241
Reaction score
1
Location
Beautiful, but wet, Mid-Wales
PLEASE POST YOUR ENTRIES FOR THE MARCH CHALLENGE HERE.

Challenge Requirements: Smaller than a matchbox
This month’s rules are:-

The Challenge is open to anyone and everyone
Your entry must be new and made specifically for the Challenge
Entries must be turned on a lathe using woodturning tools.
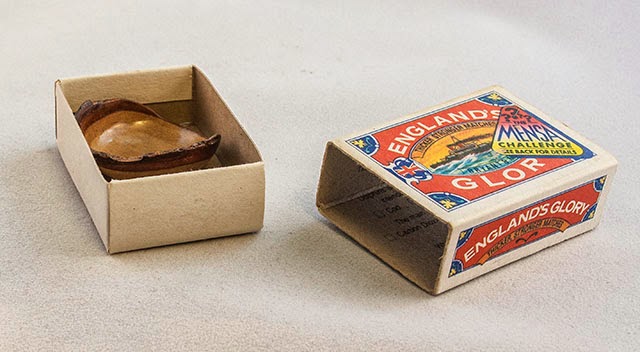
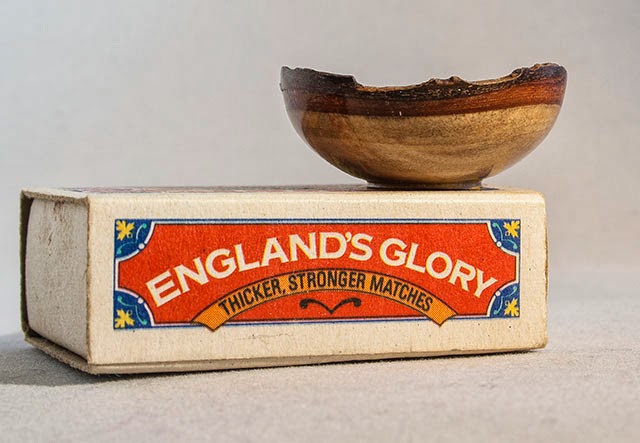
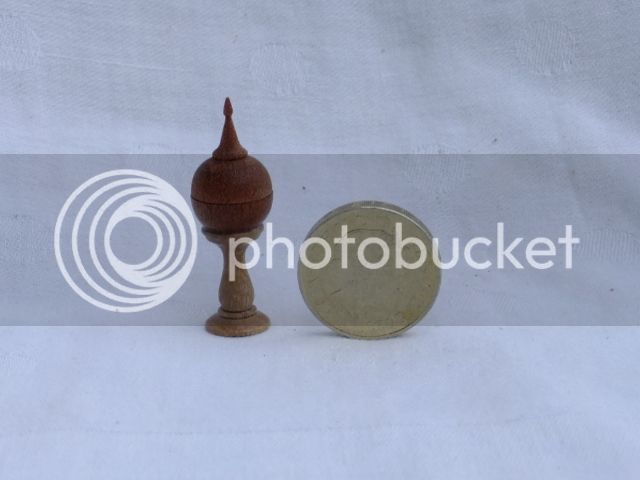
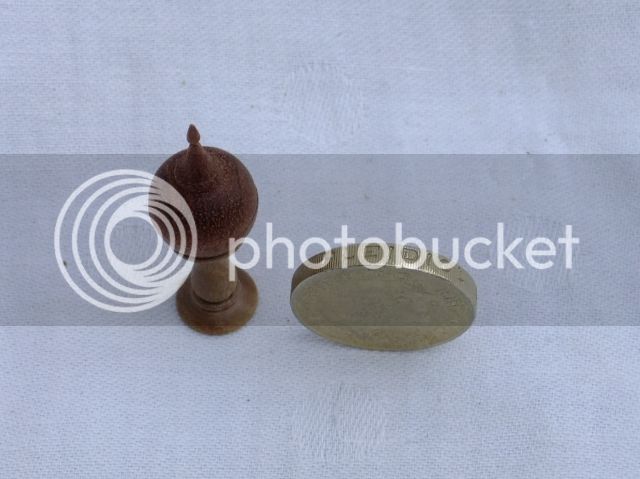
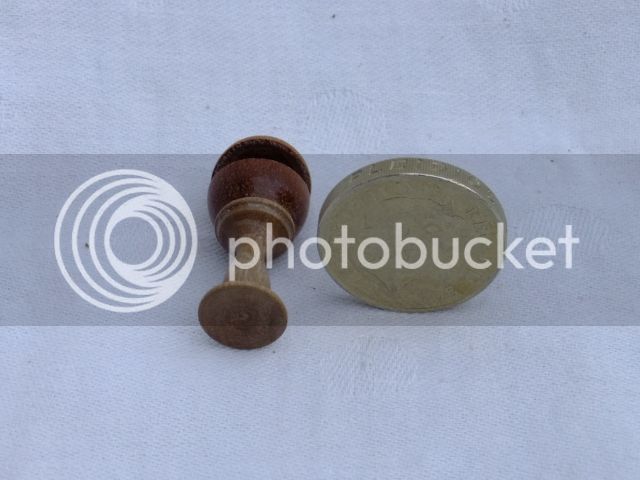
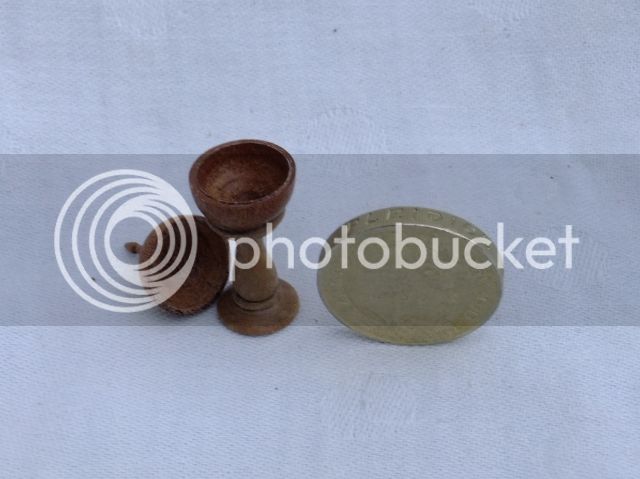
The maximum size allowed for your turning(s) is a matchbox size (defined as 15mm by 35mm by 50mm maximum dimensions :shock: :shock:). If you submit more than one item, all items must fit together within the maximum dimensions. (e.g. a miniature cup and saucer must still fit within the maximum dimensions with the cup sat on the saucer; a pair of items can each be 50mm high, but when stood side by side can only be 35mm wide in total and 15mm deep in total; you can see that a bowl can at most be 35mm in diameter and 15mm high to comply with the dimensions)

No decoration, colouring, piercing, adornment, pyrography or texturing is allowed. We want to see your turning abilities!! Beads, coves etc are a normal part of woodturning and are acceptable.

Please post 3 images of your work along with a brief note about how you made it, what tools and finish you used, what wood you used and the object’s dimensions etc.

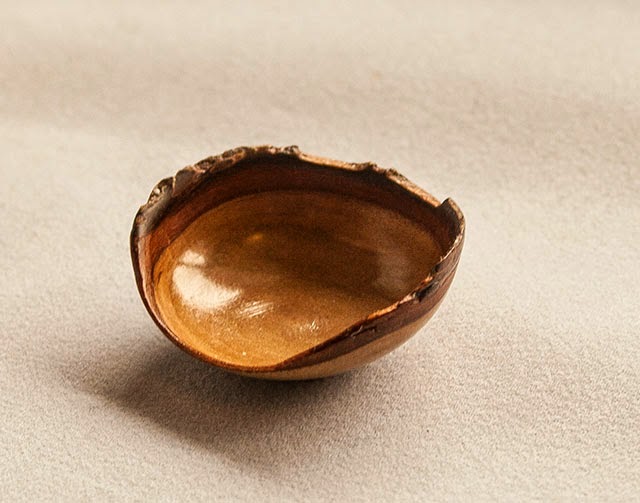
1 showing a general view
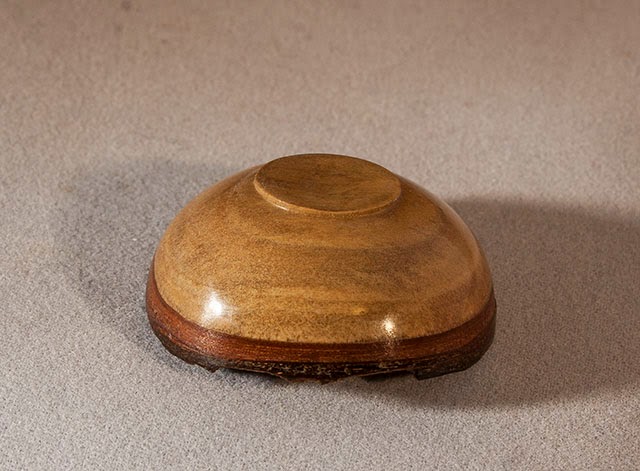
1 showing a top view
1 showing a bottom view
A fourth photo may be provided to show any particular feature of your entry (optional)

As the items being turned are small, close up photos will be required such that the items sensibly fill the photograph area. Please include a readily identifiable item in your photos as a guide to size (e.g. part of a tape measure or a 20p coin). [Hint: if your camera does not do close-ups, try photographing at a larger image size and then cropping the image to the required size so that your entry fills the image submitted.]. In the February Challenge some entrants posted more than the required three pictures. [-X [-X [-X Please keep to the required number for fairness to all entrants!!

Image size - please use image size 640 x 480 0.3 mp, as in previous challenges

Please upload your pictures and description between 10pm on the 27th March and 10pm on the 29th March.

Please also send me a PM giving me your own opinions of 1st, 2nd and 3rd places amongst the entries (other than your own) between 10pm on 29th March and 10pm on 31st March (for me to compile the entrants’ scoring).

Roundup
 
Steam engine measuring 15 by 35 by 50, the coin is a Canadian 2 dollar and measures about 28 mm. Body and stack in maple, wheels in black walnut and roof and supports in some red stuff left over from a pool cue shortening. Body was drilled for fender holes before turning and then cut down to 15 by 15 and then turned down and drilled for roof supports and then shortened. Wheels done by turning a dowel first and then drilling with forstner bits on the lathe and using parting tools to make the space. Roof supports are just turned dowels glued into the body and sanded to the right angle to fit the roof. For the roof , basically I turned a piece of thin walled pipe and then cut a section out and fit and glued it into place. I used different color woods and clear spray lacquer to get the colors. I used parting tools, skews and spindle gouge for this. Thanks to all, this took as much time as anything so far on this challenge but was a lot of fun.
 

Attachments

  • P1020199.JPG
    P1020199.JPG
    156.9 KB · Views: 2,552
  • P1020200.JPG
    P1020200.JPG
    159.6 KB · Views: 2,552
  • P1020201.JPG
    P1020201.JPG
    168.1 KB · Views: 2,552
One of the hardest challenges I have attempted so far.

I decided upon a box, but also to incorporate segmentation using Walnut and sycamore. Tools used, skey, parting tool small spindle gouge.
I started with a 50mm x 50mm x100mm of each wood and cut off 7mm thick slices lengthways from both pieces. These were glued alternately and clamped. Next day it was again sliced into 7mm slices at an angle. Every other was reversed to give a chevron pattern again glued and cramped. Next day the block was squared up and glued to a glue chuck.
The 35mm cylindrical shape was formed, and the end 30mm was sanded, sealed and polished. The lid was cut off at 6mm. This was mounted in a jam chuck and the 4mm recess formed inside the lid and the rim finished to leave a 5mm lid. The base was hollowed to 10mm and a 2mm rim formed to marry to the lid. The box was parted at 14mm. This was mounted on a spigot and the base finished to give a 10mm box with a 2mm lip. The finished box is 34mm diameter and 15mm high, split at 10mm and 5mm.

closed.jpg


half.jpg


top and bottom.jpg


open.jpg
 

Attachments

  • closed.jpg
    closed.jpg
    107.6 KB · Views: 2,531
  • half.jpg
    half.jpg
    134.4 KB · Views: 2,531
  • top and bottom.jpg
    top and bottom.jpg
    128 KB · Views: 2,531
  • open.jpg
    open.jpg
    133.9 KB · Views: 2,531
Wood is Osage orange - a hard American wood that holds detail well. Mostly used a couple of gouges. Measures 40mm tall by 15mm diameter. Finished with sanding sealer to bring out the grain, and paste wax.
 

Attachments

  • image.jpg
    image.jpg
    103.7 KB · Views: 2,527
  • image.jpg
    image.jpg
    105.7 KB · Views: 2,527
  • image.jpg
    image.jpg
    118.8 KB · Views: 2,527
  • image.jpg
    image.jpg
    89.8 KB · Views: 2,527
I found this very tricky too. In hindsight, choosing a piece of plum burr full of holes to try and turn something really small wasn't the best idea - it was something akin to trying to turn a digestive biscuit, although I was pleased with how it came out since it's only the second box I've made (after one slightly bigger practice go). Used a spindle gouge, scraper and parting tool. Turned the inside of the lid first then parted that off and turned the tenon, used this to hold the lid to finish the top. Then removed the lid and finished the inside, parted off the base then hand sanded off the nub. Finished with shellac and wax. It measures 35mm wide by 15mm.

rsz_side1.jpg


rsz_top.jpg


rsz_bottom1.jpg


rsz_inside.jpg
 

Attachments

  • rsz_top.jpg
    rsz_top.jpg
    58 KB · Views: 2,502
  • rsz_inside.jpg
    rsz_inside.jpg
    54.1 KB · Views: 2,502
  • rsz_side1.jpg
    rsz_side1.jpg
    42.3 KB · Views: 2,502
  • rsz_bottom1.jpg
    rsz_bottom1.jpg
    44.8 KB · Views: 2,502
I also found this months challenge tricky. Not so much the turning but rather what to make. Just went brain dead on ideas. In the end, it was the match box that sowed the seed and I decided to make a couple of (deliberately different) mocked up matches. Ash. Dimensions are small enough to fit in a regular small size matchbox. Skew, 1/4" spindle gouge. Finished just with sanding sealer.
 

Attachments

  • March comp 4.jpg
    March comp 4.jpg
    141.5 KB · Views: 2,495
  • March comp 1.jpg
    March comp 1.jpg
    128 KB · Views: 2,495
  • March comp 3.jpg
    March comp 3.jpg
    237.3 KB · Views: 2,495
  • March comp 2.jpg
    March comp 2.jpg
    236.9 KB · Views: 2,495
Like most I found the most challenging part this month was what to make.
I started by making a chess pawn from a bit of ebony left over from the Priest. Unfortunately my parting off was not too good so I decided to do a small goblet also from the ebony.

It is 15mm Dia by 32mm tall. I used a cheap set of mini chisels I got before I even had a lathe but they seemed to cope with the task ok. I only had a square scraper, angled scraper and a 1/4 spindle gouge. I hollowed the goblet with an 8mm drill in the tail stock then turned it further to about 13mm using the spindle gouge. I then turned the outside profile with the gouge and finished with the square scraper. once parted off I removed the small nub on a sanding disk in the head stock.

Don't hold out much hope having seen some of the other entries. But as has been said I have learned from the challenge so its not wasted time.
mini1.jpg

mini2.jpg

mini3.jpg


Looks so much rougher in the pics than it does to the naked eye.
 

Attachments

  • mini1.jpg
    mini1.jpg
    176.6 KB · Views: 2,486
  • mini2.jpg
    mini2.jpg
    161.7 KB · Views: 2,486
  • mini3.jpg
    mini3.jpg
    160.9 KB · Views: 2,486
From little acorns ...

Dimensions (as displayed) 15 x 34 x 47 mm

This shows two acorns sprouting into oak trees and is, not surprisingly made from oak. The taller (older) tree is a single turning while the smaller one is two turnings with the acorn / tree section sitting on a separate base. This was, of course, a deliberate design feature and nothing whatsoever to do with any sort of breakage .....

Used a variety of skews, 8mm spindle gouge, thin parting tool and a small drill bit in a Jacob’s chuck. The finish is natural, sanded with 400 grit (though as procell says the macro photos don’t do it any favours - it's not as rough as it looks in real life!).
 

Attachments

  • Acorns_top.jpg
    Acorns_top.jpg
    212 KB · Views: 2,453
  • Acorns_bottom.jpg
    Acorns_bottom.jpg
    123.9 KB · Views: 2,454
  • Acorns_tall.jpg
    Acorns_tall.jpg
    79.5 KB · Views: 2,453
  • Acorns_general.jpg
    Acorns_general.jpg
    167.9 KB · Views: 2,453
A ringed goblet in bubinga.

All done with a 1/4" spindle gouge and a skew for the lines, 320 and up abrasive and a coat of MC wax.
My ring is not as ringular as I'd like but I chickened out when sanding as I did not want to break it :oops:


2014-03-28 09.51.08.jpg


2014-03-28 09.48.41.jpg


2014-03-28 09.58.03.jpg


2014-03-28 10.29.47.jpg
 

Attachments

  • 2014-03-28 09.58.03.jpg
    2014-03-28 09.58.03.jpg
    96.8 KB · Views: 2,449
  • 2014-03-28 09.48.41.jpg
    2014-03-28 09.48.41.jpg
    99.5 KB · Views: 2,449
  • 2014-03-28 09.51.08.jpg
    2014-03-28 09.51.08.jpg
    94.8 KB · Views: 2,449
  • 2014-03-28 10.29.47.jpg
    2014-03-28 10.29.47.jpg
    99.2 KB · Views: 2,449
I'm disqualifying myself straight away this month. I didn't read the brief properly, and mine is too big. This "pill box" measures 42mm wide by 12mm high, so over the 35mm diameter limit. Doh!
I had a scabby iPhone photo of it with a 10 bob bit on it, but can't seem to find it. So
This is from the top, using a tea bag for scale. It was all I could find at the time with a fairly uniform size.... :D
top on teabag.jpg

and a view of the inside
inside.jpg

and one of the bottom.
bottom.jpg

I had one showing the grain match on the side too, but that would break the 3 fotie rule too.
I decided to post it here anyway, even though it can't be considered, because I'm particularly pleased with the result.
Finish is 2 coats of melamine lacquer wiped on.
 

Attachments

  • bottom.jpg
    bottom.jpg
    46.1 KB · Views: 2,365
  • inside.jpg
    inside.jpg
    48.7 KB · Views: 2,365
  • top on teabag.jpg
    top on teabag.jpg
    51.1 KB · Views: 2,365
I too found that picking a subject was half the challenge! In the end I decided to go with something fairly simple as that gave me the better chance of getting a reasonable item. I decided that a natural edged bowl would be the subject and the timber used is Pearwood. The finish is Shellac. I used a 3/4 roughing gouge and a 3/8 spindle gouge for the whole thing.


Challenge-03-14-1.jpg


Challenge-03-14-2.jpg


Challenge-03-14-4.jpg


Challenge-03-14-6.jpg
 
Wow! Found this challenge very, err well..., challenging.

Decided to go for a simple jewellery set of a ring, pair of earrings and a pendant. All from an off-cut I had lying around that I think is Padauk.

Everything was finished by sanding up to 400 grit, sealed and a coat of wax. The ring was initially drilled out at 16mm on the lathe and then open out to 18mm using a scraper, then mounted onto a jam chuck for the outside which was done with a skew. Earrings and pendant were shaped using a skew, finished and then parted off. The backs of the earrings and pendant were finished using double sided tape to mount onto the face of a scrap piece of pine on the lathe, sanded and waxed.
 

Attachments

  • matchbox.jpg
    matchbox.jpg
    204.7 KB · Views: 2,341
  • side.jpg
    side.jpg
    121.9 KB · Views: 2,341
  • back.jpg
    back.jpg
    208.1 KB · Views: 2,341
  • top.jpg
    top.jpg
    204.9 KB · Views: 2,341
Hi I found this hard, as I have no micro tools. But after some practice with different Ideas I think this was the best.
100_1747.JPG
100_1751.JPG
100_1758.JPG
100_1767.JPG
 

Attachments

  • 100_1747.JPG
    100_1747.JPG
    63.3 KB · Views: 2,327
  • 100_1751.JPG
    100_1751.JPG
    61 KB · Views: 2,327
  • 100_1758.JPG
    100_1758.JPG
    71 KB · Views: 2,327
  • 100_1767.JPG
    100_1767.JPG
    65.7 KB · Views: 2,327
OK here goes made from the scrap box, Mahogany and Olive wood. Tools used 1/4" spindle gouge and 1/2" skew chisel The fun part was getting the bead to scale of the piece
The box stand turned first nothing really to explain as this was no more than normal spindle turning the bead was the most fiddly part as I wanted this to be in proportions to the rest.
The box part was rough turned and parted in the middle so that the grain would match up. I then turned the lower inside first and then the outer with out parting off, the lip for the top to register was also turned this was a very fine lip just enough to hold the lid.
Now this was parted making sure that it followed the contours of the stand. The bottom was glued to the stand making sure that it was level. Now attention was put to the lid this was reverse chucked so the parted off section faced out, the lid is hollowed to match the bottom part along with the lip, the outside of this part was to match the bottom outer and also shaped working down to the finial part this had to be done with a very steady hand the skew chisel comes into its own here very light cuts are needed to finally shape the finial and part off with a taper.

It measures 38mm tall and at the widest point it is 13mm

Sorry for bad photo's

DSCF3020_zpsccdc6c63.jpg


DSCF3021_zpse63a6463.jpg


DSCF3022_zps449a22f4.jpg


And my optional photo of the box without the lid on

DSCF3023_zps94fcadf1.jpg
 
My effort at this month's challenge is a small lidded box, I'm not quite sure what the wood is? it was turned green which is why the lid doesn't fit very well and it's not quite cylindrical anymore. I used a 6mm gouge for most of it and drilled an 8mm hole using a pillar drill. Sanded to 400 and MC wax applied after a week or so to let the wood dry out a bit. It measures 15mm diameter and 30mm tall.
 

Attachments

  • mc01.jpg
    mc01.jpg
    38.8 KB · Views: 2,272
  • mc02.jpg
    mc02.jpg
    45.8 KB · Views: 2,272
  • mc03.jpg
    mc03.jpg
    44.8 KB · Views: 2,272
Status
Not open for further replies.
Back
Top