Infill smoother restoration

UKworkshop.co.uk

Help Support UKworkshop.co.uk:

This site may earn a commission from merchant affiliate links, including eBay, Amazon, and others.

JIJ

Established Member
Joined
29 Sep 2011
Messages
56
Reaction score
0
Location
N. Yorkshire
Hello all,

I bought a joblot of 6 rusty planes on eBay, 5 were bailey types and hidden at the end was a Scottish infill.


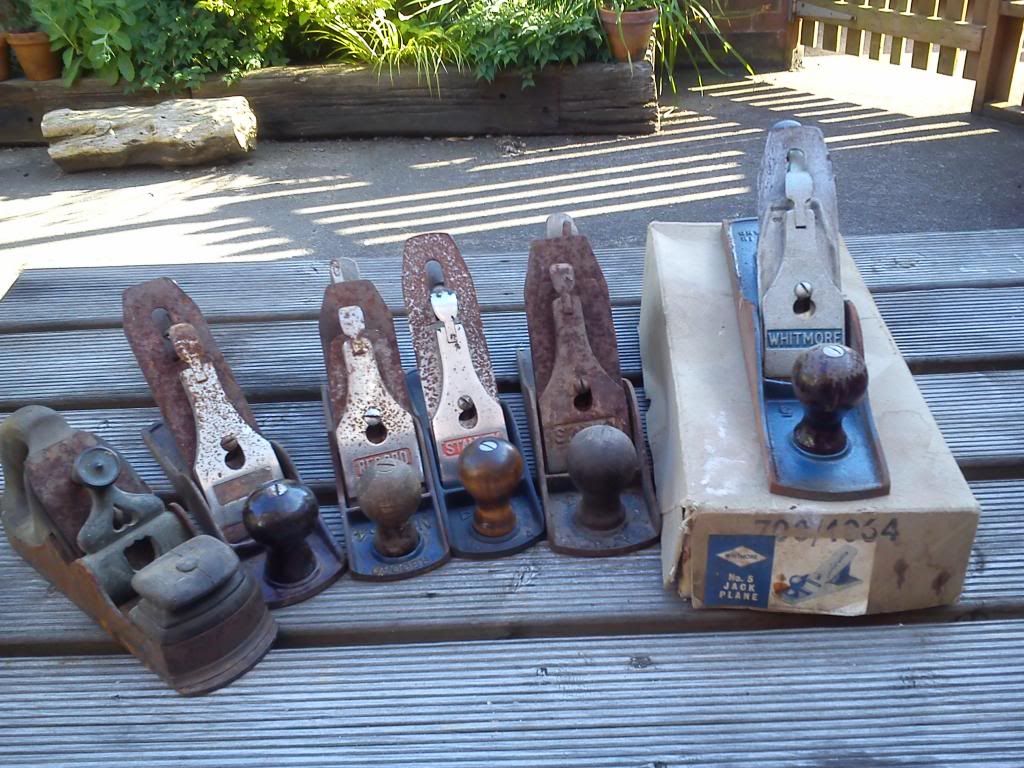
This is the planes as received.


I'm not familiar with infillls, I thought the mouth looked wide but it's not the case.


The heart and shield lever cap. Or curvy girls bum and shield as I see it., like an optical illusion.


The front bun has a crack and is loose. It would still be useable but I had a go at fixing it anyway.


I suspect the top of the handle has been damaged at some point. It seems to have been filed back to its curent form.The lever cap screw is bent too but still functions. I bet whoever dropped it was cursing themselves.


I've ordered some renaissance wax that I'm still waiting for. £13.60 for 200ml fromyandles, seems like a good price. Well it will be if it turns up

James
 
I'll be watching this one with great interest, thanks for sharing.

Good news the sole looks a lot better in the above compared to the ebay pics.

Congratulations again on a well spotted bargain =D> =D> =D>
 
Thanks Mr P,

Yes, it looks better in the flesh than it did in the eBay pics, was a nice surprise. I've given the plane a quick rub over with 600 wet and dry and it's cleaned up very well.
 
Here's a before and after picture of a infill smoother sole I'm currently working on.

before and after.jpg


That was the easy bit on my 1 metre long float glass.

The sides are proving more difficult especially where it meets the wooden infill.
 

Attachments

  • before and after.jpg
    before and after.jpg
    199.8 KB · Views: 1,132
The cap iron that came with it is 2" but a 2 1/4" seems to fit better, unfortunately I only have one that size and it seems too chunky to fit. The blade doesn't clear the mouth.

The mouth isn't quite straight, it's approx 1mm wider at one side than other, the blade will clear on wider side. I'm not sure where the problem is

Mouth not being straight?
Blade too thick? Is 5mm unusual?
Cap iron not sitting flush against blade? See rubbish pic below. Seems the most likely but looks too symmetrical to be accidental. Top corners of cap iron are curled down, should I bend them straight?


James
 
Can't tell from the picture is the front of the mouth straight ?

Infills irons are a bit like bit like me, thicker is better. Is it tapered or parallel ? Parallel is best but often get replaced with cheaper tapered ones from wooden planes grrrr.

The cap iron is the problem I'd focus on, needs to make contact with the entire iron.

Give me a measurement in mm and I might have one from a derelict woodie.
 
Nice one James!

There seems to be a number of these neglected infills knocking about eBay hidden amongst other stuff lately!

Depending on the level of surface rust on the body I would go with rubbing it with half a lemon and then wiping off and repeat first. This will remove the rust without the patina coming off below.

Try that first...if it doesn't work you can move to more aggressive techniques.

The iron seems to be on its last legs anyway from the pictures you have shown.

I would look for a replacement iron on FleaBay...there are plenty around if you look. What is the width at the mouth?

Are you going to replace the infills?

Jimi
 
Very kind Mr P. It's 55 mm, but I should be able to straighten it. I've compared it to my others and can see the difference. I'll do some hammering/ filing tonight.
Afraid it is a tapered iron from a woody but it doesn't have to be permanent, just to get it working.


The mouth is a tad over2 1/4".
I've got the front bun out now as it was a bit loose. Needs a crack gluing and refitting. I took over an hour to get one screw out, trying not to damage it.it turned out(pun intended) to be bent. I found a suitable replacement anyway.
Thanks for tip about lemons. Reminds meI have some vinegar alreadyl I can try. I guess 5% acetic should be about same pH as citric acid.

I'll leave the rear infill, it's solid and comfortable.

James
 
I've managed to get the cap iron to fit correctly and have worked out a solution to the blade catching on the front of the mouth. WhenI checked the angle of the primary bevel it was 28 degrees. I reground it to 24 degrees and this has just given it enough clearance to fit through the mouth. I've glued a crack in the front infill and refitted that so it's good and firm. I flatten the sole too, but it didn't need much work at all. Just waiting for renaissance wax to be delivered to finish it.

James
 
Great work and quick.

Guess the internals were pretty easy to sort once the front bun was out ?

Would of thought vinegar would be OK, I've also heard about rhubarb and brown sauce but that might just be for polishing silver.

Safest bet if you do try it, don't leave it on too long and make sure you neutralise after with lashings of oil.

Disclaimer: I've never tried any of the above.
 
It's all been fairly straightforward. If I was more adventurousI could have tried replacing the infill, maybe one day.

I tried the vinegar but must'nt have left it long enough, it didn't have much effect. I've had some success using it to clean up old chisels before so it can work. I've got high hopes for the microcrystaline wax. Andy showed some before and after pictures when using it that we're pretty impressive. Hopefully it'll arrive tomorrow.


Here's the finished plane. I'm happy with it. It cuts well, left a great finish on some tough oak. I could have spent a bit more time cleaning it up but I was a bit overly concerned about removing the patina.

James
 
JIJ":1n7fef7b said:


Here's the finished plane. I'm happy with it. It cuts well, left a great finish on some tough oak. I could have spent a bit more time cleaning it up but I was a bit overly concerned about removing the patina.

James

Good job there mate.
Glad you left the front infill.
Why not replace the read infill? Looks horrible like that and can't be comfortable can it?
Or cut the tote of and custome to a open handled one, mortice a new tote in place.

TT
 
I think you have done an absolutely perfect job there James.

You have retained the aged patina but made it clean and rust free so that is the optimum.

Given that it was a bit of a state in the first place you have a great user there and if you are comfortable with the rear handle damage then it's not necessary at all to replace the infills.

Unfortunately mine was a little bit more beaten up so there was no option and that sort of handle is not the one to start practicing on mate..trust me on that one! :mrgreen:

Most excellent!

=D> =D>

Jimi
 
Very nice job and thanks for sharing.

I'm with you: If it's comfy and works, why fix it ?

Toby,
Eye of the beholder and we don't all have Jim's experience/skill.
 
Thanks for the kind comments,

I was in two minds about the infills but decided against it for now. It may happen in future, it seems comfortable enough to me although I haven't used it for any extended period. It turned into a pretty quick, just get it useable restoration. Although now I've done my first one I may be more willing to have a go next time

James :D
 
Back
Top