chippypah
Established Member
Hi Everybody,
I have not done any green woodturning for a number of years now, so I thought it was about time I did. Somebody kindly gave me two pieces of plum that had been chopped down last week. The piece that was used for this project was 15 x 8 inches, and weighed in at 10.10 kg ( 22 lb 4.2 oz). Fortunately the tree was felled just in time as it had not started to draw sap, so although green it was not soaked.
This piece promised to be a nice coloured bit, and when mounted on the lathe the bark was removed to roughly get it round. It was noticed then that there was a large amount of sap wood, although in itself it was not a problem but I hoped for a bit of colour.
Now I am not sure how other people do green turning, but I find this way a great challenge and a lot of fun. Unlike dry turning I start on the inside first, this really tests your turning ability as you are shaping the inside by the feel of the chisel alone. It is like blind woodturning, as you can not see what you are removing only the sound and feel tells you the shape that is being made. As with any hollow form constant stopping and clearing out the shavings is vital, the last thing that you want is the chisel jamming inside. To make life a bit easer I use a saw tooth cutter to bore down as far as I can, this just saves cutting everything out with the chisel. As for the shape I thought it would be nice to make a table lamp, so the shaping was done for this. One important thing is that if like me you are not going to complete in one day, then at the end of the day cover with a plastic bag to keep in the moisture and help prevent cracking, it is not so bad at this time of year when the temperatures are lower. When the inside is shaped as you want it, now is the time to sand down and seal the inside. This is done because as you will see later on it is more difficult to finish the inside.
At this point of sanding it was impossible to get my hand inside, so a good idea is to get some plastic pipe that will fit in easily. If you make a cut lengthwise in the pipe with a saw, then it an easy to slide a piece of sandpaper down the cut. One important thing it to put the sandpaper in the direction of rotation, as if you do not then it grabs and rattles about (yes I forgot and it made me jump to put it mildly).
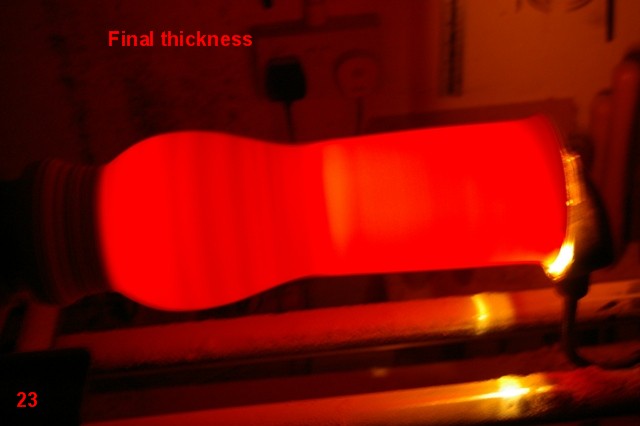
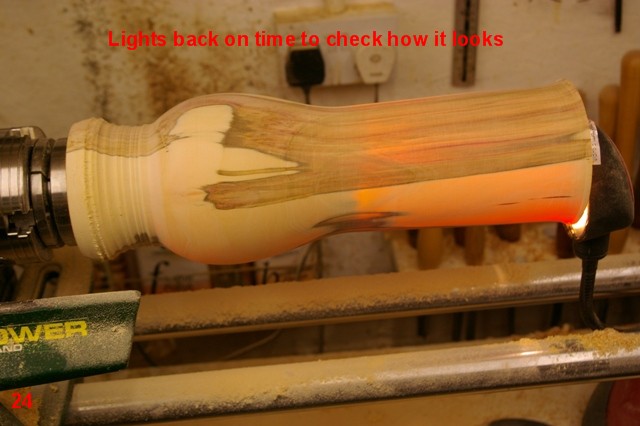
Now comes the real fun bit, firstly roughly shape it. Then for the next process you will need a very bright light, for this I use a halogen desk light. This is shined in the end of the piece, as close as possible as you want all the light to shine inwards. Next step is to turn the lights out in the shop with the door shut so as it is as dark as possible. It is also useful to have a light on the lathe as well, so you do not fall over anything when getting back to the lathe. When you are ready chisel in hand and lathe running turn out the lathe light, at this point you will be able to see a slight glow from the turning. Now very carefully start to remove the outside wall to get a uniform colour coming through. When you have got to this stage you can start to gently remove more from the wall, the colour will change from a very dark red to almost yellow or almost white. When you have gone to the yellow stage all over, stop the lathe and turn the light back on and you will see how thin the outside wall is. As long as the colour is uniform throughout the turning then the thickness will be uniform, and you will greatly reduce the chance of any cracks appearing when it totally dries out. If you are happy with the thickness then very lightly sand and finish the turning.
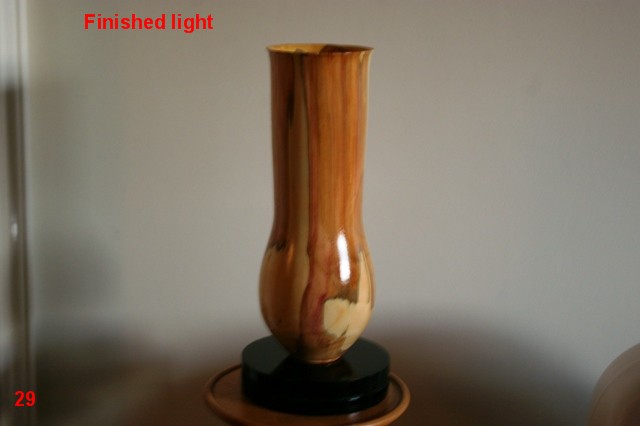
The piece that I made as I said is to be a table light, so was taken as thin as possible then the light will show through. The base of my light was made from a piece of beech and was routed out for the cable to be hidden, and the turning was mounted on the plinth.
To give you some idea of how much material was removed as I said earlier the starting weight was 10.10 kg (22 lb 4.2 oz), and the finished shade was 254 grams (9 oz).
Cheers
Pete
http://farm4.static.flickr.com/3101/261 ... 9509_o.jpg
![url]](https://proxy.imagearchive.com/b81/b817cd1967f26c9c733c57eb30762f5b)
http://farm4.static.flickr.com/3270/261 ... 0632_o.jpg
![url]](https://proxy.imagearchive.com/32a/32ad7321dc16776fcec5ccf0ed7b08df)
I have not done any green woodturning for a number of years now, so I thought it was about time I did. Somebody kindly gave me two pieces of plum that had been chopped down last week. The piece that was used for this project was 15 x 8 inches, and weighed in at 10.10 kg ( 22 lb 4.2 oz). Fortunately the tree was felled just in time as it had not started to draw sap, so although green it was not soaked.
This piece promised to be a nice coloured bit, and when mounted on the lathe the bark was removed to roughly get it round. It was noticed then that there was a large amount of sap wood, although in itself it was not a problem but I hoped for a bit of colour.
Now I am not sure how other people do green turning, but I find this way a great challenge and a lot of fun. Unlike dry turning I start on the inside first, this really tests your turning ability as you are shaping the inside by the feel of the chisel alone. It is like blind woodturning, as you can not see what you are removing only the sound and feel tells you the shape that is being made. As with any hollow form constant stopping and clearing out the shavings is vital, the last thing that you want is the chisel jamming inside. To make life a bit easer I use a saw tooth cutter to bore down as far as I can, this just saves cutting everything out with the chisel. As for the shape I thought it would be nice to make a table lamp, so the shaping was done for this. One important thing is that if like me you are not going to complete in one day, then at the end of the day cover with a plastic bag to keep in the moisture and help prevent cracking, it is not so bad at this time of year when the temperatures are lower. When the inside is shaped as you want it, now is the time to sand down and seal the inside. This is done because as you will see later on it is more difficult to finish the inside.
At this point of sanding it was impossible to get my hand inside, so a good idea is to get some plastic pipe that will fit in easily. If you make a cut lengthwise in the pipe with a saw, then it an easy to slide a piece of sandpaper down the cut. One important thing it to put the sandpaper in the direction of rotation, as if you do not then it grabs and rattles about (yes I forgot and it made me jump to put it mildly).
Now comes the real fun bit, firstly roughly shape it. Then for the next process you will need a very bright light, for this I use a halogen desk light. This is shined in the end of the piece, as close as possible as you want all the light to shine inwards. Next step is to turn the lights out in the shop with the door shut so as it is as dark as possible. It is also useful to have a light on the lathe as well, so you do not fall over anything when getting back to the lathe. When you are ready chisel in hand and lathe running turn out the lathe light, at this point you will be able to see a slight glow from the turning. Now very carefully start to remove the outside wall to get a uniform colour coming through. When you have got to this stage you can start to gently remove more from the wall, the colour will change from a very dark red to almost yellow or almost white. When you have gone to the yellow stage all over, stop the lathe and turn the light back on and you will see how thin the outside wall is. As long as the colour is uniform throughout the turning then the thickness will be uniform, and you will greatly reduce the chance of any cracks appearing when it totally dries out. If you are happy with the thickness then very lightly sand and finish the turning.
The piece that I made as I said is to be a table light, so was taken as thin as possible then the light will show through. The base of my light was made from a piece of beech and was routed out for the cable to be hidden, and the turning was mounted on the plinth.
To give you some idea of how much material was removed as I said earlier the starting weight was 10.10 kg (22 lb 4.2 oz), and the finished shade was 254 grams (9 oz).
Cheers
Pete
http://farm4.static.flickr.com/3101/261 ... 9509_o.jpg
http://farm4.static.flickr.com/3270/261 ... 0632_o.jpg