Fun little project, help needed !

UKworkshop.co.uk

Help Support UKworkshop.co.uk:

This site may earn a commission from merchant affiliate links, including eBay, Amazon, and others.

stef

Established Member
Joined
16 Jan 2007
Messages
383
Reaction score
0
Location
Normandy
Evening people !
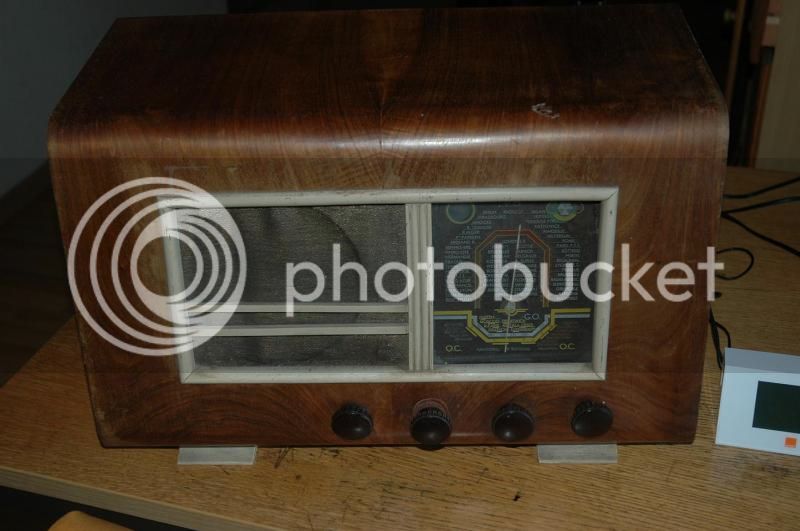
I have just undertook a small project, involving the modernising of this thing:


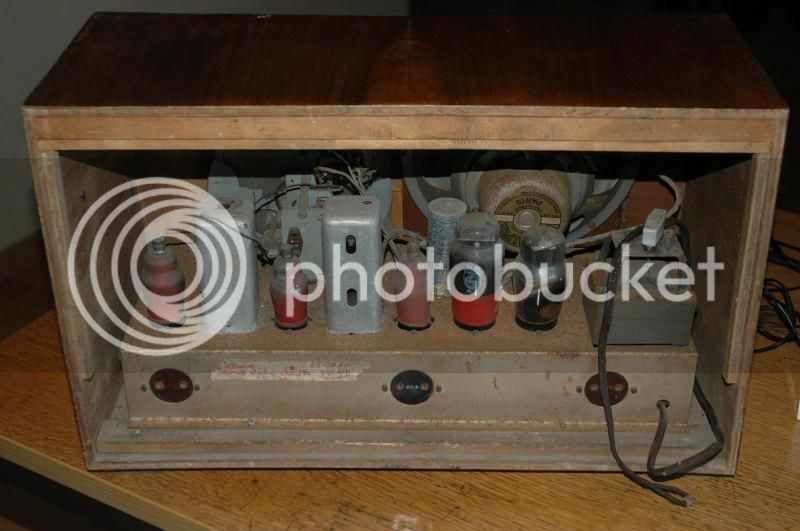
After refurbishing the cabinet, i intend to replace all the old electronics with a modern solid state amp(class AB, 35W), power supply, wifi, MP3 and possibly bluetooth smart phone connection.
I will have two speakers mounted on the sides for some sort of stereo sound
I would still like to keep the vintage appeal of the radio though.

I am going to have to make a new front, joining the two existing sections. veneer looks like wallnut, so i'll try to find a suiteable wallnut piece.
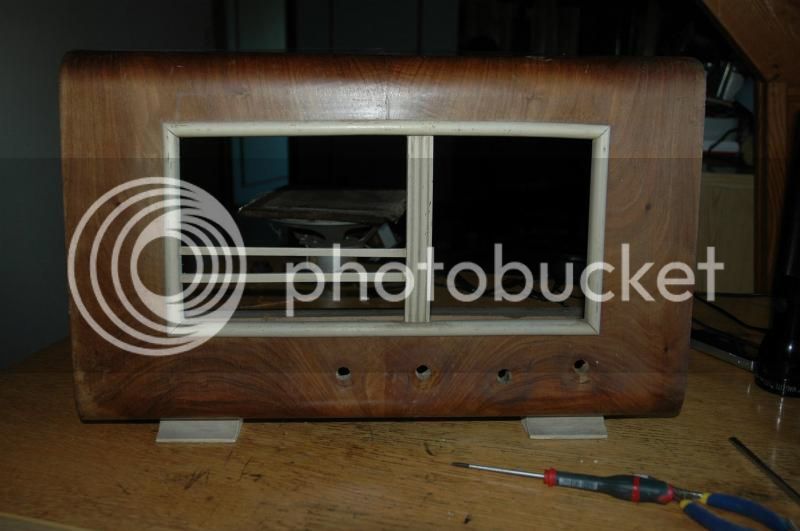
here is what the cabinet looks like as per today:


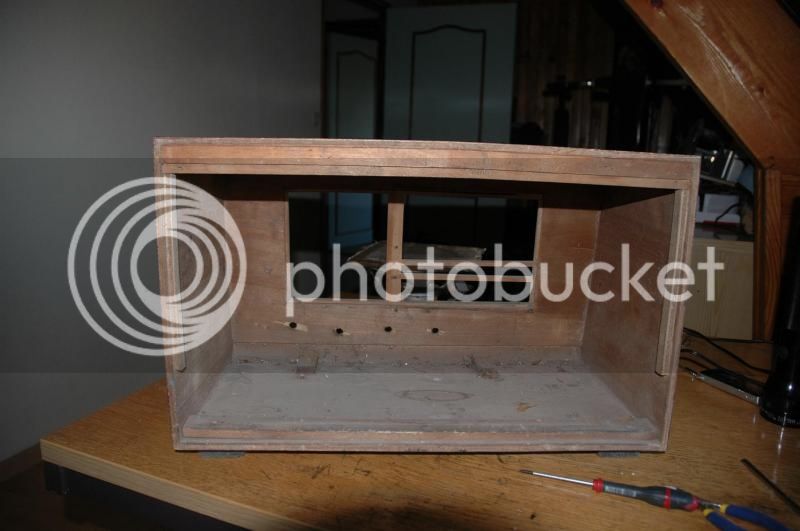
It is not so obvious on the pictures, but the ply supporting the veneer is a little bent, mostly visible on the top left of this picture:

basically, the top is not truly flat, it has a slight bowl in that corner, which i would like to rectify before doing anything else.
I am thinking soaked towels in a tray, placed inside the cabinet, and some sort of clamp to force the bowl straight.
would that work ?

once straighten, i was thinking of a good scrub with fine steel wool and alcohol, followed by a few coat of shellac...

what else could i do to improve on the finish ?
 
:D
I can understand your point of view, but as a practicing electronics engineer (and in RF, as it is), i can assure you that apart from the cabinet, there is nothing to salvage here.
It's just pile of burned lamps and capacitors and inductors badly put together. highly inefficient, and not very elegant. this is likely a "local" build, as there was thousands at the time. not rare, not pretty and not sounding too good either, i reckon. I paid 20 euros for it, which is probably 20 euros over it's real worth. apart from the variable cap which was on ball bearing, no other component was likely to pass an electron ever again.

So, i figured i will it do more justice as a token of yesteryears by giving it a new heart and having it rock again, rather than by letting it rot into oblivion.
 
Understood, it'll be interesting to see when you've completed the project.

I used to have a small collection on old valve/mains radios but when I moved to a smaller bungalow I no longer had the room for them. But, having said that, I'm a radio amateur and much of my main equipment is now pretty ancient. :)
 
Progress tonight: I cut a piece of strong ply and glue it on the inside of the cabinet, underneath the top, which i then braced and clamped to ge tit straight.
Before bracing, you could see the daylight between the top and the true flat surface of the aluminium.

afterwards, the top is truly flat.
Lets hope it stays that way once i remove the clamps !


quite some progress over the last few weeks:
i sanded down the cabinet, and routed the side openings, into wavy shapes:


followed by a few thin coats of varnish:


and fitting most of the new electornics.it's a simple stereo amp, 35W, based on twp TDA2050 chips. it has a 80W power supply, with a toroidal transformer. i still have a few big capacitors to connect, but most of the wiring is done.
The 3 font pots now control:
1, the audio source (jack plug, internal mp3 player to come, or bluetooth (futur upgrade).
2 , the amp volume
3, the output (internal HPs, headphone, or external HPs.

i had it runing for the first time tonight... pretty loud ! and the sound is... well, very vintage for now! (i didnt say rubbish !) so plenty of room for tweaking !


I still have to work out how i am going to close the front cavity. maybe with some routed logo and vintage cloth. we will see..
 
Hi Stef, only just caught up with this. Cracking job. Looks like you've done a good job with the varnish. I would have thought oil and wax, or dare I say it french polish, might have been a better way to go but if you have achieved a good finish with varnish then well done. I can't see and brush marks, did you spray it?
What no remote control?

regards

Andy
 
Very nice work, luckily I have no idea about electronics otherwise I would be adding another project to my long long list of things to make.
 
Loving it. Its nice to see people doing different things - especially resoration.
I enjoy the engineering challenges of that kind of thing.

Which reminds me, I need to start posting my next WIP here.
 
dedee":1jku4uu0 said:
Hi Stef, only just caught up with this. Cracking job. Looks like you've done a good job with the varnish. I would have thought oil and wax, or dare I say it french polish, might have been a better way to go but if you have achieved a good finish with varnish then well done. I can't see and brush marks, did you spray it?
What no remote control?

regards

Andy

no, it's painted on. i thinned the first coats with white spirit and hoped for the best ! it's actually "fond dur", which i translate as varnish, but it's not just that !
I was half tempted to use shellac and try a french polish, but i'd like to keep the radio outside, by the terrace (and oven) during the summer time, so the finish needs to be water(and alcool) proof !
remote control ? yes, the mp3, wifi streamer that i plan to install inside has a remote !
it's one of those orange HIFI decoder (basically a wifi media streamer) that i picked up in a yard sale for 5euros !
that defeat the point of installing a raspberry pie !
However, i am still not excluding the raspberry, because i really like the idea of the flexibility you can get with programming your own interface.
 
great idea and like the idea of a nice bit of furniture rather than a plastic box........ one of my mates is working on a project to fit a PC into a real Motorcycle crash helmet with remote visor lift to access the dvd player/writer, when its finished it will have a custom airbrushed finish so should look pretty cool on his desk. the monitor is very slim and keyboard wireless.
some very inventive people about!
 

Latest posts

Back
Top