SketchUp Guru
Established Member
Alright. I took time off from the SU Project to do this episode of the Friday SketchUp Tips. I have to do this early because I'll be unavailable on Friday.
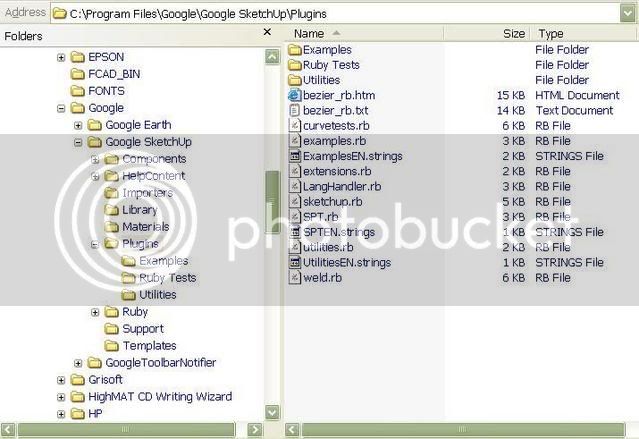
The first part of this has to do with drawing Bezier curves. This requires that you have a file called bezier.rb in your Plugins directory. If you don't see a Plugins menu when you have SU open, you also need to copy sketchup.rb from the Examples folder into the Plugins folder.
The tree view of your SketchUp directory should be something like this:
SketchUp
--Plugins
----Examples
------sketchup.rb
You want it to look like this:
SketchUp
--Plugins
----Examples
----bezier.rb
----sketchup.rb
----any other scripts you may have.rb
I hope that makes sense.
Click here: bezier.rb to get the script.
For the final part of this episode, you'll need weld.rb which is available via this link: weld.rb
Here's how to draw a Bezier curve. First, select the script from the Draw menu.

Next, choose the "Degree". (Note the VCB) I don't understand the reason for that term but it indicates the number of "spaces" between editable points on the curve. You can also think of it as the number of points not including the first one. The default setting for this is 3. If you want more points simply type the desired number and press Enter.
I've set the Degree to 5, started the curve at the origin dragged off to make the opposite end which is the second point you'll locate. I haven't actually set that point yet.

End points are set and I'm about to set point number three.

More points set. The straight lines are shown between the points you've set. You'll note the points do not fall on the curve.

After the last point is set the straight lines go away and you're left with the curve. Here I've turned on shadows. You can see that the curve is 3D and does not lie on a single plane. That's cool if it's what you want but if you are trying to draw the edge of a table top, this wouldn't be quite the thing.

This time I start with a face to draw on. Make it large enough so that all the points will lie on it. You can always erase what you don't need later.

Select the script from the menu. Set the Degree. Start clicking points.


Push/Pull gives it some thickness.

Next, I'm going to use Follw Me to add a profile to the curved edge. The first thing I do is use the Protractor tool to set a construction line that is 90° to the first segment in the curve. This is very important for Follow Me to work properly.

Then I draw out a face and add the features for the profile. In this case a simple arc.

Select the edge to be the path for Follow Me.

Choose the Follow Me tool, click on the profile and...

And from a different angle.

Now, for fun I'm going to do an Offset on the bottom and pull down as if this was the top to a corner cabinet or something.

Notice when I pull down the center area I have all these faces on the edge. This is because Follow Me breaks up curves into their individual line segments. The lines between them could be smoothed with Ctrl+Eraser tool but that could add a bunch of work.

Instead we'll use the Weld script to join all those line segments. First we select the segments of the curve. I double clicked on the inside face which selected the face and its bounding edges. Then, while holding the Shift key I clicked on the face and the two straight line leaving only the curve selected.

I select Weld from the Plugins menu.

A message box comes up asking if I want the curve to be closed. In this case I say no. If I chose Yes it would draw a line from one end of the curve to the other.

Another message box asks if you want it to find the face. I chose Yes. then I used Push/Pull again and you can see the result.

And again from another angle.

The first part of this has to do with drawing Bezier curves. This requires that you have a file called bezier.rb in your Plugins directory. If you don't see a Plugins menu when you have SU open, you also need to copy sketchup.rb from the Examples folder into the Plugins folder.
The tree view of your SketchUp directory should be something like this:
SketchUp
--Plugins
----Examples
------sketchup.rb
You want it to look like this:
SketchUp
--Plugins
----Examples
----bezier.rb
----sketchup.rb
----any other scripts you may have.rb
I hope that makes sense.
Click here: bezier.rb to get the script.
For the final part of this episode, you'll need weld.rb which is available via this link: weld.rb
Here's how to draw a Bezier curve. First, select the script from the Draw menu.
Next, choose the "Degree". (Note the VCB) I don't understand the reason for that term but it indicates the number of "spaces" between editable points on the curve. You can also think of it as the number of points not including the first one. The default setting for this is 3. If you want more points simply type the desired number and press Enter.
I've set the Degree to 5, started the curve at the origin dragged off to make the opposite end which is the second point you'll locate. I haven't actually set that point yet.
End points are set and I'm about to set point number three.
More points set. The straight lines are shown between the points you've set. You'll note the points do not fall on the curve.
After the last point is set the straight lines go away and you're left with the curve. Here I've turned on shadows. You can see that the curve is 3D and does not lie on a single plane. That's cool if it's what you want but if you are trying to draw the edge of a table top, this wouldn't be quite the thing.
This time I start with a face to draw on. Make it large enough so that all the points will lie on it. You can always erase what you don't need later.
Select the script from the menu. Set the Degree. Start clicking points.
Push/Pull gives it some thickness.
Next, I'm going to use Follw Me to add a profile to the curved edge. The first thing I do is use the Protractor tool to set a construction line that is 90° to the first segment in the curve. This is very important for Follow Me to work properly.
Then I draw out a face and add the features for the profile. In this case a simple arc.
Select the edge to be the path for Follow Me.
Choose the Follow Me tool, click on the profile and...
And from a different angle.
Now, for fun I'm going to do an Offset on the bottom and pull down as if this was the top to a corner cabinet or something.
Notice when I pull down the center area I have all these faces on the edge. This is because Follow Me breaks up curves into their individual line segments. The lines between them could be smoothed with Ctrl+Eraser tool but that could add a bunch of work.
Instead we'll use the Weld script to join all those line segments. First we select the segments of the curve. I double clicked on the inside face which selected the face and its bounding edges. Then, while holding the Shift key I clicked on the face and the two straight line leaving only the curve selected.
I select Weld from the Plugins menu.
A message box comes up asking if I want the curve to be closed. In this case I say no. If I chose Yes it would draw a line from one end of the curve to the other.
Another message box asks if you want it to find the face. I chose Yes. then I used Push/Pull again and you can see the result.
And again from another angle.