Fitting a vice to my new workbench

UKworkshop.co.uk

Help Support UKworkshop.co.uk:

This site may earn a commission from merchant affiliate links, including eBay, Amazon, and others.

SPinonit

Established Member
Joined
24 Feb 2009
Messages
92
Reaction score
0
Location
Suffolk, England
Hi there, I've got a lot of inspiration from this forum and decided to build a workbench. I'm sure I read somewhere that building a workbench is a good starter project, but I guess it's almost essential to have one if you intend making much else.

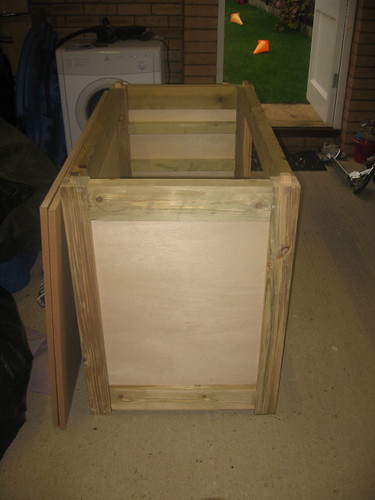
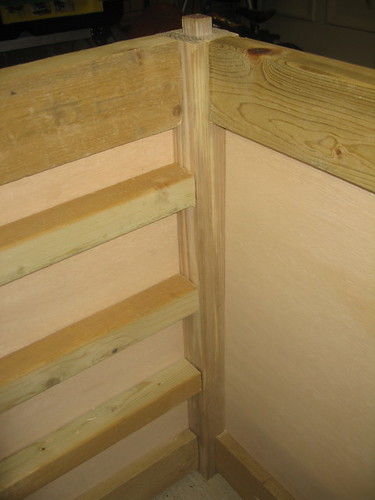
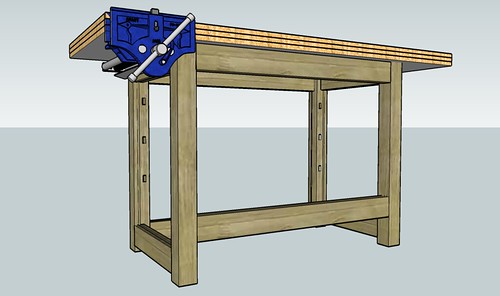
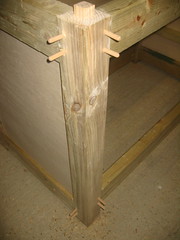
Anyhow, I saw Lord Nibbo's masterpiece (I would love to build something like that eventually) and I also noticed Paul Champan's built using layered MDF for the worktop. I thought I'd try to combine a few ideas from both into mine. I used the general style and layout and took the three full size drawers and the tenons on the top of the legs to locate the worktop from LN's bench. I used the MDF worktop and the back buffer (stop) from Paul's - plus the apparent simplicity, which gave me the confidence to have a go.

A bit of background about me before I go too much further might stave off some rather harsh criticisms of my 'masterpiece'. I haven't done any woordworking since around 1980, when I was told by my secondary school that I could not do 'O' level woodworking as they needed the space to allow girls in that class for the first time. I was offered metalworking, home economics or some sort of typing class. The last two wanted to attract boys since lots of girls had abandoned these classes to take my space in woodwork! lol

Since then, I've done ad-hoc diy stuff, but until now, nothing you can call proper woodworking. Arguably, whatever I'm doing now may still not be proper woodworking, although my last bit of background might in part explain why. Followng a bad motorcycle accident with a mysterious hit and run driver, I lost the use of one arm - so I'm literally doing this single-handedly.

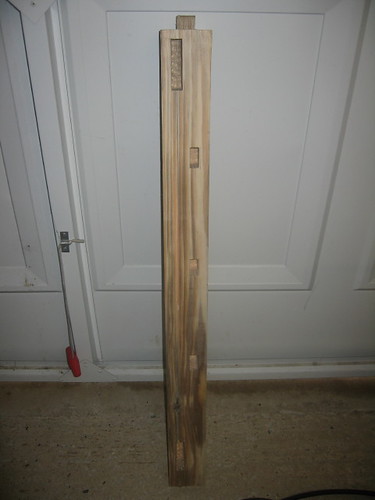
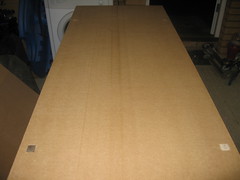
In addition, I have picked up most of my tools second-and from ebay or sale items. The wood I have used is also not the most ideal, but I have tried to recycle whatever I had lying around in the garage. Mostly, this consisted of exterior grade sawn landscaping timber - pressure treated for decking etc. It was a bit twisted in some cases and I've had to be rather creative with some of it. I used Sketchup to draw the plans before cutting any timber, so I was happy that it should all fit properly - so far I've been very luckly and it's gone together ok. So far, it's cost me about £7 in new materials (MDF) and has taken a couple of weeks to get this far.

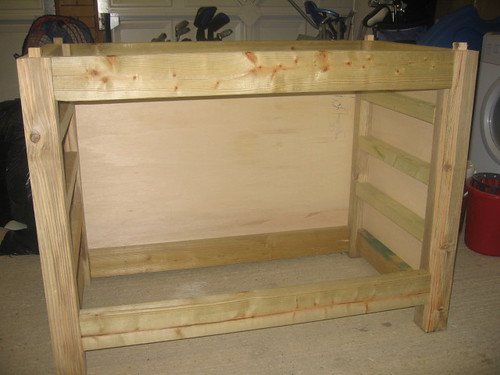
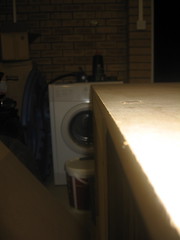
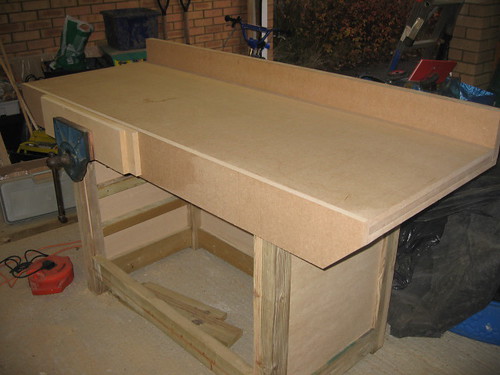
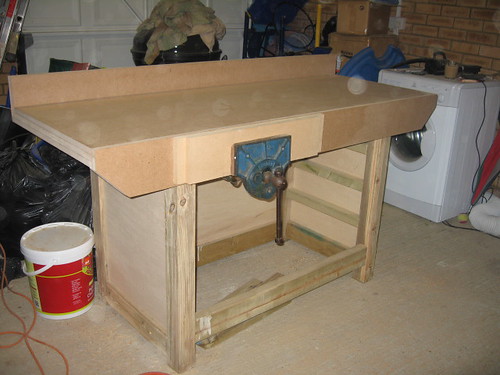
So far, I have built the carcass and today, I was hoping to add the layered MDF worktop. I need to work out how to fit the vice - a Record 52 1/2 9". Originally, I had planned to fit it to the left of the workbench and just mount it under the worktop, however, it is a very heavy item and I'm concerned the weight might distort the top. Any advice or suggestions would be very gratefully received.

I have some pics (and I guess the Sketchup plan), which I would happily post, if I knew how. Not sure how to upload images onto the forum.

Thanks
Steve
 
I look forward to the pictures :)

Welcome to the forum, it's a damn good place!

Miles
 
There's a thread on this very topic in the jigs and tips section that I did ages ago. Have a look for it using the search function and all will be revealed :wink:

Welcome to the forum as well :D

I can sympathise with the accident too, I had the same on a motorbike when I was younger and damn near lost a leg, but all sorted now!


Cheers, Paul :D
 
Thanks for the warm welcome and yes I agree, it is a briliant site, with great imput, people and ideas. Hopefully this post will allow me to post the pics using the guide paulm posted (thanks). :D
 
Welcome. The method I am using is similar to the one paulm used here (thanks Paul!). I'm the opposite way to you, I've so far got as far as making the worktop but no base yet :). Mine is shown here including the way I made a cutout for the vice.

Good luck
Boz
 
ok, lets try some pics - hopefully these will work, although I must apologise for their quality. My garage (aka workshop) is not very well lit - something I will have to improve. As a garage for storing cars and junk it was fine, but I struggle to see marks and measures so I need more lux.

Unfortunately, I appear to have lost a whole load of photos that I took as I was building, including the rather innovative methods I had to employ in order to 'clamp' the workpieces without clamps. At present, I have no clamps at all, so I used other objects such as a trolley jack, ladders and other wood to weigh down the parts and let gravity do the clamping for me. Obviously, at some stage I will get clamps, but they aren't cheap and I didn't want to fully equip myself until I knew I could actually do some woodworking.

Here goes...
4063742497_0838d62caa.jpg

This is one of the legs/posts. You can just about see the mortices I cut using the £15 morticer I picked up on ebay. Not a bad deal really, as I really would have struggled to cut these single handed. Unfortunately, I do not think you can se the rebate I routed to take the ply side and back panels. The 19mm square tenon (?) at the top is designed to fit into mortices cut into the first of the layers of MDF for the worktop, ensuring it sits square (a la Nibbo's bench). Unfortunately, you cannot see the difficulty I had cutting these using my router in a router table that doesn't properly fit (they're safe, but not an ideal match) holding bits of 800mm+ fence posts at right angles (ie sticking out way over the table), holding them level and pushing with just one hand. My arms were like Popeye's after! ugg ugg ugg

4063742971_8143087a41.jpg

This is the built carcass. You can see the three crossbars (is that what they are called) for the drawers. I raised the lower front crossbar, as Colin C suggested to LN, to allow my feet to easily go underneath.

4064491596_fd48de3c8d.jpg


An end shot of the bench. Overnight, I had glued the sections and stored the carcass on end with heavy objects to weigh it down. A 4metre piece of 4"x2" was used to kind of 'grab' the corner and brace it as square as I could manage. As far as I can tell, it is reasonably square, although getting a square into the inside corners was virtually impossible and I don't have squares long enough to go around the outside. so long as it within my tolerance range (+ or - 1metre! :roll:), I'll be quite happy.

4063744687_65be1bc5b2.jpg

This just shows the inside corners, which were difficult for me to ensure were square. Not the most attractice mortice/tenon joints, but this was not the best material and I'm working within my own limits of competence. Hopefully, they will improve. [/img]

The vice was supposed to be mounted onto the worktop on the left-hand side, which would have sufficient overhang to accomodate it, but as I said earlier, I am not sure about the weight distorting the top. Now that I've got this far, I would hate to have to radically change the design, so any suggestions would be very welcome. Maybe the combined strength of 3 18mm MDF panels will be ok, or maybe I need to add a fourth?

I will try to post the Sketchup plans in a while.
 
2D Sketchup model:
4064025639_4d7c5ed852.jpg


Boz62, thanks for the post - your description pretty much perfectly solves my problem. I can now see where I was going wrong and I dont think your solution will take very much altering on my model. Brilliant - thanks. If my Sketchup plans could help your workbench, I'd happily share them.
 
Glad to be of help. Thanks for the offer, Steve, but I'm part built now on the base. I may have been a computer guy in my past, but I still hand draw stuff for the workshop :oops:.

The only downside of recessing the back jaw as I have done, is that you need to be more accurate making the rear jaw, so that they are nicely flush with the leg to their right. My jaws are roughed out and "settling" in the workshop at the moment, will tackle those last once it's on its' base.

I'd have thought 3 layers of 18mm MDF would be OK for supporting the vice at that overhang length. It was what I was planning, before I came up with the kitchen worktop idea.

Boz
 
Welcome Spinonit!

You have done amazingly well with this considering you are doing it entirely one-handed. I'm truly impressed. I like a nice sturdy bench, too. I don't have any faith in some of the prissy little things you see occasionally!

Whereabouts in Suffolk are you? We have a reasonable East Anglian contingent on here......and the occasional get together (GTG).

Cheers

Mike
 
Thanks Mike (and all others too).

I'm Steve by the way - sorry I overlooked that earlier. Now that I think I've solved my vice conundrum, I've carried on some more:


4064879321_f3fcd16d6e_m.jpg
shows some dowels I have added [hopefully] to improve strength. They have now been glue and hamered home. After drying overnight, I will sand these flush to give a nicer finish.

4064878229_0e8a1a87f5_m.jpg
with the first sheet of MDF on. You can see the four corner tenons showing through. I cut them to a depth of 19mm so that they would only show through and locate the first sheet. I intend to add two further layers using a biscuit jointer for alignment.

4065628384_189b16f020_m.jpg
I think I was quite lucky to get everything so well lined up (not so lucky with the photo lighting). This photo just about shows the top flush with the rear of the base and the corner tenon just about flush with the top surface. Some very minor sanding should remove any imperfections.

Steve
 
Hi all, bit of an update; I finished my workbench a few weeks ago, but as I've restarted my degree, commuting for 6+ hours every day, trying to get a new job (guess why) and trying to build some wood projects, I'm struggling for time. I will try to post a picture of the bench this weekend.

Since finishing the bench, I have gone on to build a dust extractor in the style of Mike Garnham's. I have to say that it was reasonably simple for me to build and my limited tests reveal it should work (for me) very effectively. I am trying to fit a cartridge style filter (hopefully HEPA) to the top of the box where the vacuum connects. I figure a circular filter has more surface area and whilst possibly not necessary, it should stop any dust whatsoever from getting into the vacuum itself. It may also smooth out the vacuum air stream and prevent any unwanted eddies, but we'll see.

I've also cut the basic components for a storage unit for one of my kids' bedrooms. It a fairly simple rectangular unit built of 18mm mdf with two stories (?) of three dividers - 6 partitions in all.

I have dry built the unit and (as I've now bought some clamps) clamped it together. It looks ok, but it doesn't sit perfectly square naturally. I don't think the clamps help, but I wonder if anyone has any good tips on how to build it square when glued? Sorry, I realise I'm not speaking good woodworking terms, so I hope you can overlook my newbieness. I know that I can measure the diagonals and they should match, but it will obviously have to stay still until the glue has dried. How can you square (push) the corners and then get it to stay there?

Sorry, I really hope I'm making some kind of sense here, but I really appreciate any words of wisdom you guys may be able to offer.

Message to Mike Garnham: Hi Mike, I'm in Saxmundham, which is about 20 miles north of Ipswich, but I work in London (Southwark). Depends where abouts you are, or where you meet, but I would be interested in any GTGs. Cheers also for inspiration for the dust collector. Simple, but genius!!
 
squareness isn't the best of skills that I have - pretty much like the rest of my woodwork really ;).
There are a couple of ways to make sure things stay square that spring to mind:
1) put a temporary back on it - you could just hold it in place with a couple of panel pins.
2) clamp some square bits of wood in the corners - so you clamp to bottom/top and side. Do this in all the corners and things can't move.
3) screw some layout bits of wood to a bench and align everything (with clamps) to them.
 
Hi Spin

Welcome to the forum

Some impressive stuff you have knocked up there

I'm often in Saxmundham when I'm playing in that white domed thing just east of you.

Can someone give a link to Garnham's dust collector, cos I seem to have missed that
 
Spin, ta for the link

Had something similar on the tuit list, now I've seen how easy it is, I'll knock one up over the hols - Thanks Mike :lol:
 
Welcome Steve,

Spent a year of my life in Suffolk, at Shotley. I still have nightmares about the place. But at least I could sail up to Pin Mill, at the weekends, and relax with a sketch-book!

You are doing well and your bench looks fine. You might want to refine the drawers, by adding some 'dust-barriers' of 3mm MDF to separate each drawer. Just fit the MDF into the drawer supports you have there.

If it's too late to rebate the frames, some quadrant-beading will make a 'housing' for the sheets. Woodwork is a dusty business as you know, and softwood drawers also create a lot of dust, as the runners wear.

I like the idea of drawers under the bench. mainly because I can't get down low now, to peer into deep cupboards!

Happy Woodworking.

John :D
 
Here's a couple of photos of the finished bench. I've not yet sealed it of coated it with anything, although I have bought some Briwax, which I think should work ok?

4181601565_c4a3c10306.jpg
4182364118_a81f0bbd91.jpg


I've found the second-hand vice to be a little loose and I have also fitted it slightly out of square. It doesn't seem to matter when holding pieces of work, as the jaws tighten up well enough, but it bugs me all the same.

Benchwayze wrote: I still have nightmares about Shotley

It's a bit funny like that out here....you start off struggling to get used to a very different way of life in Suffolk. I liken it to drowning; you start off thrashing about for all you are worth. Sometimes you think you can make the shore, but after a while you start to accept the inevitable and take a deep breath [of water]. Apparently, the moment of drowning is a very peaceful way to pass over [I hope no-one has suffered a drowning related accident with their friends or family]. Much like when I moved to Suffolk (originally from Sarff Lundun aint I), for the first year I felt as though I needed to get as far away as possible - I felt as though I couldn't breathe. After that, I began to resign myself to living here for a while, but now I think I would find it difficult to leave. It has an extremely peaceful way of life, the people are really nice, the countryside and the beaches are great and I don't have to get wound up by inconsiderate neighbours and racer boys overly loud boom boxes. I work in central London, so I guess I get the best of both worlds, although the travelling is a nightmare.
 
Oh believe me, my nightmares have nothing to do with Suffolk itself. It was HMS Ganges, that caused them! :lol:

Put it this way... if the NSPCC could have gotten inside the place they would have had a Birthday... !

Say no more. :)

John

PS How do you mean your vice is loose?
Won't it close? or are the rods worn?
 
Back
Top