First Project Finished - Coffee Table in AW Oak

UKworkshop.co.uk

Help Support UKworkshop.co.uk:

This site may earn a commission from merchant affiliate links, including eBay, Amazon, and others.

David_Nicolaou

Established Member
Joined
23 Dec 2006
Messages
33
Reaction score
0
Location
Doncaster, South Yorkshire
Just finished my first project - a coffee table in American White Oak. The top is lipped MDF - should have been solid oak but had a little issue with my Dewalt P/T.

Pressie for the wife for christmas.

CoffeeTable.jpg


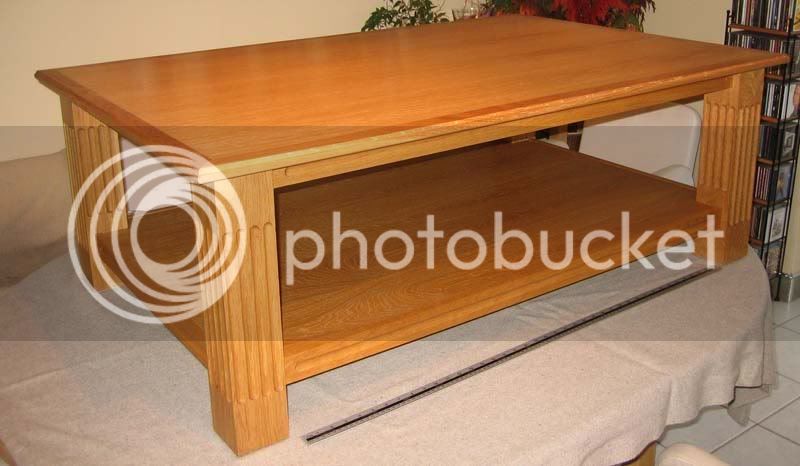
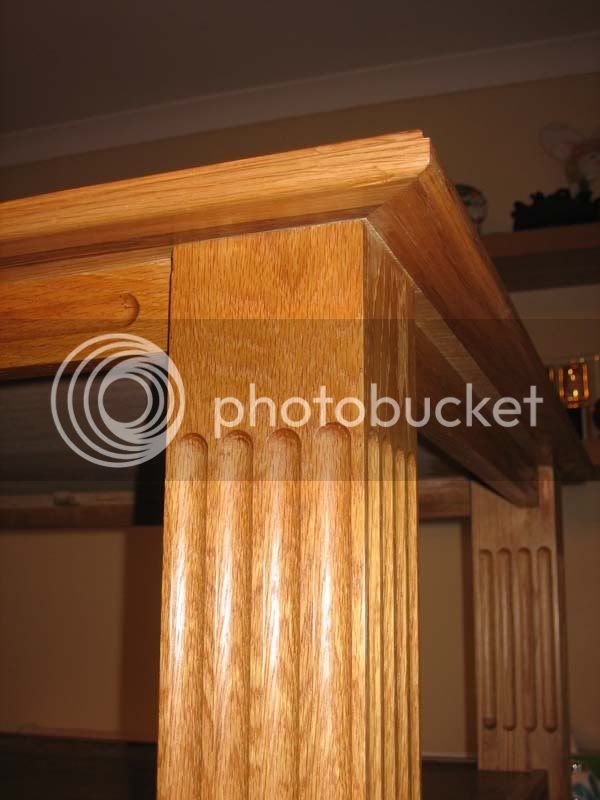
The legs were inspired from an article in Finewoodworking where inch thick oak was mitred and joined to create a four sided faced block of wood over a solid wood core. It worked quite well but have since learnt of a better way to do it.

CoffeeTableLeg.jpg


It isn't perfect by any means and there are quite a few mistakes cunningly covered up but I had a great deal of fun and most importantly I have learned a lot.

The finish is 3 coats of danish oil applied a couple of days apart and a clear wax finish over the lot - the top has had 3 coats of wax in all.

Have a merry christmas everyone and keep up the excellent posts
 
Welcome to the forum, David. Nice job. :D I'll just see if my over-posting actually comes in useful and The Mighty Spaminator will let me show the finished project on your behalf.

CoffeeTable.jpg


CoffeeTableLeg.jpg


Merry Christmas, Alf :deer
 
Hi David,

Welcome to the forum. :D

Nice looking table. Has your wife pasted judgement on it yet? 8-[

The Mighty Spaminator will leave your posts alone, once you have a few more to your name. 8)
 
Hi there,David.

Firstly,welcome to the forum :D

Secondly,congratulations on such a lovely piece of furniture :D (It's a brave person who combines "first project" with "first post".. :wink: )

Andrew
 
Thanks for the comments - I am quite chuffed how it all turned out in the end, the wife loves it - on and off it took about a year and a half. The coffee table was meant to be a christmas present in 2005 but work inevitably gets in the way.

I really wish now that I took some photos along the way as I don't have a photographic record to show off. Next time i guess.

The legs were thicknessed to just over 20mm (thick enough to allow them to be routed with a coving bit) and a 45 degree mitre was run on each edge. This did leave the edges a little brittle but the glue surface was big enough to not need a spline or biscuits. The faces were taped together and folder around a solid wood core (method courtesy of fine woodworking). The coves were then cut using a simple jig I made. Mortices were cut in two sides of the legs and the rails were then tenoned to fit the mortices. A rebate was cut into the bottom rail to support a shelf and a groove was cut into the top rail to allow buttons to be used to attach the top.

I dry assembled the frame and measured and cut the bottom shelf. The 4 corners had to be cut into (the shelf) to get round the legs. The shelf is Oak faced MDF (I would probably saw my own veneers next time as the next bit of kit is a bandsaw).

The whole thing was glued up - the shelf fitted and left to go off. I had enough wood for a solid top but as I mentioned - my P/T wasn't set up awfully well and after changing the blades - I made a mess of the setup. I thought everything was square and level but it wasn't and I got wood tapering front to back and side to side (a planer setting jig from rutlands has since come to the rescue).

As it happened - I had some spare oak faced MDF and used that with a generous oak lipping. It was biscuited, scraped flat and finished.
The edges of the top have a ovolo profile routed into them, the bottom side is slightly rounded over.

In hindsight - I should have routed the lipping before mitering - I would have if I had a router table (thats on the list after the bandsaw).

Sanded from 180 to 400 grit - rubbed down with synthetic 0000 wire wool and danish oiled with a wax on top.

Whew - sounds quick when you type it out :).

Lots of fun and I am on a steep learning curve here but enjoying every minute.

I have an IT background so used cad to prototype the design - so I was happy with the look before I started - but the next project is a pair of side tables and they are going to be much more elegent affairs.

I will take photos of that though as I go along
 
Lovely table David. I like the proportions and the routed flutes look great
 
Thanks for the kind words. Those flutes were a real pain - took me quite a few attempts in some scrap to get the right router speed and then there was still some burn that needed removing with a lot of elbow grease.

Well i must say I am lapping up the comments :D
 
Great looking table and welcome to the forum. If you have used wax on the top (which looks great) it will make a 'ring' if you put a cup of hot tea or coffee directly onto the surface...as I have found to my cost and wallet - Rob
 
Yeah - i heard that happens - there are coasters now every 8 inches and there is a piece of glass on order to cover the top.

Thanks for the heads up about the hot drinks mate.

Happy Christmas and thanks for such a warm welcome to the forum :)
 
Hi David, that's real nice. I love american white oak and you have used it well.
As others have said, with a wax finish, hot cups will leave marks on the top.
On simular projects I have used Chestnut Products Melamine Lacquer.
It is heat resistant and has withstood hot coffee cups, spilt coffee and even the occasional Indian Takeaway spilt on it!!
John
 
That's a lovely table, David. Thanks for going through how you made the legs. I've made similar sized legs for an oak Morris Chair but veneered the non quatersawn faces to achieve a quartersawn face all round. Next time I think I'll follow your method as the result is superb.

Ted
 
hi david, well done with the table it looks fantastic, i have just shown the wife it and now she wants one like it. so i guess cos we havent got a coffee table it looks like i am in the shed in the morning. ps welcme to a great forum =D>
 
Hello dave,nice job on the table, this is my first post on the forum,

& i'd like to offer a design tip if you intend upon making any other or matching fluted furniture,--that is the out flats of any fluted post/pillar/leg should be larger than the flats that lay inbetween the flutes, the ratio is rough ly 10/6 (eg:- 10mm outside/6mm inside),this keeps in accord to the ratio's of the golden section of design,


regards

Shivers.
 

Latest posts

Back
Top