European Oak Wardrobes

UKworkshop.co.uk

Help Support UKworkshop.co.uk:

This site may earn a commission from merchant affiliate links, including eBay, Amazon, and others.

BradNaylor

Established Member
Joined
17 Oct 2007
Messages
2,311
Reaction score
2
Location
Turning MDF into gold in a northern town
We've been busy this week making a pair of oak wardrobes for a regular client. 4 days in the workshop and a full day today for Phil and I assembling them. (Karl was having a very well deserved day off!)

First in is the plinth on adjustable feet for levelling.

DrewittWardrobes001.jpg


The carcasses are simply boxes of veneered MDF

DrewittWardrobes003.jpg


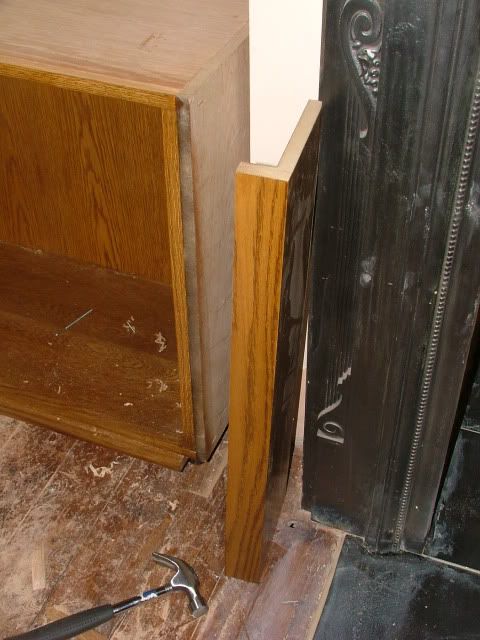
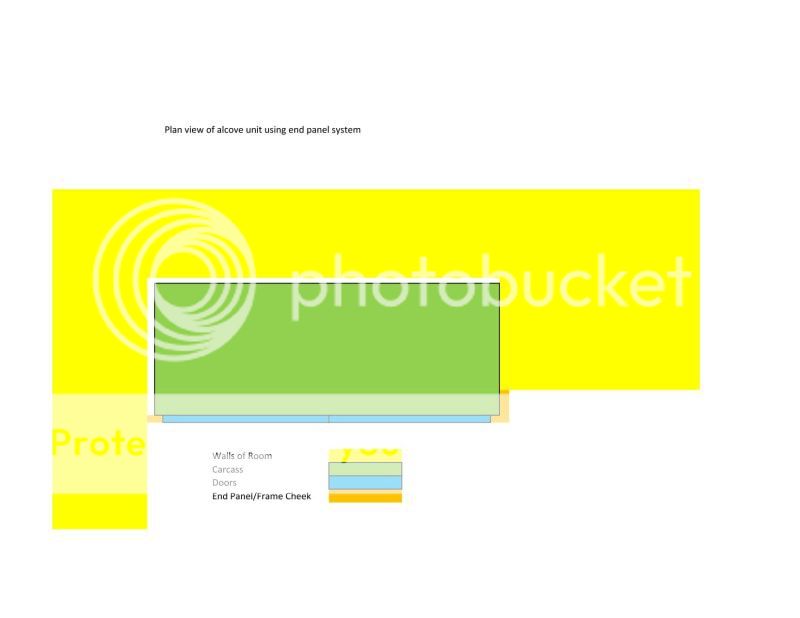
The end panels with wrap-round face frames are then attached

DrewittWardrobes004.jpg


The cornice is ready made in the workshop and slid into position

DrewittWardrobes006.jpg


DrewittWardrobes009.jpg


The doors are fitted with concealed hinges and we're finished

DrewittWardrobes010.jpg


DrewittWardrobes012.jpg


The customer was delighted and and confirmed that they want us to build them a new bling kitchen in the new year. :D

Cheers
Brad
 
TheTiddles":2bz7qc1a said:
Fitted onto carpet? Is that a preference or just the way it happened?

Aidan

They're not fitted. They're free-standing wardrobes which can be disassembled and relocated.

The clients have just received planning permission to build a new house in their back garden, which is where they intend living. The existing house will be sold.

These wardrobes, and any other furniture we make for the current master bedroom, will move with them to the new house. We've already got the nod on the kitchen for the new house, and obviously are hoping to get a lot more work besides.

And yes Colin, the doors are solid oak.

Cheers
Brad
 
Nice clean looking cupboards. 8)
How did you raise the panels, was it SM or router and what cutter? I've been looking at some spindle tooling for this and it's making my head spin. :?
 
Nice, Brad, as usual.
Tell me, what's the advantage of having a separate end panel? Why not just add the fake face-frame piece to the side of the carcase?
Cheers
Steve
 
frugal":1gd2uczw said:
BradNaylor":1gd2uczw said:
First in is the plinth on adjustable feet for levelling.

DrewittWardrobes001.jpg

If the feet are used for leveling how do you stop their being a gap under one end if the floor is not level?

Seems pretty level to me, spouse its experience!
 
Steve Maskery":3bht88nv said:
Tell me, what's the advantage of having a separate end panel? Why not just add the fake face-frame piece to the side of the carcase?

Speed - and ease of assembly on site.

We have found that this construction method saves us hours in the workshop making separate face frames. The integrated end panel and frame cheek is very quick to glue up but gives the impression of traditional face frame construction. We now use this system as a matter of course in virtually all our furniture, even though it uses a little more veneered board. The extra material cost is more than balanced by the time savings.

It also makes assembly a lot more straightforward. It is a particularly good system for fitted furniture such as an alcove unit or wardrobe where the carcass extends forward of a chimney breast.

HillAlcoveUnitsWIP014.jpg


Scribing the panel to the face of the chimney breast is made very simple - it is almost silly person-proof!

This system also facilitates the use of 35mm concealed hinges without having to use packers behind the face frame as the inside of the cabinet is flush with the door opening.

Cheers
Brad
 
Sorry Brad for being a bit thick here but I am not quite sure what you mean by the seperate end panel and it being much easier to scribe in? Can you elaborate a bit for my old worn out brain cells? :?
 
BradNaylor":9cuobsg3 said:
We have found that this construction method saves us hours in the workshop making separate face frames... It is a particularly good system for fitted furniture such as an alcove unit or wardrobe where the carcass extends forward of a chimney breast... This system also facilitates the use of 35mm concealed hinges without having to use packers behind the face frame as the inside of the cabinet is flush with the door opening.

Cheers
Brad

Cheers to you too Brad - very, very neat couple of tricks there, and as Steve M says, duly filed away for future reference ;)

Cheers, Pete
 
mailee":yoji7kyh said:
Sorry Brad for being a bit thick here but I am not quite sure what you mean by the seperate end panel and it being much easier to scribe in? Can you elaborate a bit for my old worn out brain cells? :?

This may help. Alan.

Alcove.jpg


The end panel is scribed to the face of the chimney breast, instead of a filler piece having to be scribed to the side wall of the alcove. Believe me, it's much simpler, neater, and most importantly quicker!

The frame cheek on the left hand side of the unit in the plan above I would fix to the carcass in the workshop and scribe to the wall on site. Any small gap between the carcass and the side of the chimney breast is swallowed up by the thickness of the end panel.

Cheers
Brad
 
Back
Top