First, since this is my first post here, let me introduce myself - my name is Denis (male), and I'm a freelance translator from Croatia.
I've only got interested in woodworking a few months ago, in a roundabout way - via photography, my first hobby. I use analog (film-based) cameras, and lately I've been shooting mostly with ancient large format wooden cameras, which sometimes need small repairs and adaptations - thus some knowledge of woodworking was required")
I also made some simple wooden boxes for storing my large format lenses, and it really got me interested in woodworking. My main interest is box making...
I got some "tailed" tools, but wasn't really happy with them - I mean, woodworking is a hobby for me, and I detest the noise and dust those tailed tools make - I'd rather use hand tools and work in relative silence. The tailed router is particularly annoying
Thus, it wasn't long before I found this forum.
I've been reading older posts here a lot - mostly on hand planes, and also admiring the planes made by Philly and others, and it wasn't long before I got some "proper" tools - cheap plane variants and knock-offs mostly, since Stanley, LV, LN and other planes are virtually unknown here - but wooden planes can still be found new in stores (sometimes).
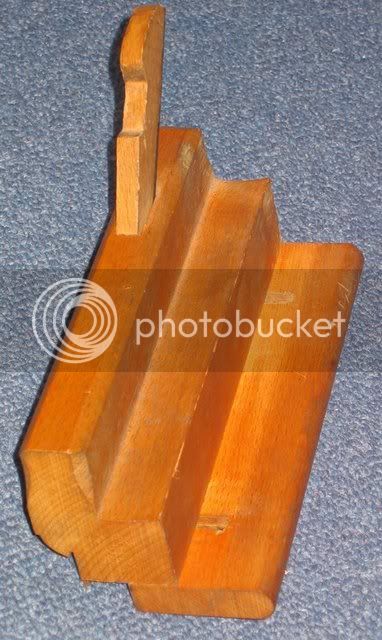
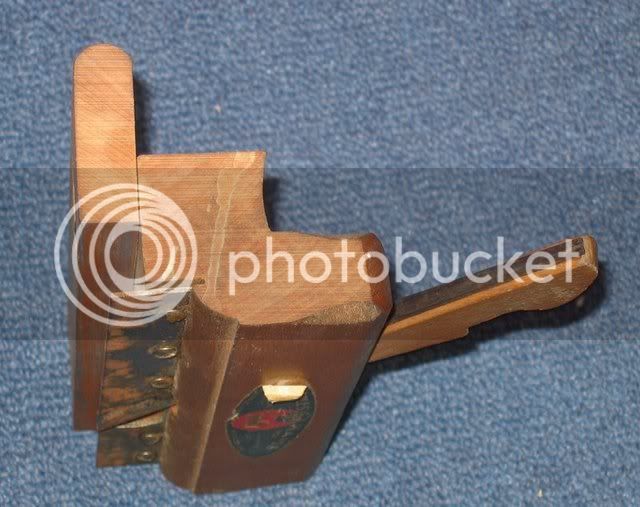
Here's a quick shot of part of my "arsenal" so far..

Finally, to my question - I'm about to try to make same wooden planes myself. After seeing all the wonderful planes the members here make, the next step was to buy some books (Finck's and Hack's), get some blades made and get some wood
One of the first planes I intend to make is probably not a good idea for the first DIY plane, but I'd like to try it, nevertheless.
Namely, I need some kind of plane which would be used in making simple grooves - mainly in box-making, for grooved recesses in the sides for bottoms of boxes, etc.
Rather simple stuff, really, but the dimensions are a problem. For bottoms of my (rather small) boxes, I usually use 4mm plywood, so I need a specialty plane that would be used to make 4mm wide grooves, mostly in thin box sides, usually oak, pine, wenge, padauk, etc. The sides of such boxes are usually from 5mm to 10mm thick.
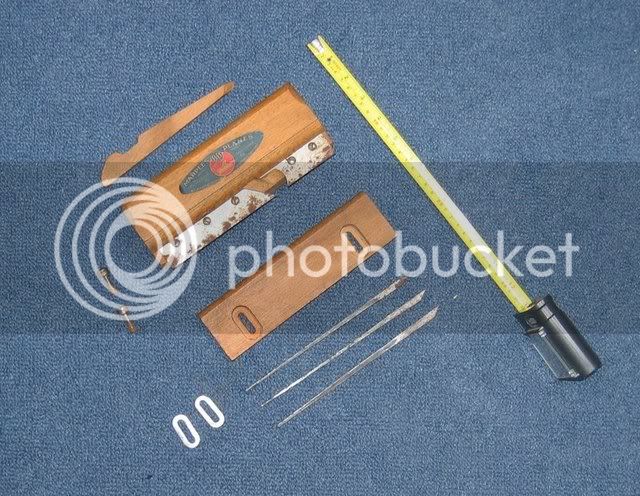
So, I had a couple of 4mm wide blades made (along with some others for future planes...), and now I'm thinking about the plane design. The blades are 4mm wide, 5mm thick, and about 12 cm long.
Here's a photo of some of the blades I had made - on of the two thin ones (lower two on the photo) will be used for my "grooving" plane:

(The ruler is metric)
Now I'm considering the best (relatively simple) design of my future "grooving" plane, and decided to ask for help here.
In short, it needs to make 4mm wide grooves (along the grain, usually), and the depth of those grooves is usually from 3 to 5 mm - just enough to hold the bottom of the box (similar to drawer bottoms, I guess). Since the bottom is usually plywood, I don't have to worry much about wood movements, and the grooves are relatively shallow and tight.
I was thinking about using the general shape of rebate (rabbet) plane, "sandwiched" from 3 slices of beech, but I'm not sure about the sole profile. I guess the center "slice" which houses the blade, should protrude below, forming a kind of "skate", like the fillister or plough planes - about 5mm tall, since that's the max depth of the grooves I'll be using. Also, I'm not restricted to beech - I also have some relatively thin planks of wenge, padauk, jatoba, oak, etc - obtained from flooring suppliers :wink: - so this centrer slice can be e.g oak or something else.
Any hints or suggestions regarding the design and wood to use would be more than welcome.
Thanks in advance (and sorry for the long post),
Denis
I've only got interested in woodworking a few months ago, in a roundabout way - via photography, my first hobby. I use analog (film-based) cameras, and lately I've been shooting mostly with ancient large format wooden cameras, which sometimes need small repairs and adaptations - thus some knowledge of woodworking was required
I also made some simple wooden boxes for storing my large format lenses, and it really got me interested in woodworking. My main interest is box making...
I got some "tailed" tools, but wasn't really happy with them - I mean, woodworking is a hobby for me, and I detest the noise and dust those tailed tools make - I'd rather use hand tools and work in relative silence. The tailed router is particularly annoying
Thus, it wasn't long before I found this forum.
I've been reading older posts here a lot - mostly on hand planes, and also admiring the planes made by Philly and others, and it wasn't long before I got some "proper" tools - cheap plane variants and knock-offs mostly, since Stanley, LV, LN and other planes are virtually unknown here - but wooden planes can still be found new in stores (sometimes).
Here's a quick shot of part of my "arsenal" so far..
Finally, to my question - I'm about to try to make same wooden planes myself. After seeing all the wonderful planes the members here make, the next step was to buy some books (Finck's and Hack's), get some blades made and get some wood
One of the first planes I intend to make is probably not a good idea for the first DIY plane, but I'd like to try it, nevertheless.
Namely, I need some kind of plane which would be used in making simple grooves - mainly in box-making, for grooved recesses in the sides for bottoms of boxes, etc.
Rather simple stuff, really, but the dimensions are a problem. For bottoms of my (rather small) boxes, I usually use 4mm plywood, so I need a specialty plane that would be used to make 4mm wide grooves, mostly in thin box sides, usually oak, pine, wenge, padauk, etc. The sides of such boxes are usually from 5mm to 10mm thick.
So, I had a couple of 4mm wide blades made (along with some others for future planes...), and now I'm thinking about the plane design. The blades are 4mm wide, 5mm thick, and about 12 cm long.
Here's a photo of some of the blades I had made - on of the two thin ones (lower two on the photo) will be used for my "grooving" plane:
(The ruler is metric
)Now I'm considering the best (relatively simple) design of my future "grooving" plane, and decided to ask for help here.
In short, it needs to make 4mm wide grooves (along the grain, usually), and the depth of those grooves is usually from 3 to 5 mm - just enough to hold the bottom of the box (similar to drawer bottoms, I guess). Since the bottom is usually plywood, I don't have to worry much about wood movements, and the grooves are relatively shallow and tight.
I was thinking about using the general shape of rebate (rabbet) plane, "sandwiched" from 3 slices of beech, but I'm not sure about the sole profile. I guess the center "slice" which houses the blade, should protrude below, forming a kind of "skate", like the fillister or plough planes - about 5mm tall, since that's the max depth of the grooves I'll be using. Also, I'm not restricted to beech - I also have some relatively thin planks of wenge, padauk, jatoba, oak, etc - obtained from flooring suppliers :wink: - so this centrer slice can be e.g oak or something else.
Any hints or suggestions regarding the design and wood to use would be more than welcome.
Thanks in advance (and sorry for the long post),
Denis