


8 drawer tallboy
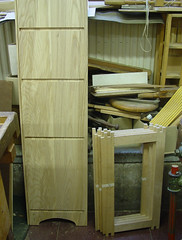
I wanted a practical piece of furniture with a relatively small footprint since we have a small flat and a tallboy seemed to fit the bill. There never seems to be enough storage.
One aim, which has been realised, was to avoid all metal fixings. Another aim was to have a strong contrast between the sides and the drawer fronts. I originally wanted for the drawer fronts bog oak about which I had read so much and which seemed trendy but I didn’t know how to find it here in Belgium if it even exists and so I opted for American black walnut.
For the sides I really wanted a very blonde wood to maximise the contrast but I still felt myself too amateur to let myself loose on American maple and so I went for European ash more readily available here and much cheaper. The only problem was when I thicknessed it I was a bit shocked to see how figured it was. I was expecting something more homogenous. I still find it difficult to predict how wood will look when planed. The dovetail keys are purely decorative and were inset after the boards had been jointed. I’ve since learned that there is a routing template for these but I did them by hand.
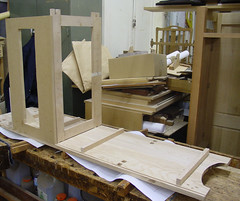
For all but the shallowest drawers, I had to join boards to obtain the required height (the tallest bottom drawer is approximately 28 cm deep) and again the black walnut boards which in their rough state had all seemed uniform in the timber yard turned out to vary quite a bit in colour. I didn’t want to get into the risky business of staining to harmonise the colour so I was stuck with them.
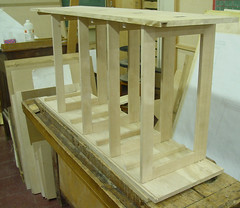
Four of the drawers run on the horizontal frames (in beech) which I made on a simple jig to ensure they were identical. The remaining 4 drawers sit on runners set into rebates routed in the sides. In the design of the width of the carcase and the widths of the drawers I made provision for 8mm x 8mm drawer guides to give me some tolerance so that I could ensure the drawers would all line up on completion.
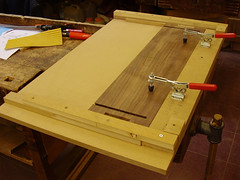
In an early version of the design I was going to fix the drawer fronts to the sides with through tenons but in the end I got cold feet. Afraid that I might ruin the beautiful (and expensive) walnut I chose instead dovetailed housings routed again with a simple jig.
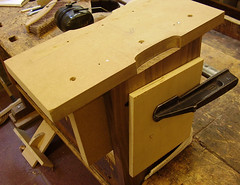
Before assembling the drawers I also routed the handgrips in the ends. The drawer sides and back are in beech and the bottoms are 9mm oak veneered plywood.
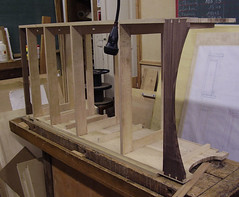
The design of the top kept evolving until the time came to make it. At one stage it was going to be a hinged opening lid with possible a mirror inside but I decided this was way too difficult and possible too heave and to high to open and so the top is fixed. Practically at the last minute I decided to have the broad cornice and the banding as a tribute to Arts and Crafts.
To stop the drawers from bring pulled completely out, I’ve glued little strips (of scrap Jatoba, I think) to the inside faces of the sides and a series of removable pegs in the drawer sides which hit these strips when the drawers are opened almost fully. I found cedar disks (sold as anti-moth) with holes in them in the supermarket and so I glued the pegs to them. In this way, each drawer has 2 ant-moth “devices” incorporated.
I didn’t want a very glossy finish and I have used wax before on top of a synthetic sanding sealer but this time I used 2 coats of Osmo which had been highly praised in Furniture & Cabinetmaking magazine and which is readily available here followed by one coat of liquid wax applied with a soft cloth.
I wanted a practical piece of furniture with a relatively small footprint since we have a small flat and a tallboy seemed to fit the bill. There never seems to be enough storage.
One aim, which has been realised, was to avoid all metal fixings. Another aim was to have a strong contrast between the sides and the drawer fronts. I originally wanted for the drawer fronts bog oak about which I had read so much and which seemed trendy but I didn’t know how to find it here in Belgium if it even exists and so I opted for American black walnut.
For the sides I really wanted a very blonde wood to maximise the contrast but I still felt myself too amateur to let myself loose on American maple and so I went for European ash more readily available here and much cheaper. The only problem was when I thicknessed it I was a bit shocked to see how figured it was. I was expecting something more homogenous. I still find it difficult to predict how wood will look when planed. The dovetail keys are purely decorative and were inset after the boards had been jointed. I’ve since learned that there is a routing template for these but I did them by hand.
For all but the shallowest drawers, I had to join boards to obtain the required height (the tallest bottom drawer is approximately 28 cm deep) and again the black walnut boards which in their rough state had all seemed uniform in the timber yard turned out to vary quite a bit in colour. I didn’t want to get into the risky business of staining to harmonise the colour so I was stuck with them.
Four of the drawers run on the horizontal frames (in beech) which I made on a simple jig to ensure they were identical. The remaining 4 drawers sit on runners set into rebates routed in the sides. In the design of the width of the carcase and the widths of the drawers I made provision for 8mm x 8mm drawer guides to give me some tolerance so that I could ensure the drawers would all line up on completion.
In an early version of the design I was going to fix the drawer fronts to the sides with through tenons but in the end I got cold feet. Afraid that I might ruin the beautiful (and expensive) walnut I chose instead dovetailed housings routed again with a simple jig.
Before assembling the drawers I also routed the handgrips in the ends. The drawer sides and back are in beech and the bottoms are 9mm oak veneered plywood.
The design of the top kept evolving until the time came to make it. At one stage it was going to be a hinged opening lid with possible a mirror inside but I decided this was way too difficult and possible too heave and to high to open and so the top is fixed. Practically at the last minute I decided to have the broad cornice and the banding as a tribute to Arts and Crafts.
To stop the drawers from bring pulled completely out, I’ve glued little strips (of scrap Jatoba, I think) to the inside faces of the sides and a series of removable pegs in the drawer sides which hit these strips when the drawers are opened almost fully. I found cedar disks (sold as anti-moth) with holes in them in the supermarket and so I glued the pegs to them. In this way, each drawer has 2 ant-moth “devices” incorporated.
I didn’t want a very glossy finish and I have used wax before on top of a synthetic sanding sealer but this time I used 2 coats of Osmo which had been highly praised in Furniture & Cabinetmaking magazine and which is readily available here followed by one coat of liquid wax applied with a soft cloth.