Crisp internal corner

UKworkshop.co.uk

Help Support UKworkshop.co.uk:

This site may earn a commission from merchant affiliate links, including eBay, Amazon, and others.

SteveF

Established Member
Joined
16 Sep 2013
Messages
2,230
Reaction score
1
Location
Maidstone
I should start every thread with a big SORRY
but I have another question
if you was making a L shaped piece (size not important) how do you get a crisp internal corner?
my only thought is to start with a morticer (which I dont own)

not often I need to do this, but when I do it is usually creep up to cut with tablesaw \ tracksaw then get a handsaw\jigsaw to get into corner but it is never "perfect)

Steve
 
Not sure I can imagine needing to do this... But assuming you mean in plywood or similar, I guess your problem is that the handsaw kerf will be less than the power saw. A quick swipe with a chisel should clean it up nicely.
 
it is a piece of hardwood 10mm thick
there is no joint \ join, it is to be made from the solid
I want to make a letter L
lets go for 400mmx400mm square as starting piece and making an L 400x400x40 by 10mm thick (think of a framing square, I do wonder how they make them, i can only guess they are stamped out)
I want that internal corner clean & crisp
I could mitre \ butt joint but is not the look I am after
short grain \ long grain is also of no consequence in this application

Steve

i have one of those corner chisels that you bash with a hammer that may clean up a router radius,if I went that route, but I feel they crush rather than cut the fibers
 
So you want to just cut a shape out of a solid piece. This is more like fretwork than joinery, as I can't imagine any circumstance where this would arise in classic joinery.

How are your paring skills? I'd be paring then scraping if I ever found myself trying to do what you're trying to do. Which I wouldn't.
 
help me please.JPG
ok lets try this please
I will route out the red part, I know I could have tackled this better with some forward thinking
I then want to replace the routed part with a piece of mahogany but want the blue part a crisp 90% corner

Steve
 

Attachments

  • help me please.JPG
    help me please.JPG
    53.5 KB
If you try and chop out an internal corner in one go with a chisel, even in 10mm thick stock, it'll get a bit messy as the bevel of the chisel will force the chisel backwards. The solution though is simple. You chop out to 1mm (actually a bit less is better if you can work to those tolerances) on the waste side, you then re-sharpen your chisel and make the final cuts right to the line. It's not hard and I can assure you it'll be cleaner than a morticing machine or router can achieve. Just make sure the workpiece is resting on some scrap so you don't get any spelching on the back edge.
 
I've no idea what happened, but I posted a long post and it disappeared.

Your problem also occurs in the timber you are cutting out of (the piece in the photo). I would try to design this problem away, but if you are determined, then I would suggest making this out of veneer, and cutting out with a sharp Stanley knife. That way it will be absolutely spot on. Otherwise, as I said before, you are going to be paring, then scraping...........with loads of offering up and adjusting.
 
Or, if you have one, a scroll saw with a fine blade will do that "hole" job nicely (sorry! - once you've learnt to cut straight lines with it - not being funny, but not as easy as you may think).

AES

Edit for a P.S. A coping saw with a fine blade will do it too (no scroll saw machine necessary), but to save a LOT of hand cutting, get as near as you can with a jigsaw or router first, then finish off with the coping saw - but note a FINE blade needed (and even a jeweller's saw will do if you don't have a coping saw).
 
Why couldn't you make this in two pieces? One long piece and another shorter piece glued together leave the "crisp internal corner" simply cut on a cross -cut saw and polished up on a disc sander. Given that the two pieces would be cut from the same piece of wood side by side, and glued back in the position they came from, you'd never find the glue line in a month of Sundays.
 
I agree with all that has been said
tbh i could just cut this in 2 pieces from plywood and cover in pig suede...job done :D
sometimes the questions I ask are for members to learn from (including me)
seems strange that with all our modern technology \ machines that the best result would come from a sharp chisel, but seems the favoured approach for me
the glued up option would still show the kerf from a power tool or even a hand saw and not what i want for this project
I am not trying to be smart or clever (hopefully I am not coming over that way,as that is so far from my intentions)
my design and execution was very poor, I have no choice to admit that as the picture says it all
sometimes you "screw up" and attempt a fix rather than a re-make, or am I lazy?

all i will say is a big thankyou to those that contributed to my dilemma
I am making a simple cutlery canteen that is teaching me so many skills \ errors that the whole progress is making me a bit anal and critical

Steve
 
Just to add that I do this kind of thing frequently in MR MDF and Birch ply, and the tracksaw/tablesaw followed by a sharp chisel works very well.
 
SteveF":ylm9nviq said:
.....the glued up option would still show the kerf from a power tool or even a hand saw.......

No it wouldn't. Not at all. I'm not trying to change your mind because you seem determined on one approach, but I promise you you are wrong. You could make that join such that you wouldn't even be able to find it yourself even though you knew it was there.

As I said, I'd design the problem away. I can't see any need for a corner at all, and I don't think it would look as nice as have a straight band of contrasting wood running the whole width of the tray.
 
MikeG.":m32wp9x3 said:
SteveF":m32wp9x3 said:
.....the glued up option would still show the kerf from a power tool or even a hand saw.......

No it wouldn't. Not at all. I'm not trying to change your mind because you seem determined on one approach, but I promise you you are wrong. You could make that join such that you wouldn't even be able to find it yourself even though you knew it was there.

As I said, I'd design the problem away. I can't see any need for a corner at all, and I don't think it would look as nice as have a straight band of contrasting wood running the whole width of the tray.
I cant have straight piece as the knives are longer than forks,sorry not really visible in that pic
all the internals of the box are replaceable so if I need to dump that it is no major
maybe I should have found an easier way to cut the slots, again I did not want to cut through the piece and re-glue as that one would be endgrain
the first knife slot in centre of that piece will allow me to route a clean edge
maybe the plywood and suede was not a bad idea tbh (well maybe not ply but some offcuts of hardwood, I would know the ply was there and it would bug me)

Steve
 
SteveF":2w80bykg said:
.........I cant have straight piece as the knives are longer than forks........

I know, and I really don't see why that makes any difference. The cut outs for the knives would simply penetrate the contrasting timber more than the cut outs for the forks do. Where is the problem?
 
Hi Mike
I am being a bit slow here
the only reason for cutting out the top back is to get rid of unsightly slots and prevent the cutlery sliding
I was not intending to extend the cut outs into the new part I will plant on

maybe you could do me a pic of what you are explaining please?

Steve
 
MikeG.":3j77zpqp said:
You could make that join such that you wouldn't even be able to find it yourself even though you knew it was there.

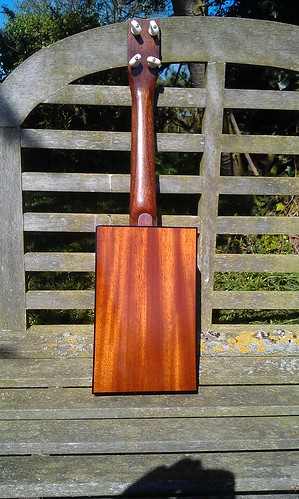
Just in case a picture helps reinforce the point, the back of this uke is either two or three pieces and I can't remember which. Planed until no light visible when held together, then glued up. And really not at all difficult, honest!

13899023974_d2bcae2e0b.jpg
 
Hi Profchris
nice work I followed your last build with great interest

I am ok at joining wood I think
glue up.jpg

but I can see the 5 separate pieces I used here
I have to admit that I have never cut a piece and joined it back together so as suggested it may not be so obvious to the eye
I will have a play

Steve
 

Attachments

  • glue up.jpg
    glue up.jpg
    210.7 KB
Back
Top