


oddsocks
Established Member
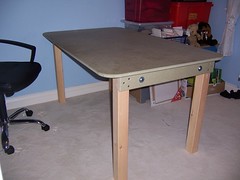
This is definitely not cabinetry, but given the number of recent threads on pocket screws I offer up a craft table I recently built for my wife (who makes cards and drives the internet from her laptop).
The brief was simple - it had to fit the space drawn in the air with female pointed finger (assessed as 1450mm long by 850 mm wide), be as tall as our dining table (730mm to top, legs eventually made at 710mm with 18mm MR MDF top), had to be easy to take apart (for when guests used the bedroom) and finally had to be built by the next weekend and not bang knees (underframe 85mm)
Other pictures....
the pocket screws securing the underframe:

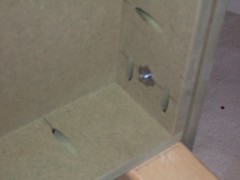
T Prong nut fitting:
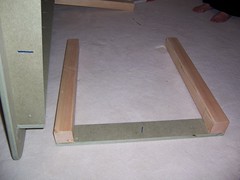
Simple leg assembly:
The images show the final design and the simple but effective way the legs are attached to the underframe using 8mm T prong nuts, bolts and washers. This has thus far proved very strong.
I created the design in sketchup, exported to cutlist (with 5 components the free version can be used) and took it to my local timber yard who cut it all. I bought a complete 8x4 sheet of MR MDF but have almost a half sheet offcut (future planning). MR MDF - £32, 4 x legs planed to approx 70mm sq £14 = total = £46 (actual MDF used means cost was about £32 plus nuts and bolts).
I used MR MDF as i have never used it and this was a cheap starter. In the end the table has not been finished in anyway (as many boxes get pushed around the top) and it is far better than the normal brown MDF.
Assembly was straight forward and took less than 3 hours.......
A simple design that could be adapted to provide stable table for car boots etc.
An added bonus is that I now know where my wife is - the table has proved so successful the room is now designated as the' hub' as she spends so much time there
Dave
The brief was simple - it had to fit the space drawn in the air with female pointed finger (assessed as 1450mm long by 850 mm wide), be as tall as our dining table (730mm to top, legs eventually made at 710mm with 18mm MR MDF top), had to be easy to take apart (for when guests used the bedroom) and finally had to be built by the next weekend and not bang knees (underframe 85mm)
Other pictures....
the pocket screws securing the underframe:
T Prong nut fitting:
Simple leg assembly:
The images show the final design and the simple but effective way the legs are attached to the underframe using 8mm T prong nuts, bolts and washers. This has thus far proved very strong.
I created the design in sketchup, exported to cutlist (with 5 components the free version can be used) and took it to my local timber yard who cut it all. I bought a complete 8x4 sheet of MR MDF but have almost a half sheet offcut (future planning). MR MDF - £32, 4 x legs planed to approx 70mm sq £14 = total = £46 (actual MDF used means cost was about £32 plus nuts and bolts).
I used MR MDF as i have never used it and this was a cheap starter. In the end the table has not been finished in anyway (as many boxes get pushed around the top) and it is far better than the normal brown MDF.
Assembly was straight forward and took less than 3 hours.......
Used the axminster pocket hole jig to cut the pockets in the 4 pieces of the underframe to attach it to the top and the short sides to the long ones.
Temporarily clamped the two MDF leg rails to the two frame short ends, so that the centres were aligned. Drilled 9mm holes x 2 to take the fitting bolts and T nuts.
Fitted the T nuts (to the correct face!!) using a bolt and large washer to pull it in - never try and hammer these in.
Pocket screwed the ends of the frame to the sides and centralised the completed frame on the top and marked the position.
Shaped the top - cut rounded corners and then routed a simple profile. Also shaped the bottom edges of the frame and the leg sides.
Fitted the underframe to the top.
drilled 3 countersunk holes in the MDF leg rails for each leg and then bolted the rails to the underframe.
Applied glue to one face of each leg and glued and screwed each leg to the frame. I Used a bessey clamp to ensure the other leg face was tight up against the long frame side - this proved enough for the leg to naturally be at 90 degrees.
Undid the bolts, took the table to the designated room and reassembled in about 1 minute.
A simple design that could be adapted to provide stable table for car boots etc.
An added bonus is that I now know where my wife is - the table has proved so successful the room is now designated as the' hub' as she spends so much time there
Dave
")