Adjustable router compuss jig

UKworkshop.co.uk

Help Support UKworkshop.co.uk:

This site may earn a commission from merchant affiliate links, including eBay, Amazon, and others.

garywayne

Established Member
Joined
21 Jun 2005
Messages
744
Reaction score
0
Location
Bideford, North Devon
Hi all.

Not sure if this should be here, hand tools, or projects.

Scenario: Narrow groove in round table.

Objective: Widen groove a tad.

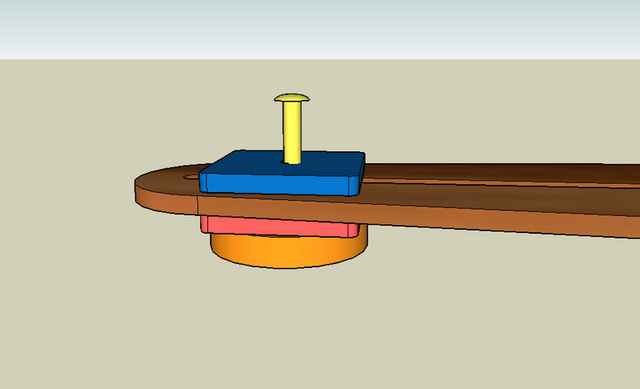
I have made this jig:-

Routercomposjig.png


Instead of using a pin to center the jig, I thought I would use a base plate with a dowel hole, and connect it to the table using double sided tape. At the other end of the jig there is a spacer underneath so everything will be level.

What I am asking from you is, what do you thing is the best way to turn this jig into a sliding adjustable jig. So that it can be adjusted exactly to ware I need to widen the groove in the table.

All suggestions will be contemplated.

Thank you all for you input, and the use of your little grey cells.
 
Hi, Garywayne..

have you given a thought to a vacuum clamp??

if the table is not something that needs to be done "yesterday".....and

if your into making your own Jigs for your Router, you could do a lot worse then get a copy of

Router Magic by Bill Hylton ISBN 1-86108-127-8

regards
 
Hi Neil.

Thanks for such a quick response.

Alas, my financial status is rather bleak at present. Everything I do has to be done on the cheap.

I was thinking of cutting a section out down the center and fixing some sort of sliding, clamping thingy to it with a dowel hole for fixing to the base plate. I am still not sure how to go about it yet.
 
Hi Gary,

There was a discussion some time ago here https://www.ukworkshop.co.uk/forums/view ... ght=#94992

On that thread I posted a link to FWW magazine. The video referred to has expired but you might just be able to make out the idea from the illustration. Very simple and effective. Basically you need to make a sliding section that has the pivot pin, if that makes sense :?

Hope this helps :wink:

Paul
 
Gary

Correct me if I'm wrong but wouldn't it be better to have the fixed dowl in the base plate and then stick the base plate to the table with double sided tape. The trammel then sits over the dowl and away you swing merrily.

The thread that you have been refeered to is one I started on trammels jigs becasue i needed one for a couple of jobs. never did get around to making one, instead i got one form the states which is excellent. How big is the table you need to rout?
 
Paul, thanks for the link. I couldn't quite make out what was going on.

Waka. The reason I left the hole in the base, was so that I could see the centre mark on the table, then the dowel in the jig can be plonked in the hole in the base. That got a bit confusing, I hope I got it right. Does it make sense to you. Table being 24" across.
 
Hi Gary,

Yes, the picture's a bit small :oops: I'll try to explain it - draw it out on a piece of paper. Once you grasp it, it's quite simple and effective. The long board has two slots in it. The smaller board rides on top of it with two pieces of wood sliding along each edge of the long board. The pivot pin (a piece of 1/4" or 6mm rod) passes through the small board and the centre slot of the long board and into the workpiece. A bolt passes up through the other slot in the long board (you have to make a recess in the underside of the slot to cater for the bolt head), through the small board and is secured with a nut. That locks the smaller board and pivot pin in position. Hope that is clear but let me know if it isn't :wink:

All the best

Paul
 
OK, this is what I have come up with:-

Routercomposjig2.png


The Orange bit, which has a hole in it's centre, is stuck to the table with double sided tape. The Blue & Pink pieces clamp the Brown piece,(Compass part), with a bolt that passes through into the Orange bit, which allows the router to circle the table at said distance.

The Orange piece has a nut glued into it, and there is also a lock nut (not shown in picture) that fastens down onto the Blue piece which will hold the compass.

I hope this all makes sense.

Please, [-o< if anyone has a better idea, let me know.
 
Gary
How are you going to ensure that your pivot point is EXACTLY in the centre of the table? I infer that the table already has a groove in it, so the tweaking must be from the same centre.

And I'd want a MUCH bigger fixing plate; if it slips...

Assuming that the table and groove were cut originally from the same centre (I know, I know....) then you could make a curved fence for your router fence ods and run round the outside.

HTH
 
Gary, could you elaborate on the groove that already exists on your table top? How wide is and how deep? Do you know the radius of the curve? How much wider do you need to make the groove? Are you widening it to the outside or inside of the existing groove? Or would you be running on center along the existing groove?
 
Following on from Steve's post. Instead of making a curved fence, simply putting two radiused pegs onto the parallel fence at each end (pointing towards the router) will enable the router to follow the outside edge. (I seem to recall seeing this in a router operating instruction book.)

It will also follow (50% depth) of the hollows/defects in the outside edge (and duplicate them = twice as many!), but maybe this is OK?

Simon
 
Gary,

I would be concerned that using double-sided tape it would be hard to find the centre point and it might slip. A better approach might be to use a conventional trammel bar which is simply a metal rod which passes through one of the router's fence rod holes and has a spike at the other end. This will mean a VERY SMALL mark in the centre of the table top which probably wouldn't be noticeable when filled in. Your router probably takes 8mm or 10mm fence rods. If so you could probably get some suitable 8 or 10mm metal rod of an appropriate length from B&Q quite cheaply. You can get the spike as an accessory to fit 8 or 10mm rods from Trend (£5 or £7 + VAT). They have them on page 134 of their 2005/2006 catalogue (can't find them on their website). To find the centre point I would use a compass from three points on the existing circle. Scribe an arc and draw lines from where the arcs cross.

Hope this helps :wink:

Paul
 
Mine is a bit of MDF with a hole in the middle and three bits of wood to hold the router in place , attached to this is another strip of mdf and i put a screw through the centre line where ever i need it . If i dont want a screw hole in the centre ill spend £11 on a sheet of MDF and cut a template ..... or use the 8-[ Legacy 8-[
 
Hi everyone. This is my second attempt.

Steve- Simple geometry will find the centre of the table. The hole in the base-plate will allow me to see where the centre mark is on the table. Another thought about centering, is to place the base-plate over the centre mark, put a dowel through the base-plate hole with some pressure and move the router round the table with a small cutter in the original groove to fine tune the base-plate position.

A bigger base-plate (fixing-plate) can be arranged.

Running around the outside sounds like a good idea. I'll try a dry run and see how it go's. Thanks Steve.

Dave- Sheela, (my wife) bought a round table that had some damaged inlay beading stuff, which she has now removed. Her intentions are to replace the inlay with Andy's (LyNx) generous donation.

The groove in the table is 3/32" (2.58mm) wide by 1/32" (1.01mm) deep. To be inlaid with 1/8" (2.98mm) wide by 3/64" (1.18mm) thick inlay beading.

The sizes in the picture are wrong. They should be: 3/32" wide x 1/32" deep.

Table2K.jpg


I have a 3mm router bit, which I have used to cut a trial groove in some scrap. The new inlay fits really snug. The material on the inside shall be removed. The radius is 11". Thanks Dave.

Simon- Thanks for the upgrade for the router fence.

Paul- I thought double-sided tape would hold. But now you mention it, I will do a trial run first.

I would rather not put holes in the table top if I can help it. Thanks Paul.

JFC- Thanks for your input, but I can't afford £11.00 for MDF at the moment. We are literally living on a shoestring. By the way, I don't want to sound totally ignorant, but what is a legacy? Thanks JFC.
 
Gary, when I asked those questions I had in mind a jig with a couple of pins to follow the existing groove but I see now that the groove probably isn't deep enough to be a trustworthy guide.

The first thing I thought about when I saw the picture is a simple jig that would follow the outside edge of the table top. I've got an idea for a simple adjustable jig that would work. This would eliminate the need to find the exact center of the table as well as the need to securely fix the jig to the table top.

If you want, I'll make up a sketch of my idea. If you want to use the trammel, make the base of the center pin much larger and use a lot of tape to secure it. You've got plenty of room for it.
 
At the risk of going "off-topic" - have you considered using a scratch-stock instead of the router? November issue Furniture and Cabinetmaking article by John Bullar refers to this and shows a way of making one by cannibalising an old marking gauge (expensive if you don't have a scrap gauge though!)

Advantage over the router claimed to be lower rate of doing damage if something slips. I am not sure how well it would enlarge an existing groove, but I am sure that there are some on the forum who could advise on this.

Simon
 
SON":2lyxiq7m said:
At the risk of going "off-topic" - have you considered using a scratch-stock instead of the router? November issue Furniture and Cabinetmaking article by John Bullar refers to this and shows a way of making one by cannibalising an old marking gauge (expensive if you don't have a scrap gauge though!)

Or see Alf's article here about making a scratch stock :wink: http://www.leevalley.com/newsletters/wo ... ticle1.htm

Paul
 
Dave- A sketch would be great. Thanks.

Son- Nice idea. I could use my cutting gauge with a concaved headstock. Do you think it will be accurate enough for inlay?

Paul- Thanks for the link.
 
Back
Top