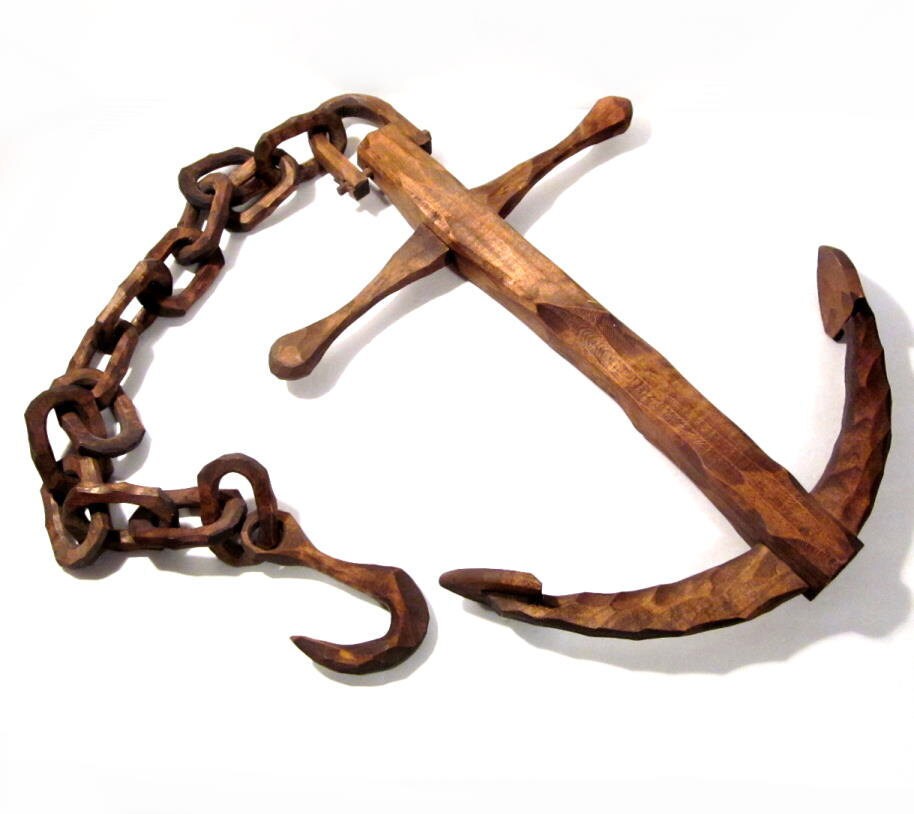
A bit different.. a wooden anchor! WIP no more!

UKworkshop.co.uk

Help Support UKworkshop.co.uk:

This site may earn a commission from merchant affiliate links, including eBay, Amazon, and others.

zodiac

Established Member
Joined
19 Dec 2012
Messages
120
Reaction score
0
Location
Wales
Despite being a woodworking newbie, I am in the middle of making a wooden anchor for my nearly 3 year old's pirate themed bedroom. A search on Pinterest for ideas to copy turned up mostly ones cut from a sheet of ply but I did find an antique one which is more 3D and made of timber, so I'm having a go at that!

Also I'm only using reclaimed wood, which might actually help it to look aged. I'll put up some photos a bit later when I work out how to, maybe pick up some tips from you more experienced guys along the way.

:)
 
Maybe start with something simpler like a plank lol (sorry Dangermouse has more self control than I).

Good Luck and welcome to a woodier world.
 
Oh, unless you mean a "walk the plank" plank. I'm not that much of a newbie hopefully !

I meant one of these ...

il_fullxfull.295220580.jpg


... but I'm not attempting the chain, will probably use old rope if anything in place of that.
 
Sorry trying to be funny and failing. They are a very helpful bunch on here, I'm pretty new to this wood working lark myself.

Think a proper 3d anchor might be a tad ambitious for a first project if it was me I think I'd try and cut out an anchor type shape out of mdf or other cheap material and then make it 3D with papier mache. Obviously attach it to the wall well above your young lad's reach.

He's not called Jim is he ?

Edit: That anchor looks deceptively simple, one stake and two cross beams. The top one should be fairly easy to create but the curved one at the bottom could be trickier. All depends on what tools you have / access too.
 
No, he's not Jim Lad either lol

I've already got the piece for the upright, which is 2 feet of 3x2 which I have roughed up using a rasp disc in the drill (never seen one until I found it on ebay) ... I have decided to make the curved bottom piece two separate crescents and try and mortice/tenon kind of joint each one but since then I have thought of a one or two ways I could have made that one piece and been stronger. Oh well, I don't have another piece of scrap reclaimed wood like it so it's staying a 2 piece.

Tools? Hmm... scrollsaw (cheapie), £15 type drill press, B&Q ten quid special mains hammer drill which gets used in any way that works!, cordless drill, Silverline dremel-type rotary tool and god knows how many bits to fix into that, usual array of hand tools, hammers, chisels, clamps, basic stuff really... oh yeah the very much ill-advised drill powered lathe as well but I haven't had the stones to try that one yet without a suit of armour :p
 
Just be bloody carefull it might be fun to wear an eye patch or a hook for a day but not for life.

Scroll saw and thick timber is a complete no no. £15 drill press sounds dodgy as well.

If you end up mixing old and new timber you could always go for a rusty coloured paint finish ? After all even Noah had a metal anchor ( well in my mind he did lol).

Good Luck and stay safe.
 
I was thinking of painting it black when fully finished to look more like metal than wood but maybe a very dark stain instead hmm
I didn't mention safety glasses in my tool list but I got em and I use em ... Two eyepatches may look piratey but you can't see what you're doing :p
 
The upright part, as I got it...

2013-04-23%2012.41.16.jpg


... and after some roughing up with the rasp disc thingy...

2013-04-23%2013.58.08.jpg


... a well weathered piece for the curvy bits...

2013-04-23%2015.28.04.jpg


... halved! ...

2013-04-23%2015.38.42.jpg


... rough pencil lines drawn, out with the jigsaw ...

2013-04-23%2015.58.39.jpg


... and one side is cut out...

2013-04-23%2016.12.07.jpg


That's it so far, I have cut out the other lower half but the wood had a split in it so that is glued and clamped at the moment. I'm hoping to make more progress on the weekend and see it start to take shape. Bear in mind that I am new to this, haven't done it before and am working from the photo I posted above only with no plans or measurements. The thread might not be useful to anyone but maybe I can pick up ideas or tips along the way by having it here.

In case it helps anyone offer advice I forgot to mention I have at hand a jigsaw, belt sander and 1/3 sheet sander that I forgot to mention earlier.

I will probably use the scrollsaw to make the U shaped piece to go on the top, out of an offcut from jigsawing the curved parts.
 
Ah, have realised today I should have put WIP in the thread title, maybe a mod can do this?

Got a bit more done today, will add photos later :)
 
zodiac":2nmf9hyg said:
Ah, have realised today I should have put WIP in the thread title, maybe a mod can do this?

I don't think it really matters - but if you want to, you should be able to edit the first post yourself and add it into the title still. If you make any changes to it, that's how it'll show in the forum thread list, and on any new replies.
 
JakeS":k5cpx5o2 said:
zodiac":k5cpx5o2 said:
Ah, have realised today I should have put WIP in the thread title, maybe a mod can do this?

I don't think it really matters - but if you want to, you should be able to edit the first post yourself and add it into the title still. If you make any changes to it, that's how it'll show in the forum thread list, and on any new replies.

That works, thanks JakeS :)
 
Ok, got a bit of time in the shed today :) Mostly shaping (re-shaping?) what was cut out from hand drawn lines. I got one side of the (sorry, don't know what that part of an anchor is called, I'm sure there is some nautical term!) curved part shaped almost ready but the other is still quite rough, also made the U shaped piece that would be the chain link if I was making chain!

2013-05-04%2016.58.12.jpg


Decided that the 3x2 looks better narrow edge on so I placed them on the decking to see how it looks in order to judge proportion etc and decide what does and doesn't look right.

2013-05-04%2018.19.13.jpg


Tomorrow I hope to get some shed time and shape the other curved piece, maybe cut out the bits (stop me if I get too technical!) to go on the end of these, I think the U shaped piece is way too heavy so will probably take it down to half or 2/3 of its current thickness, and maybe mark out mortice/tenons. We shall see!

Thanks for putting up with me! :)
 
Hi Zodiac

It's coming on nicely.
My only concern would be that if it gets a knock then there are several vulnerable cross grain areas that could split off. Not likely of course if out of the way as an ornament but we all know what little boys are like and he might "chuck it overboard". :wink:

Personally, I'd have used hardwood or a couple of thicknesses of ply glued together but the attraction of using scrap s/w is obvious.

Bob
 
True, maybe this will live longer if wall-mounted!

I didn't think of stacking ply, I've got a few sheets that came off pallets so I might use those when I make a ship's wheel! Yes, I'm being serious. That, and a treasure chest are going around in my head already.

I did some more yesterday but pasting links is a pain on my phone so I'll probably add more pics tomorrow.

:)
 
Sounds great! Can't wait to see pics of the wheel and chest when it happens

Isn't it strange how grown men revert to childhood when they have kids. it's a fantastic opportunity to live those childhood dreams - I love it :lol:

When my daughter was a couple of months old I bought "her" a trainset and "laboured" long and hard to make a nice layout :oops:. When my son appeared, I had a field day and now that I have a first grandchild - well happy days ahead on the toymaking front :wink:

Bob
 
Well, I've managed to grab some shed time here and there over the last few days, but laptop time not so much. Here goes with a progress update!

Although I thought the only way to join the curved limbs to the upright part (no, I still don't know what the different parts of an anchor are called!) would be some kind of mortice & tenon joint, the strength would probably be minimal when it no doubt gets used as a pogo stick some time in the future. Instead I decided on a big notch which means I can nail or screw through as well as lots of surface area for glue.

This was cut out on my rubbish scroll saw, and here is a photo before I squared it out a bit better with my rasp and terrible quality chisel. I need some decent chisels!!

2013-05-05%2019.48.56.jpg


Next, on the picture I am copying / using for inspiration there are bits (barbs?) on the end of the curved limbs so while looking at my wood scraps for something to make them out of I saw the piece I cut out of the U shaped shackle thing. A quick word with the FIL who was in his shed and it was split into two with a cross cut mitre saw, much quicker and less wonky than me hand sawing it!

After a quick freehand pencil line and a whirl on the scrollsaw, followed by a going over with the mini belt sander, here is one half after splitting and one half pretty much done...
2013-05-05%2019.52.33.jpg
 
So, what next? Place the shaped piece on the end of one of the limbs to see how it looks... not too bad actually (I reckon anyway)...

2013-05-05%2019.53.53.jpg


2013-05-05%2019.54.31.jpg


... glue and nail/screw should attach them firmly enough, maybe a bit more shaping as they look slightly chunky compared to what they will be attached to :)
 
Well, I wanted to make this completely out of scrap/reclaimed wood but a google image search for anchor shows almost every time the cross piece further up the upright as a rod, rather than the ornate piece in my inspiration photo. I'm not about to turn one out though so I had to bite the bullet and buy a suitable piece :-( Does anyone sell broom handles anymore?? The pound shop does have some nice kids garden tools though, as you can see in this mock up with nothing attached yet to gauge proportion and see if it all looks completely rubbish ...

2013-05-08%2018.22.32.jpg


Whereas without a cross piece I thought it was too long and looked like a medieval crossbow, I think it actually looks not too bad (proportion wise at least!!)

The U shaped shackle thing was too chunky and looked wrong so I took the width down by about a quarter with the jigsaw and it looks better now, as can be seen in the next photo.
 
Back
Top