Turning end grain plane knob. Biting in alot question

UKworkshop.co.uk

Help Support UKworkshop.co.uk:

This site may earn a commission from merchant affiliate links, including eBay, Amazon, and others.

ColeyS1

Established Member
Joined
2 Nov 2009
Messages
4,245
Reaction score
35
Hi all.

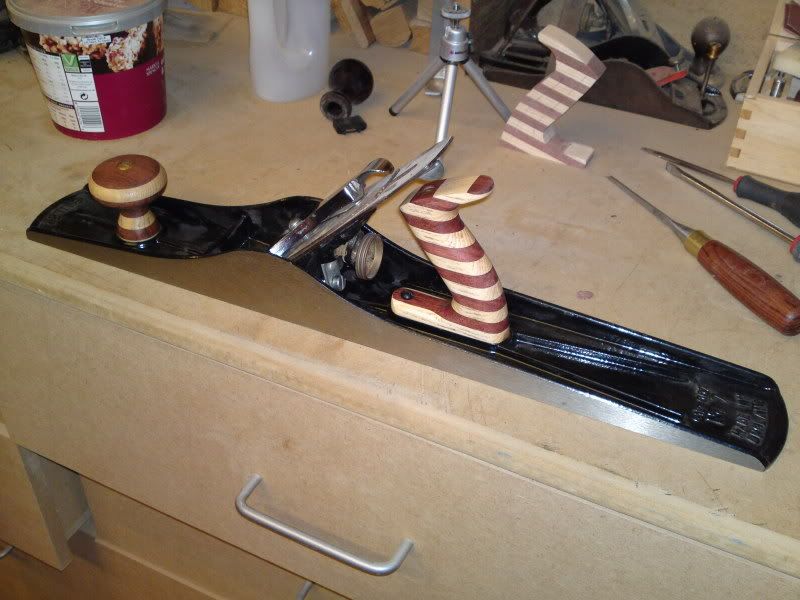
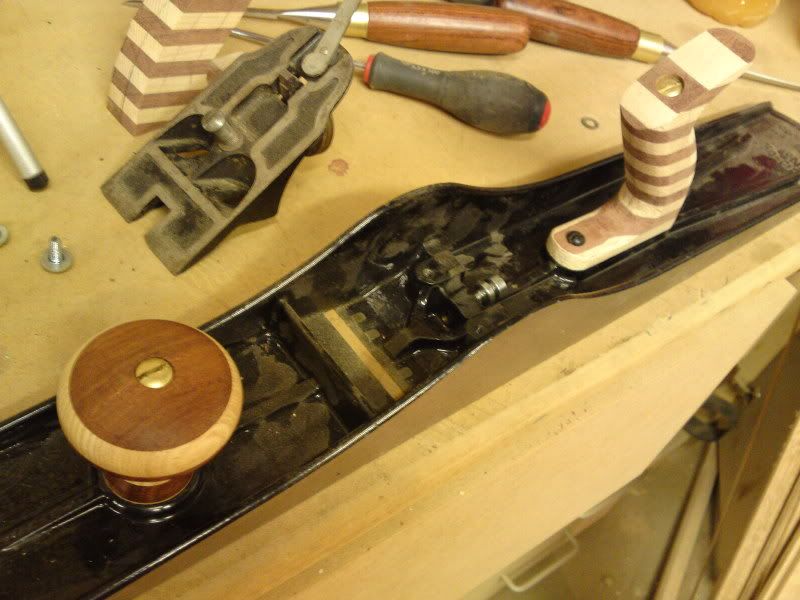
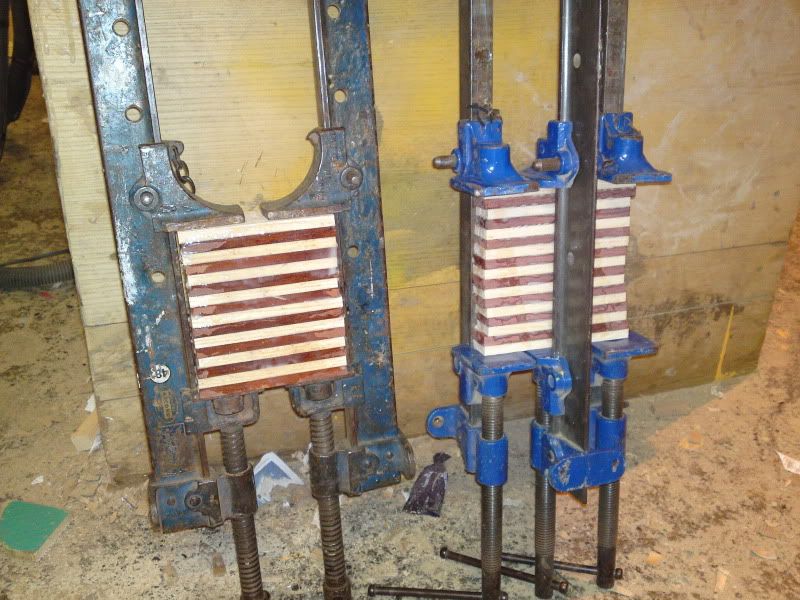
I managed to salvage a no7 plane base from a skip and thought id like to make a new handle and knob for it. Something a bit different so i stuck lots of ash and jarrah pieces together.

9699e2ca.jpg


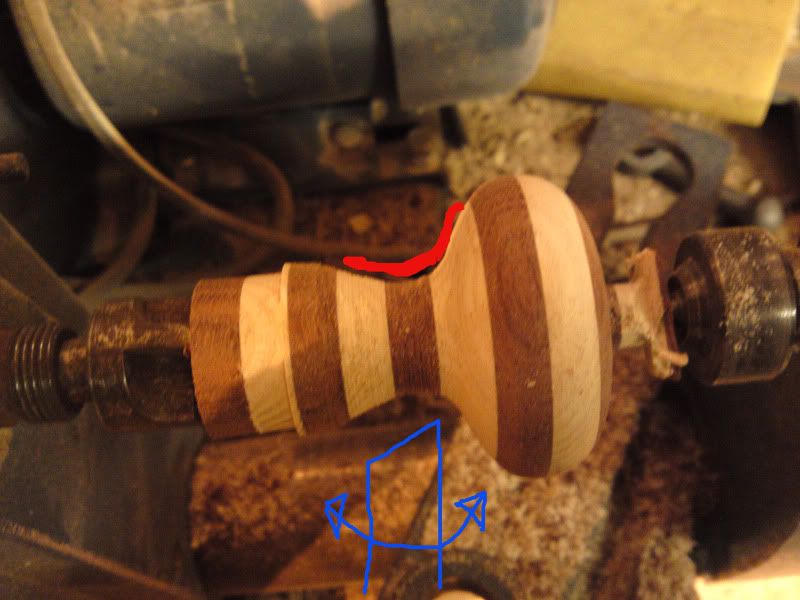
Very new to this lathe turning malarchy. When i was trying to turn the knob with a small gouge chisel, it kept biting in and splitting small chunks off.(doing the red section in the picture was the worst)
3c5c270c.jpg

Managed to finish it using a skew chisel and 80grit, but ended up not getting the shape i really wanted. Was hoping to make another one and was wondering if you could give me any tips on how to do it properly :wink:

Really wasnt much fun trying to turn this end grain :(

Thanks

Simon
 
I would use a spindle gouge for that form, approaching from both ends from widest dimension to narrowest. I.E. going downhill into the hollow.
Start in the centre area and work back to each end as you cut deeper.

No way would I risk trying to use a skew gouge on that laminated wood due the the fact that you are presented with endgrain as it rotates.

See this Video Clip
 
Simon , you should use a spindle gouge , and only cut downhill not uphill

so from the left side down to the middle , then from the right side down to the middle
 
Thanks for the quick replies chaps.
Ah ha, so its the same sort of thing as planing with the grain, gotcha :!:

Thanks for posting the link CHJ. very good example thanks :wink: I notice when the persons turning from the right part to the middle he sort of, how'd you say, is skewing it almost. But the left to middle, the chisel looks pretty much square on to the rest.
Does it make any difference at which angle the chisel is held. Should it be always square on to the shape you're trying to make?
 
coleysbiscuit":3fs0bryg said:
Thanks for the quick replies chaps.
Ah ha, so its the same sort of thing as planing with the grain, gotcha :!:

Thanks for posting the link CHJ. very good example thanks :wink: I notice when the persons turning from the right part to the middle he sort of, how'd you say, is skewing it almost. But the left to middle, the chisel looks pretty much square on to the rest.
Does it make any difference at which angle the chisel is held. Should it be always square on to the shape you're trying to make?

The angle difference is more than likely just down to the lack of flexing of the operators wrist. The right to left movement is a better flow and would provide a better bevel contact and surface polish as the curve deepens, not always as easy to simulate in both directions, and needs a little extra concentration as your wrist naturally flexes one way easier than the other.

EDIT: There are a few more simple video links from Brian Clifford

You might find some more info. from the other links in theTurner & Craft linkssection of my web site.
 
During the bulk waste removal the video shows the gouge handle being swung to the right when cutting the right side but not to the left when cutting the left side. That is really just because the turner is right handed and he can't swing the handle to the left because his body is in the way. :) The final couple of passes to finish the cove show the better shearing technique, where the gouge is rolled so the flute is facing in the direction of the cut and then rolled back to a flute up position as the bottom of the cove is reached.

Since you will be turning the edge of a face grain blank rather than having the blank oriented spindle fashion as it is in the video you will need to take extra care not to catch the end grain and split out a chunk. That would be similar to planing across the end of a board without backing up the far edge. The shearing type of cut demonstrated in the last couple of passes in the video might be necessary much earlier or even all the way in a face grain blank.

Good Luck!
Bob
 
I was thinking of getting stuck in on the lathe again tonight, but think it might be of more benefit if i study the links you posted a little more. - thanks for posting the extra ones CHJ. They explain stuff in so much detail!

Bob,
That would be similar to planing across the end of a board without backing up the far edge. The shearing type of cut demonstrated in the last couple of passes in the video might be necessary much earlier or even all the way in a face grain blank
again, when you put it like that, it seems kind of obvious why it might split off. :wink:

Appreciate your thorough explanation chaps :!:

Simon
 
This situation is really tricky!

If this was a standard spindle blank with the grain running along the bed then I'd say the same as others - cut downhill going from large diameter to small.
However, because the grain is essentially lined up like a bowl blank I'd say that the best cut will be achieved cutting from small diameter to large. When in doubt I usually think of the fibres of the wood and cut in the direction that ensures that they are supported. The problem here is that the shape means that you can't easily cut from small to large diameter whilst achieving bevel contact. The best way to proceed may be to carefully do initial shaping as per a standard spindle blank (ie. large to small diameter with bevel rubbing) and finish off with a pulled shear cut from small to large diameter. Someone may be able to provide a video for reference.
It's not necessarily a particularly easy cut for a beginner to pick up and you may have more success with a scraper - again working from the centre out.

Hope that helps

Duncan

(I think all the above is correct, these were my first thoughts on the matter and I've thought about it on and off during the day)
 
If you use a bowl gouge you should be able to get a shear cut on it. As Duncan says what you are trying to do is end grain work and is ripping the grain. Only other option I have resorted to in situations like this is to shape as close as possibly then give a good soak in sealer and use a very low grade abrasive such as 50 though that is a last resort.

Pete
 
hi all,

Duncan, thanks for taking the time to answer my dilemma. I'll have to go carefully with a gouge, depending on how i get on may have to use your scraping idea to finish it off.

Pete, sorry if this is a daft question, but what does soaking it in sanding sealer do? Do you literally mean pour it in a pot and let it soak overnight ? Think i was reading somewhere on here about raising the grain- is it something along those lines?

Bob, i'm gobsmacked :shock: . Watching the video as we speak. Cant believe you went through the trouble of making a video for my situation. unbelievable generosity. Thankyou ever so much. Will post again after i watched them all :wink:

The helpfulness of everyone on this site is incredible
 
5 minutes into the first video- just amazing. you make it look so easy
 
CB, giving the item a coat in sanding sealer will support and strengthen the surface fibres, making them easier to cut.
In the first instance just let it dry off (a few minutes) until hard.
In some instances using sealer, water or finishing oil in a still wet condition will swell the fibres, lubricate and ease the cutting, what you use depends on intended final finish.
 
Bob, those video's were incredible. :eek: I've really got to practice alot more on scrap pieces before i go attempting to turn the other knob.

pretty good finish
i find that unbelievable. I suspect you dont need 80 grit to clean up any of your turning. I was debating whether i needed 60 grit- think i just alot more practice.

i'm definitely going to have to experiment with turning/twisting the gouge. Also had no idea the edge of the gouge could be used for surface scraping. Will need to try resting my finger behind the rest also. Only thing i've ever done so far is push down on the rest with my entire hand fearing it may jump around. Top man for posting the videos. I'll be using it as a reference for practicing on my blanks first. Expect there will be alot of pausing on the video. :wink:

The one i'm yet to do will be slightly different to the one i just attempted. I've put the grain going slightly at an angle. You can just about make out the handle shape and grain pattern in the back ground. Hopefully i can turn the other knob to match the grain direction.

adbd9634.jpg

68a621fb.jpg


If i'm lucky, i may have enough zebra wood left to have another attempt at my first knob. I'll see how the second one turns out :wink:

CHJ, so sanding sealer has quite a few benefits then- it hardens and/or lubricates. I will try it at my next visit. I wasn't really sure what to put on the finished handle and knob. until a few months ago every single thing i made was satin polyurethane varnish. I've tried danish oil on this. i'm on my 5th application, it looks a nice finish until it dries. Then it looks bland. Do you think further coats may help, or would i be better off removing it and using something else ? I bought a carton of friction polish and some teak oil, i'm yet to try. Perhaps they may be more suitable.......

Appreciate all your help so far. I have already seen a change. Shavings coming from the lathe, instead of just dust and chunks. Bumby but smooth shapes, instead of ripping grain.

Thanks

Simon
 
If you have used oil, you need to leave it for some time to dry off completely, then buff, applying a hard wax like canauba or a wax blend with it in will bring to a polish after oil is buffed.

Don't know what the flat world uses for tool handles, give Philly or Alf a pm if they or other referb persons don't look in on this thread, they may shudder at 'go faster stripes' but have a lot more experience on the subject.
 
Wow! You'll not miss that one on the bench! Cool. 8)

Finish is such a personal preference thing it's had to advise; what I favour others might shudder at. fwiw, oil will build up to a good finish, but it takes time; I've found I got better results from Liberon's Finishing Oil as opposed to Danish oil, but that may be psychological. Me, I tend to use a wiped on coat or two of blonde shellac. Sometimes I'll knock it all back with a bit of wax, depending on my mood. But only 'cos they're the least hassle to use. :oops:

Cheers, Alf
 
CHJ
'go faster stripes'
:lol: I really like that !!! Someone came in yesterday and had to look twice at the handle and knob. He said it looks a bit like a stick of rock, something you'd see at a fair ground - ha ha.
I'd been reading a few posts on here about people laminating birch ply together and turning it. That was going to be my first idea but was unsure whether the bond between the layers would hold up enough for a handle. Im really only messing around with it. Prefer to have something thats functional even if it is a little out there. Only excuse i can use to have a go at turning birch ply, is to do a turning the shape of a skittle pin. -Then perhaps hollow it out as a type of vase. One for the future!

Thanks for you kind words Loz :wink: This lathe turning thing is getting a bit addictive. Found myself rescuing pieces of timber from the fire box at work. Was at home and was looking at this half shaped log, thinking 'um....wonder what that might look like cleaned up :roll: 'Needless to say its now waiting patiently beside the lathe :?

Thanks for the tips Alf. I'll stick with the oiling for a handfull more times then, then perhaps try another approach. I've picked up a bottle of tung oil today, to add to my finishing experiment. I was put off by the first lot of wax i tried- think it was called something like black bison wax-really orange colour in the tin. Will try a different wax on the next

Thanks

Simon
 
I was possibly one of the ones wot turned a ply bowl or 2? Not something that I would do on a regular basis!

The only other thing that I have turned like that was a bit of cross grained oak that I had and it looked quite interesting?

IMG_1334.jpg


I decided to keep the stem a bit thicker because of the cross grain, but I liked the result.

This is the bigger of the 2 bowls I did in ply, 12 inch dia and real rubbish French ply. I haven't found any half decent ply since we arrived

Plybowl1.jpg


Plybowl2.jpg


I don't think that I will be doing any more of these tool blunting items!!

Bob, a quick question if I may? Is there any reason that you didn't drill the hole first when you were turning that cross grain in the video? I usually do that and at least it makes sure that it's straight down the middle!
 
John
I don't think that I will be doing any more of these tool blunting items!!
I think it was well worth bluntening you tools! i think the different colours between the layers look amazing :!: :!:
The goblet you turned looks very interesting- will be a long time before i try making the walls that thin on any thing i make :lol:
Think i was reading somehwhere before that sometimes voids and other defects are found in the cheaper plys- that'll be fun looking to find the right board then :roll:

Simon
 
Back
Top