Dom's workshop build

UKworkshop.co.uk

Help Support UKworkshop.co.uk:

This site may earn a commission from merchant affiliate links, including eBay, Amazon, and others.
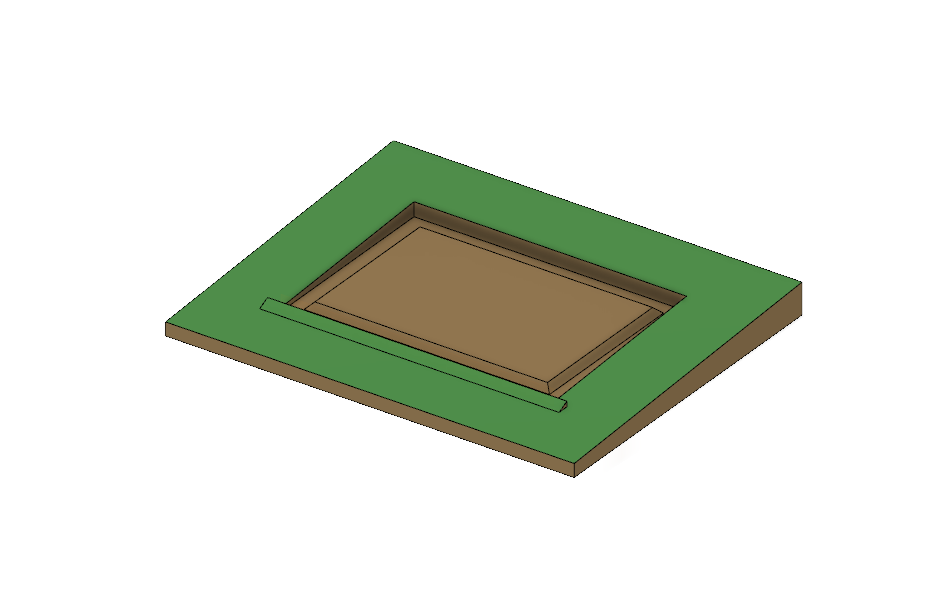
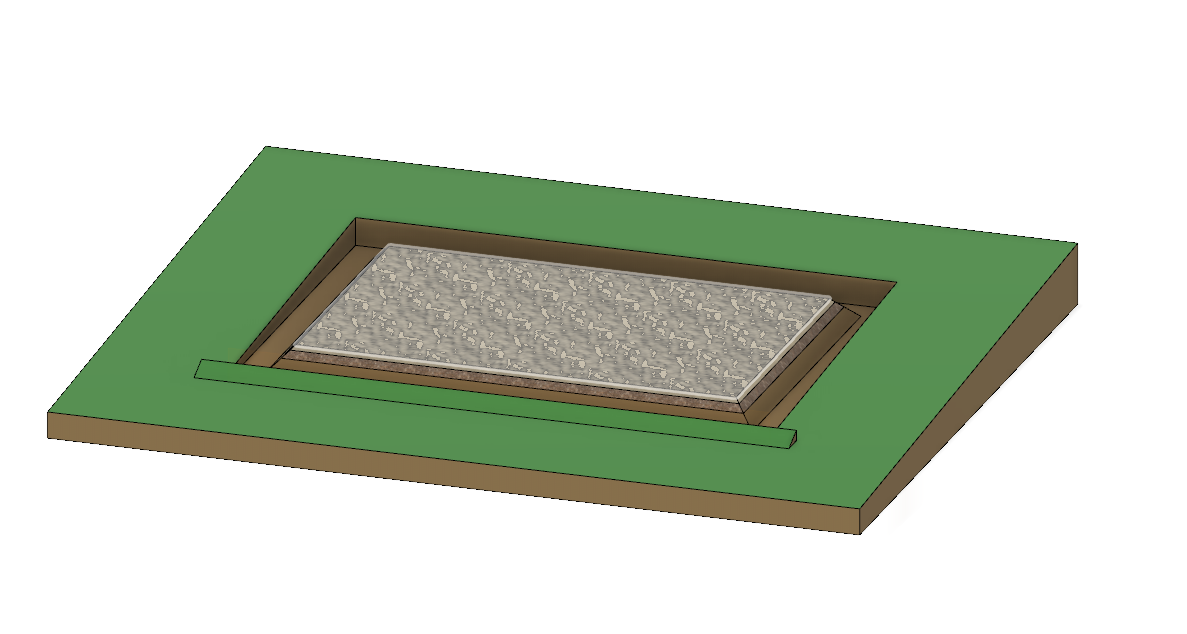
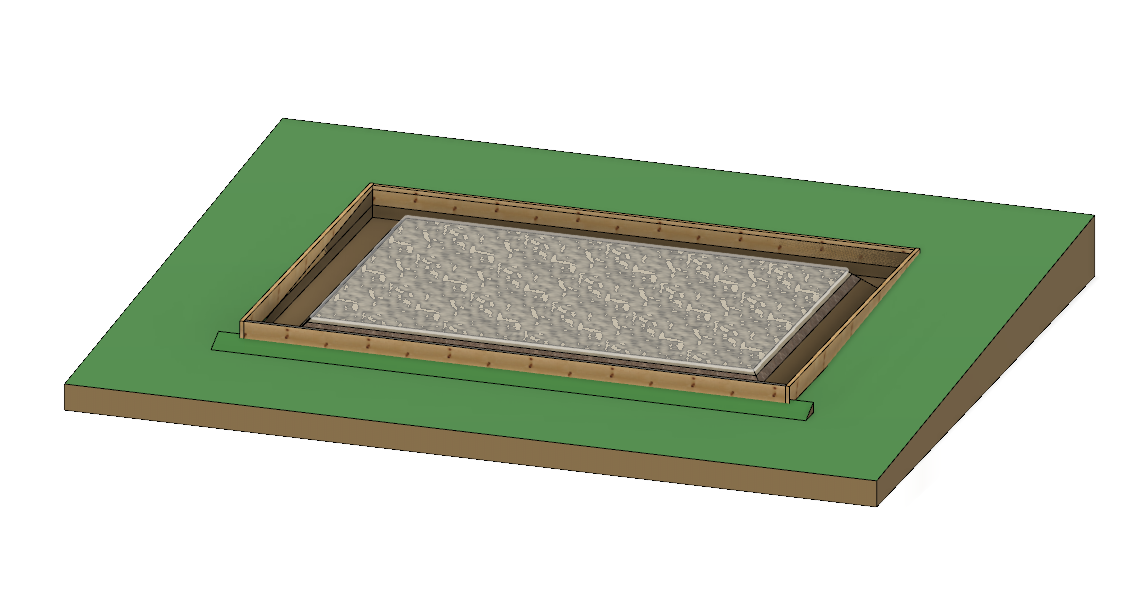
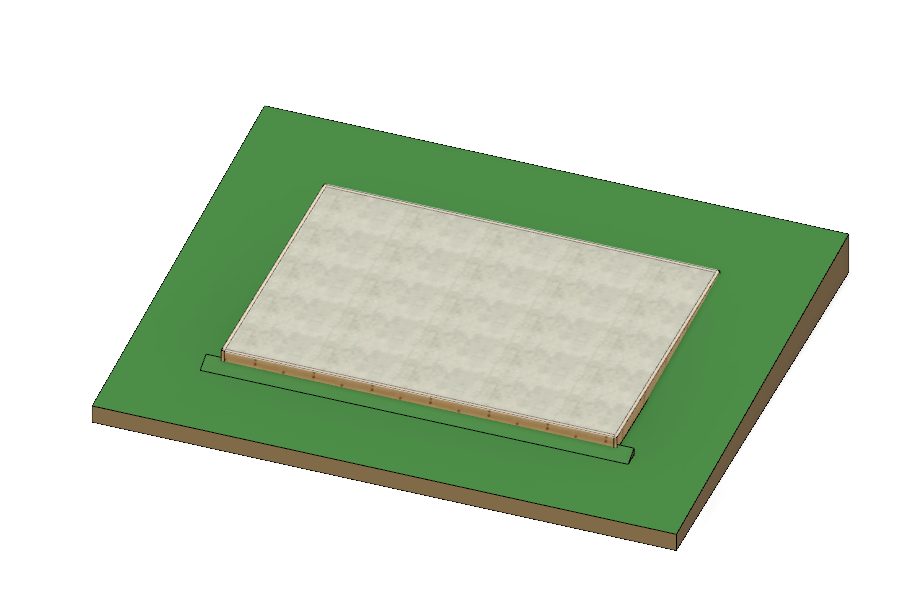
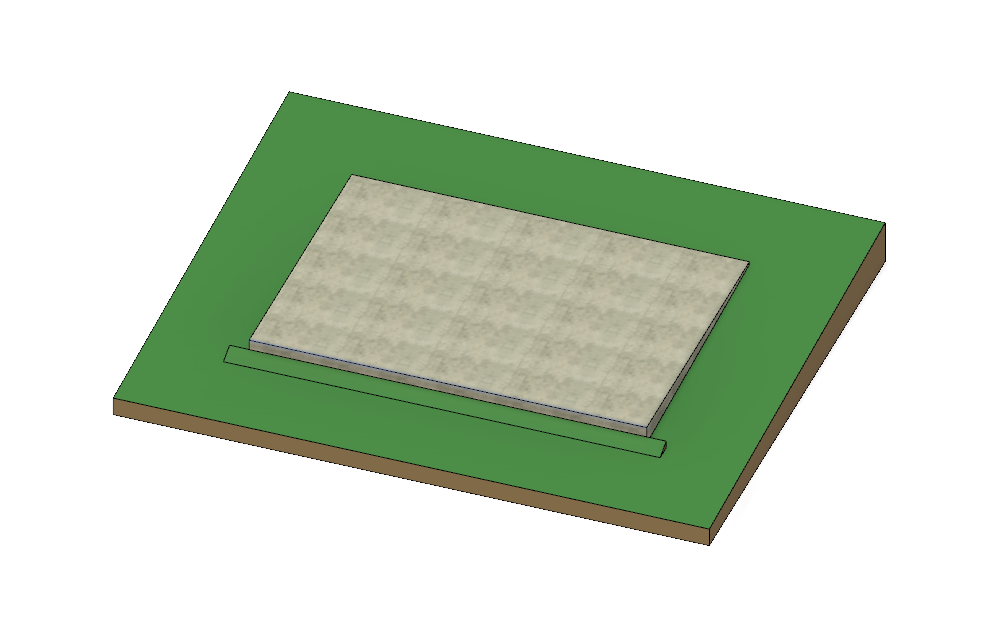
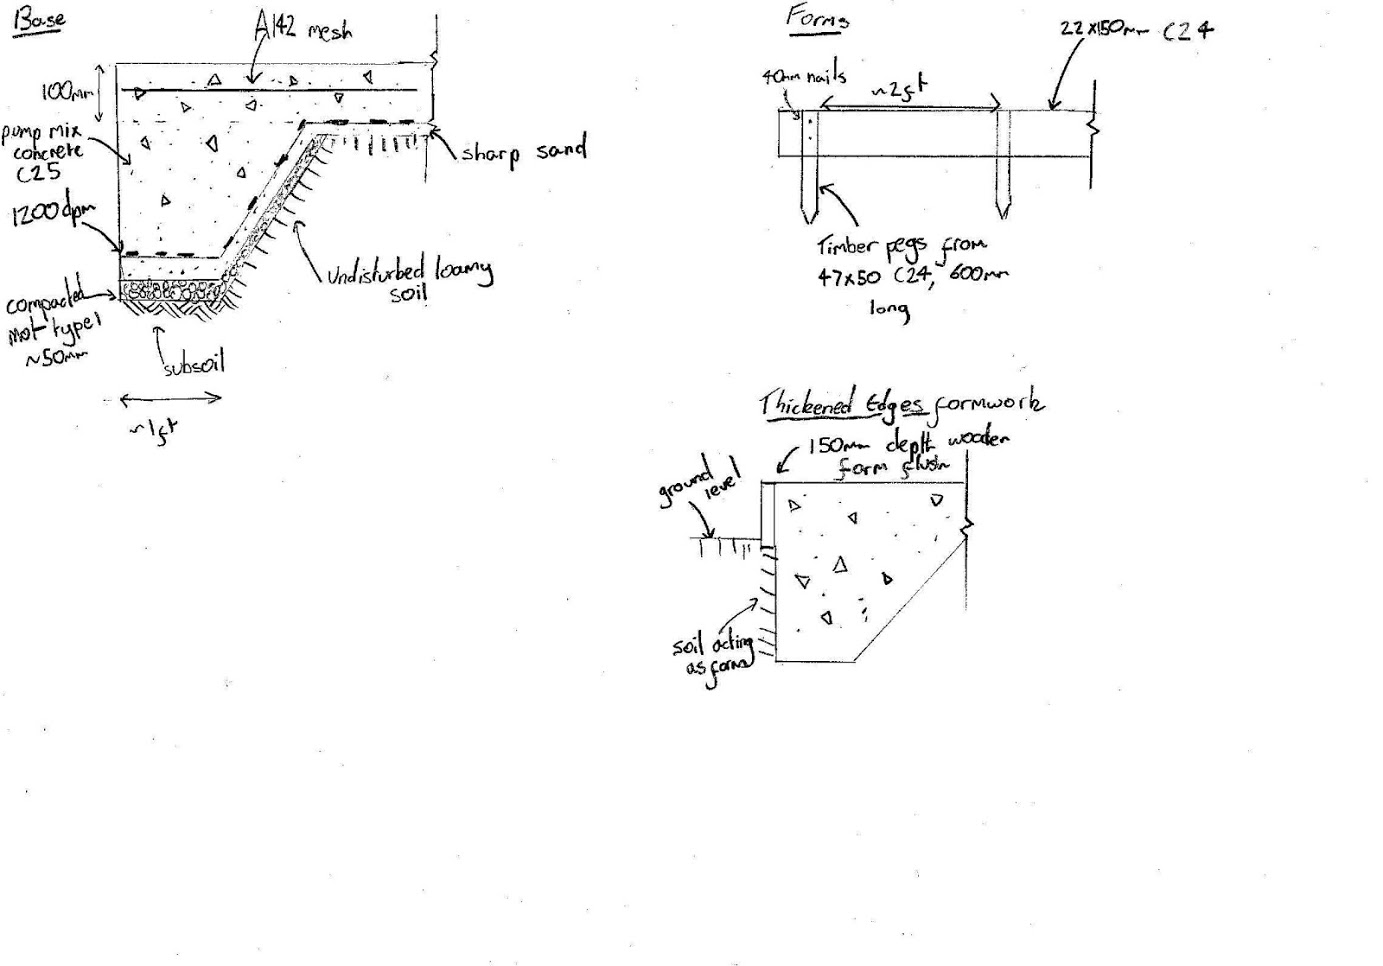
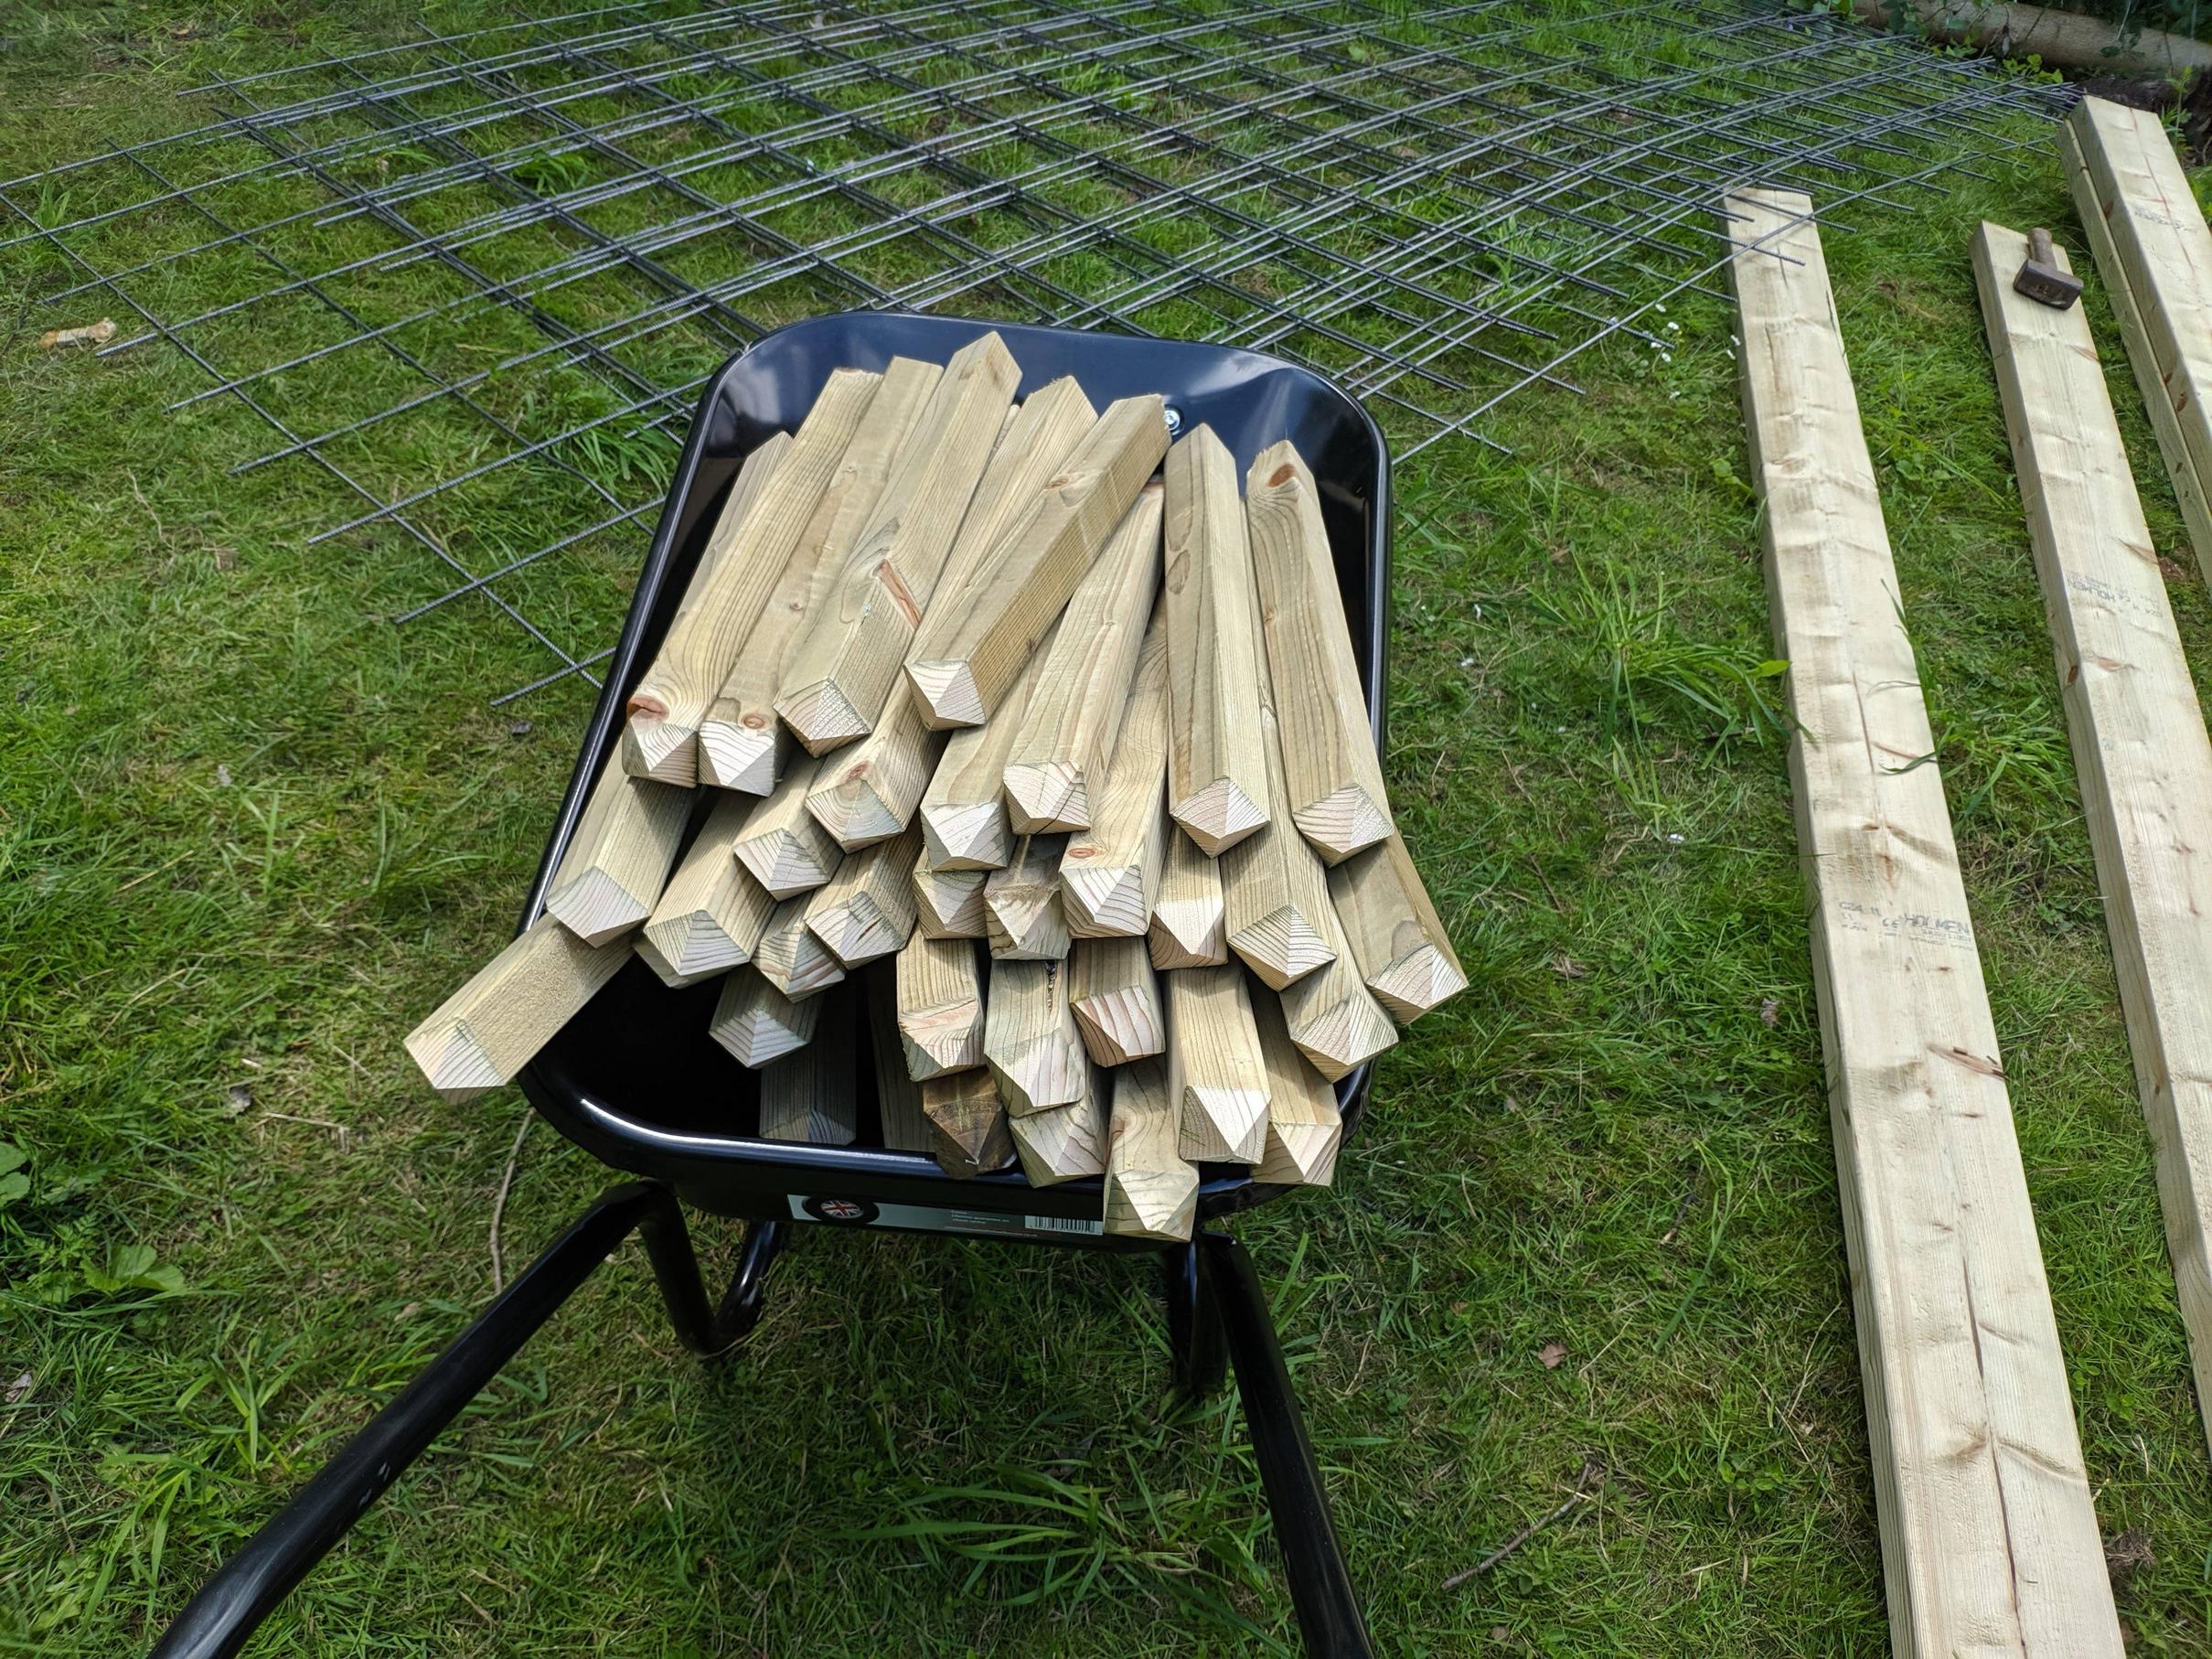
For the thickened edges I plan to have 4 16mm diameter bars running down each similar to shown below (but only one covering of mesh).
xs150gb.gif

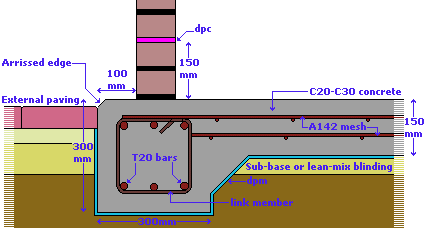
I'm guessing the link members only need to be regular enough to hold the other bars in place.
At the corners should the steel be bent round or is it fine to just cut it to length and tie to the other bars at right angles.
Also, would reducing the slab thickness to 100mm have much of an impact on strength?
Thanks
 
You're getting into an engineered solution here Dom, unnecessarily. The thickened edges I've suggested would be bearing on decent ground, and are therefore just a solid lump of something for the slab to sit on. They won't need steel in them.......but the slab will, as we've discussed. Think of the thickened edges as sleeper walls. The floor we were discussing isn't a raft (in which the whole thing floats around on a soft substrate). It is a suspended slab, bearing on the 4 outer edges.

You're on your own for a week.
 
MikeG.":3tgxj7dn said:
You're getting into an engineered solution here Dom, unnecessarily. The thickened edges I've suggested would be bearing on decent ground, and are therefore just a solid lump of something for the slab to sit on. They won't need steel in them.......but the slab will, as we've discussed. Think of the thickened edges as sleeper walls. The floor we were discussing isn't a raft (in which the whole thing floats around on a soft substrate). It is a suspended slab, bearing on the 4 outer edges.

You're on your own for a week.
Right, I will leave them empty then. I guess most of the stuff online is for building regs brick buildings.
 
I am hopefully going to get started on diggng the ground etc. next week. Is storing soil in bulk bags effective or should I be looking at another storage method?
Also a couple questions in relation to tools. I have seen US framers using 'speed squares' and was wondering if anyone had one and could comment on its usefulness; I would probably get a metric one if so.
Also there is currently a 10% off code on eBay and I am thinking about getting a DWS774 because I do not trust my old evolution saw to get me through this project. If anyone has any comments on that particular model then I would love to hear your thoughts.
Dom
 
Im in the final stages of building a garden studio around 5m x 4m.

I havent used a framing square to set out or check anything. Personally I prefer triangulation for setting out -its far more accurate.

I use an app called right angled triangle solver -it works on android. Its only basic trig, but saves doing any calcs, just enter the figures.
 
Today I put together some saw horses to get my mitre saw off the ground. I used this design and probably ended up taking longer than it could have due to the chiseled out sections.

wx2ySaY.jpg

WuXZUvg.jpg


I ended up getting a bosch saw in the sale - had to get sliding due to wide joists
QgrzbpQ.jpg


RobinBHM":nea0wolp said:
I havent used a framing square to set out or check anything. Personally I prefer triangulation for setting out -its far more accurate.

I did actually end up getting one - only for rough setting out before using triangles and diagonals. I will probably be setting out with batter boards tommorow.
Any ideas what sort of length is most suitable for a temporary saw station on the saw horses? I suppose enough to set up a stop block to cut studs, however it probably won't be long enough for joists.

Thanks for all the advice so far; Dom.
 
I have a set of taller saw horses for bench-type operations, such as using a chop saw. I put 3 or 4 scaffold boards across them and I then have a perfectly serviceable workstation. The smaller saw horses, as per the ones in the photos above, are used for hand sawing and so on (and for green oak framing). They don't get a lot of use when doing stud work.

You don't need a square for framing. In fact, they're a potential nuisance. You cut your plates (top and bottom members) accurately, clamp them together and mark up the stud positions on both at the same time. Once the studs are nailed in, squareness is achieved by correcting the diagonals until they are the same length.........and by nailing on your sheathing boards, which are in effect large accurate squares. A roofing square is an invaluable piece of site and workshop equipment, but don't use it for softwood framing.
 
MikeG.":1d3t75p4 said:
I have a set of taller saw horses for bench-type operations, such as using a chop saw. I put 3 or 4 scaffold boards across them and I then have a perfectly serviceable workstation. The smaller saw horses, as per the ones in the photos above, are used for hand sawing and so on (and for green oak framing). They don't get a lot of use when doing stud work.

You don't need a square for framing. In fact, they're a potential nuisance. You cut your plates (top and bottom members) accurately, clamp them together and mark up the stud positions on both at the same time. Once the studs are nailed in, squareness is achieved by correcting the diagonals until they are the same length.........and by nailing on your sheathing boards, which are in effect large accurate squares. A roofing square is an invaluable piece of site and workshop equipment, but don't use it for softwood framing.
I should have realised these were a little low... still will be useful no doubt. I will look into getting some second hand scaffold boards.

Sent from my MI 8 using Tapatalk
 
I layed out the site yesterday (added string lines after this picture):
8QzZzu4.jpg


The slope on the ground seems exaggerated now that I have taken a level to it. There is a ~300mm fall from the top of the site to the bottom which means ~4m^3 earth removal just for flattening and possibly another 4m^3 after for digging out the concrete pour area. I can't see this as being possible without a mini-digger (which I would be uncomfortable using, but could hire someone to do it) and even then many bulk bags would be filled with the excavated soil.

I'm not sure if there is any way of estimating if this would be doable by hand and in what timescale; I would much rather do a slab base than piers as previously discussed but I suppose piers would mean little digging. My only other thought would be to do an 'on grade' slab or have the slab mostly above ground with only the deep thickened edges below.

I would appreciate any thoughts,
Dom
 
I have layed out my site on CAD and think I have found a way to reduce amount needing dug while sticking to the previous design. Instead of flattening then digging the foundations, I was wondering if I could use the dig in to the slope as the back of 'shuttering' for the concrete: at the back concrete would be fully under surface level apart from 50mm above surface, at the front the concrete would be poking far above the surface (~250mm) but I could later use excavated earth to bring the surface level up so it is only 50mm. This is quite hard to explain so I made some slides of the steps I plan to follow.

First would be digging into the slope; thickened edges shown.
jLFpK6i.png


Then I would be adding hardcore and sand (need this in thickened edges too, forgot in CAD).
x2PbEZF.png


Next would be adding shuttering, you can see it would be almost completely below the surface at the back, using earth along with posts for support. I have read shuttering is not needed against soil in the thickened edge 'trenches', is that correct?
1IWmtpY.png


Then the concrete would be poured.
xm8lQ8l.png


Then I would remove the shuttering.
dIrHqIE.png


Maybe this way of doing it seemed obvious but it only came to me today; this should make it a managable job with a mattock and a few friends. Just wanted to check here first to ensure this is not a mistake!
Dom
 
About to make first order of materials for base.
I confused myself over the previous base diagram. As far as I am aware this redrawn one, with the load bearing thickened edges bedded on hardcore, not no hardcore under the middle, is correct. This is good news as it means only around a bulk bag of sharp sand and one bulk bag of mot 1.
ADpIOU6.png

The forms are out of C24 22x150mm with 50mm C24 pegs every 2ft. I have read that should be sufficiently strong, but don't want the form to warp too much. The thickened edges will be formed partially by a timber length and partially by soil (as shown).

This is my current shopping list for the base. Brickwork items not included.

N1W02wtkRHKqncTRqw_-Dg.png

Code:
1) Empty bulk bags for excess soil.
2) 22x150 timber for forms
3) Levels for levelling formwork (replacing my battered ones, have added a set, heard stabila are reliable)
4) Mesh for reinforcement
5) DPM 1200g, not sure how I should be taping this together
6) Sub base
7) Coarse sharp sand for blinding
8) Wheelbarrow for moving aggregates
9) Timber to make pegs - I can only do up to 47 degrees on the point but this seems to drive fine
10) Nails for connecting forms to pegs
Really hope I have not missed anything as want to get this base down as soon as I can.
Dom
 
I always screw formwork, because it makes de-mounting it much easier afterwards. Also nailing a fairly flimsy and floppy structure induces lots of movement, wobbling pegs around in the ground, for instance. Further, there is lots of adjusting to get the top level, and that can involve putting in and taking out fixings 2 or 3 times, which is much easier with screws. Make sure you screw from the outside!!
 
MikeG.":2rhmwlmj said:
I always screw formwork, because it makes de-mounting it much easier afterwards. Also nailing a fairly flimsy and floppy structure induces lots of movement, wobbling pegs around in the ground, for instance. Further, there is lots of adjusting to get the top level, and that can involve putting in and taking out fixings 2 or 3 times, which is much easier with screws. Make sure you screw from the outside!!
I swapped over to screws... probably worth getting an impact driver now then. I also got lumber twice the thickness for the formwork as I was worrying about flex.

Sent from my MI 8 using Tapatalk
 
I have now ordered all of that, due next Tuesday (hopefully to have concrete done in next few weeks).

I am struggling to square the site properly with the string lines. The angles are fairly square but not perfect: I assume this is fine as the string lines are simply for excavation purposes? Once the site is flattened I will construct the formwork, square and brace it before digging out the deep trenches.

Dom
 
The delivery of the former items should arrive tommorow; I am now looking at items for the brickwork. The dwarf wall will be (no more than) 68ft long all around (doorway will reduce this) so all calculations are done to this. This is my shopping list so far:
HzKAL-uJT2WoiOb-RataLg.png


Code:
1) 300 heather bricks - seem closest to mine and are frogged, is that what I should be going for?
2) 100mm thermalite blocks, will cut down to get 50 total.
3) Strapping to screw in below blocks.
4) A bulk bag of sand for mortar.
5) 6x 25kg bags of OPC (should I be using white?)
6) 3 bags of 'hydrated lime', again not sure if this is neccesary of if I should just be using a plasticiser.
7) a board to screed the concrete

I will soon finalise door placement etc. I am using Mike's reccomendation of '6:1:1/2 sand: white cement: lime' from thewoodhaven2, not sure if white is advisable here as the brickwork I am trying to imitate does not have very white joints.
 
Lots done in past few days.
Site flattened to level and ditches dug:
ijdtJJQ.jpg

You can see at the back where the site goes into pretty solid chalk rock:
azM68k8.jpg


I also cut down a buch of pegs for the formwork; these are only 47 degreed but drive ok:
wnakzN7.jpg


Other than the base the hardest work was moving two bulk bags of material up my garden, must have spend at least 6h going up and down.
 
Anyone got any ideas how to fill this gap in my formwork? Was initially going to do compacted earth but not sure the strength to hold back the concrete will be there, even when compacted.
d246cd0a5070460b6ff6942362c4e00f.jpg


Also I was wondering if, as the walls of the trenches are just earth, I should extend the dpm upwards to ensure the water does not get soaked up by the earth too quickly when drying? I am currently planning to go with mike's design and just take the dpm to the bottom edges of the trenches.

Thanks
 
Don't worry about the gap in the formwork and don't bother trying to compact muck into it, it won't work.

What we usually do in this case (I'm a Civil Engineer by trade) is fill the trench to the level of the bottom of the formwork. Start at your problem area as this gives the concrete there a bit of time to stiffen up. Don't worry about it spreading out under your forms, just get it in and compacted nicely up to the lower edge of the forms.

Now throw a few shovelfuls of muck against the back of the formwork on top of the lower concrete and then top up to your finished level. Poker through the layers to ensure they are knitted together properly.

If you do this it'll give you the nice square, vertical shape to the bit of the foundation that will be visible once the building is complete.

Don't forget to use a poker vibrator to compact your concrete properly and once its all filled up and screeded off with a tamp go round the edge of your slab with an arris trowel, this prevents that rough flaky corner you usually get with a squared off edge.

The project looks to be progressing nicely, I don't envy you having to dig through that rocky chalk mind!
 
will1983":1oppq4m9 said:
Don't worry about the gap in the formwork and don't bother trying to compact muck into it, it won't work.

What we usually do in this case (I'm a Civil Engineer by trade) is fill the trench to the level of the bottom of the formwork. Start at your problem area as this gives the concrete there a bit of time to stiffen up. Don't worry about it spreading out under your forms, just get it in and compacted nicely up to the lower edge of the forms.

Now throw a few shovelfuls of muck against the back of the formwork on top of the lower concrete and then top up to your finished level. Poker through the layers to ensure they are knitted together properly.

If you do this it'll give you the nice square, vertical shape to the bit of the foundation that will be visible once the building is complete.

Don't forget to use a poker vibrator to compact your concrete properly and once its all filled up and screeded off with a tamp go round the edge of your slab with an arris trowel, this prevents that rough flaky corner you usually get with a squared off edge.

The project looks to be progressing nicely, I don't envy you having to dig through that rocky chalk mind!

So if I understand correctly you are suggesting filling up the ditch behind the form up to the bottom of the form level and then adding back some topsoil and continuing to fill to the top of the form, leaving only the flat edge visible?

If so that will work well for some of my sides but the pictured side, the gap below the form continues to a slope, so pouring the concrete without it filled would mean it would start running down.

I was more wondering if forming a slope up to the form from behind (with topsoil), compacted with a sledgehammer, would be sufficient to hold back the concrete under the formwork.

Hope that makes sense,
Dom
 
I understand what you mean, the ground level is below the bottom of the form so you're concerned it'll overflow.

Don't worry about it, unless its more than about 100-150mm and your concrete is particularly sloppy it wont be an issue. If i remember rightly you're going to order an S2 slump in which case the concrete should have enough body to prevent it slumping down. Just be cautious in your use of the poker in that area. If it is wanting to run just leave some to one side for a while to let it stiffen up a bit before placing.

Working with concrete may appear a bit daunting at first but it's pretty easy in practice. You'll soon get a feel for it.
 
Back
Top