Nice new bench drill

UKworkshop.co.uk

Help Support UKworkshop.co.uk:

This site may earn a commission from merchant affiliate links, including eBay, Amazon, and others.

AndyT

Established Member
Joined
24 Jul 2007
Messages
12,028
Reaction score
539
Location
Bristol
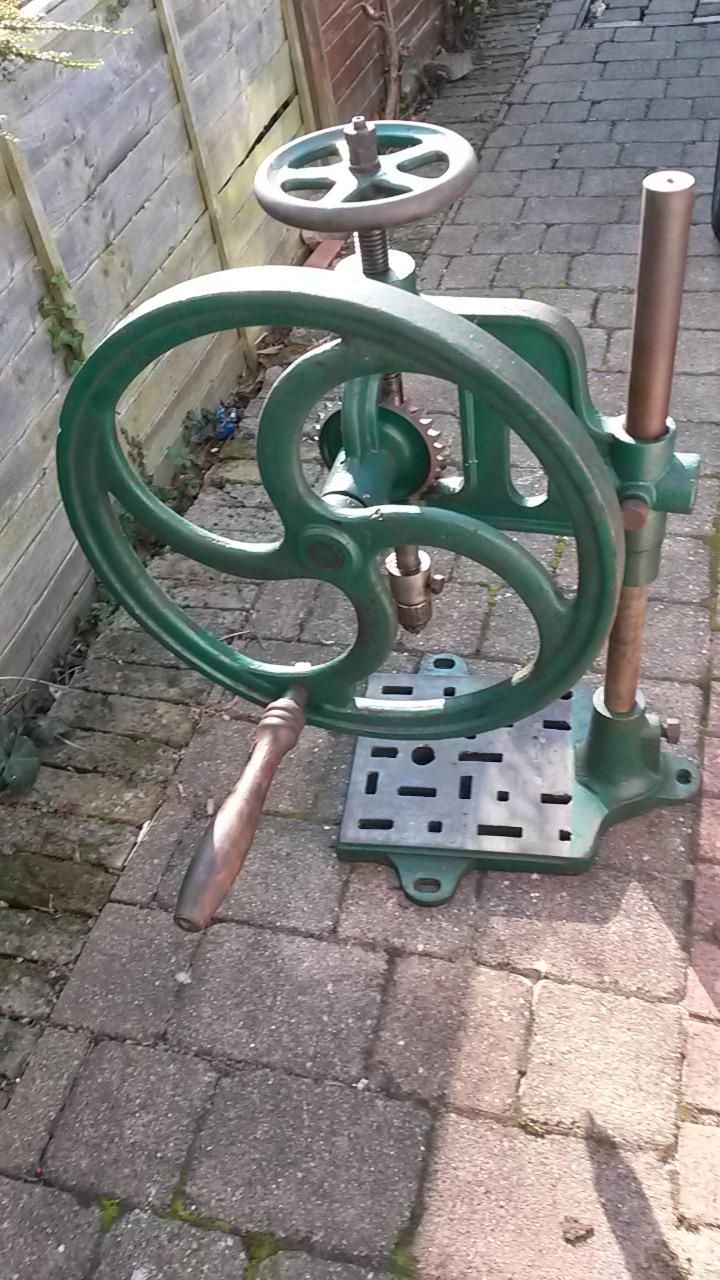
I'll post this here as I already have plenty of ways to drill holes in wood... but until now, I've not had a proper cast iron bench drill for metalwork. So I was pleased to find this one for £16 on eBay, local pickup:

IMG_3008_zps5145d27a.jpg


IMG_3010_zpsa135231b.jpg


IMG_3009_zpscc0ee4fd.jpg


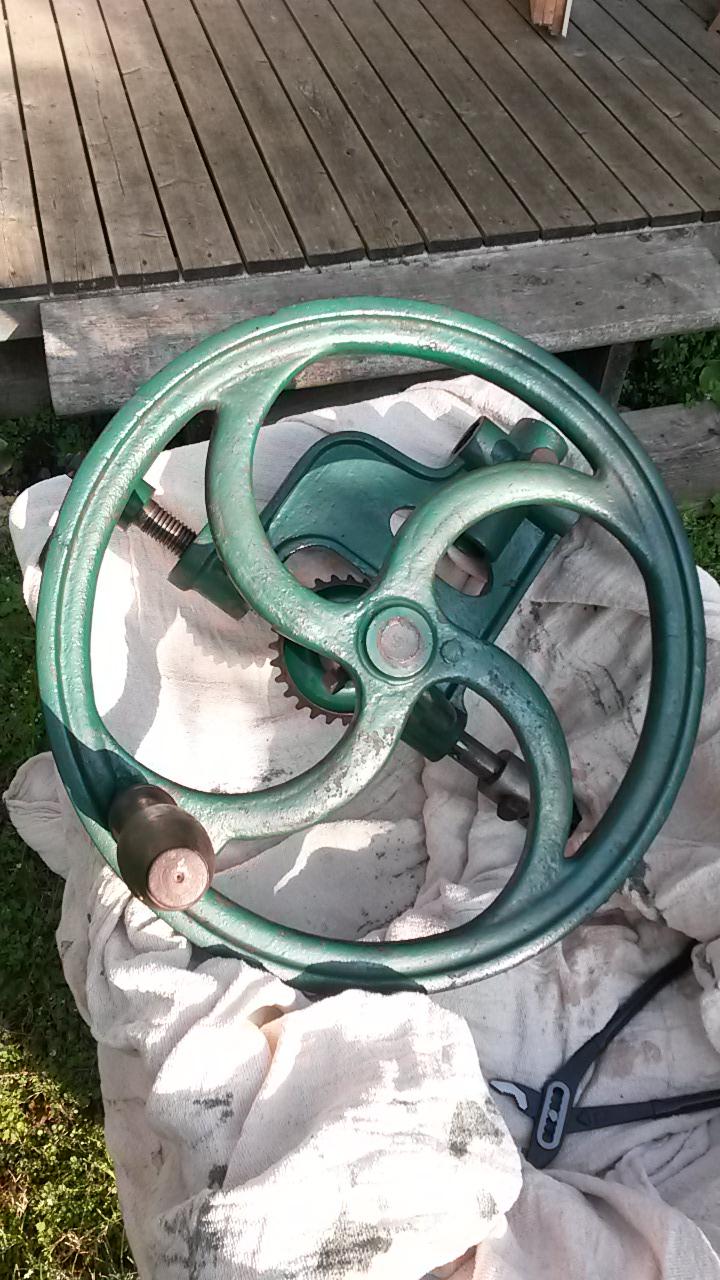
It looked like it was sound underneath the surface rust, so I set to with a wire brush so now it looks like this:

IMG_3020_zps50dd5008.jpg


IMG_3021_zps5b53c4a0.jpg


IMG_3023_zps540c7aed.jpg


I did use electrolysis for the big rusty base, and it worked well.

The surface finish is boiled linseed oil, thinned down with turps.

I think it might originally have had an auto feed, but one speed manual will do for me!

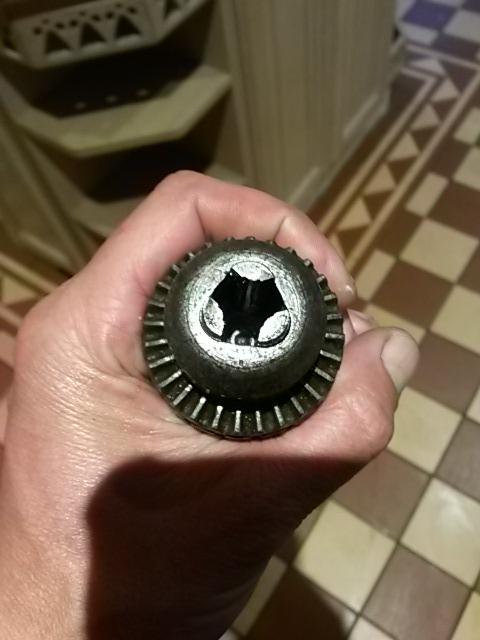
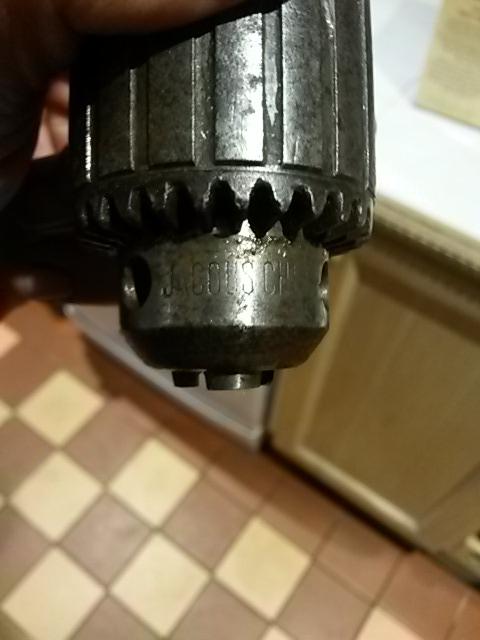
I've no idea of maker or date - but there is this one clue:

IMG_3022_zpsbf489a2f.jpg


Does anyone recognise that logo?
 
Nicely done it's good to bring them back from the brink isn't it...
 
handy things these- I have a union one that is similar in design, although not identical.
 
I thought the flywheel at the top was supposed to act as an autofeed?

Anyway, lovely restoration. I keep getting the urge to buy one of these despite having a perfectly fine electric bench drill... :roll:
 
DTR":2qo6py2f said:
I thought the flywheel at the top was supposed to act as an autofeed?

With this one, you spin the wheel on the top to make the quill go lower. There are more complicated models where the quill is lowered by a clever ratchet mechanism and you only need to turn the handle.

I think this must have had an autofeed once, as without it, there's no point in there being a keyway at the top.
 
andy;
i've got a similar one to that, but with the auto feed. it works backwards, as it were... turn the big handle and the quill comes down. Hold the wheel at the top still and vertical movement stops but rotation continues.

Cant think of the logo name other than Ransomes and Simms or Robert Stevenson! :)
 
just took another look at mine, it is the same one. RS logo and with A1 stamped on the on the other side of the casting to the logo.

if you are having to turn the wheel to make it lower the quill, something might be a little tight in there, on mine rotating the big wheel automatically lowers the quill as described above..

nice job with the restoration.
 
Thanks for the guesses about the logo - I've explored the links and could not see anything 100% matching.

Higon - can you take some pictures of yours? I think it must have some bits that are missing on mine, probably a horizontal ratchet wheel keyed to the top of the quill, and some sort of pawl to engage with it.

There is one other feature that I noticed but did not quite understand. The main casting has two tubes so you could clamp it onto the vertical tube in two different positions.

I have now found this picture of a very similar model, in a 1908 Tyzack catalogue, showing how you could wall-mount this sort of drill, assuming you have some space and a strong enough wall:

20140702_112906_zpsjybfj7ly.jpg
 
Andy
I think I still have newbie restrictions on uploading the pics, (keeps telling me the pics are too big) PM me your email and I'll get them to you there.

The two tubes is easier, they are used to change the angle of drilling; the wall mount as in the right hand side of the two illustration you found.

I don't think you are missing anything... yours looks exactly the same as mine... might be a missing woodruff key or pin below the lower bevel gear perhaps? Cant tell from the pics, do you have a spacer between the lower bevel gear and the clamp bolt that has a screw in it? All the major parts look to be there. When you turn the large wheel by the handle, does the top part of the vertical shaft, the threaded part, also turn?

Ignore that... I think I see the problem!
The two nuts at the top of the shaft, they control the "clutch" effect of the two parts of the vertical shaft - threaded and unthreaded. I think they are too loose! try changing / tightening the tension slightly.

The only other difference I see is the clamp bolt under the lower bevel gear seems tighter. the gap seems a lot less on mine, (3.29mm)

As I turn the large wheel, the lightest touch on the outside of the top wheel stops it from rotating.

I cant remember where I found the info but I dated mine between 1902 and 1912, so 1908 sounds right on track.
 
Higon":1v4c45sg said:
Ignore that... I think I see the problem!
The two nuts at the top of the shaft, they control the "clutch" effect of the two parts of the vertical shaft - threaded and unthreaded. I think they are too loose! try changing / tightening the tension slightly.

Brilliant! :idea: :idea:

Now I understand what I had overlooked before; thank you so much!

The design is so elegantly simple - with the nuts tightened up properly, there is enough grip between the parts to lower the chuck and drill the hole. If the drill doesn't go down, there is enough slip so as to not break the drill bit.

I had been confused by looking at too many pictures of more complicated models.

One subsidiary problem was that to get the two nuts held in the right place and properly locked together I needed a fairly slim spanner on the lower nut. Fortunately I still have an old bicycle cone spanner from when I was about 12, which fitted well enough. (There's a lesson there, about not chucking out old tools.)

I now have several bits of wood and metal from the scrap box, all decoratively perforated!

(PS: for posting photos, you can either shrink your pictures to below 256k as described here, or else upload them to a public photo sharing site (Photobucket, Flickr etc) and put the image location into your post, between
 
Nice one :)

I've only used it a couple of times, but with a spiral tap rather than a drill, works really well as a tapping table.

Cant tell from your pics, do you have a spacer between the lower bevel gear and the clamp bolt that has a screw in it? The screw fits into the keyway and transfers the drive from the handle to the quill.

I read about the new member posting restriction the other night in the FAQ / Sticky. The file was only 64k so don't think its that. Seems to be ok now as I managed to upload a pic on another post.
 
Andy,
Here's the pics I was trying to upload, still think Robert Stephenson is favourite! lol..
 

Attachments

  • 1-20140702_215858.jpg
    1-20140702_215858.jpg
    103.8 KB · Views: 2,432
  • 1-20140702_220006.jpg
    1-20140702_220006.jpg
    82.3 KB · Views: 2,433
  • 1-20140702_220034.jpg
    1-20140702_220034.jpg
    59 KB · Views: 2,433
  • 1-20140702_220046.jpg
    1-20140702_220046.jpg
    79.9 KB · Views: 2,433
  • 1-20140702_220056.jpg
    1-20140702_220056.jpg
    73 KB · Views: 2,434
  • 1-20140702_220237.jpg
    1-20140702_220237.jpg
    79.9 KB · Views: 2,433
Thanks Higon, we definitely have the same model.
Mine is also marked A1
20140703_165648_zpssv6hmok7.jpg


But it is also marked A3 on the big flywheel
20140703_165727_zpsp9nzahh1.jpg


I do have a spacer below the bottom bevel gear with a screw through into the keyway
20140703_165631_zpsbq8sanyh.jpg


But now that I understand how the simple clutch works, I can't see any reason why the threaded part at the top needs a keyway cut into it
20140703_165603_zpsmkq1rfea.jpg


Any ideas?
 
hmm, mine doesn't have that keyway! can't think of a good reason to have it when the shaft its on is threaded... I don't have a visible A3 stamping either (but I haven't pulled it down to bare metal)

There's a small hole in yours, in the main casting, between the handle wheel and the driving bevel. There's a capped oiler that fits in there.. you might be able to make it out at the far right of my image 4?
 
Thanks for confirming that yours doesn't have a keyway at the top. That fits with it having no apparent purpose!
Maybe someone made a mistake at the factory but the part was too good to scrap!

Mine just has a plain hole where yours has an oiler. I suppose I could fit one but it's not the first priority!
 
Might be worth dropping some lubricant into the hole and then stuffing a wooden plug or similar in there to keep the detritus out?

Strange about the keyway... but looking closer at the pics, there's more! The reason I have 3.29mm of clearance on the clamp bolt is because the casting there is in two parts, there is a removable quadrant... It doesn't look like its a cracked or damage, the sides of the slot have a machined finish. It also allows the shaft to be removed without dismantling the whole drill.
Also noticed a missing tooth on the lower bevel, right above the locating screw. Doesn't seem to affect anything...
 
In deference to Andy who set me down this path initially ... I think I'll post this here. Thanks fella. :wink:
So I picked up this beastie last week from Huntingdon. About a 2 and a half hour round trip.. Dont tell work 8)
Its a doozie, Nearly a metre tall I had to enlist help from Bill next door to get it out the caddy. I stripped it down a little to move it down the shed. No marks apart from the 'patented'
Any ideas on a maker? Bought a new key for a fiver. Jacobs chuck 33B. I'm doing 7 days a week at the moment so time is scarce to work stuff out but currently I need turn the wheel at the top to descend the quill. Turning the handle obviously rotates the chuck. Had 5 mins and tried undoing the top two bolts as per the previous drill in the thread but no joy. When I get a little time I'll have a play and let you know what ensues. Wheelbarrow and lighter for scale.

H5FOTnA.jpg


fUpekV6.jpg


leKMMoB.jpg


Zz9v8BR.jpg


exuN1vA.jpg


3OOnuMQ.jpg


V1EhFVC.jpg


Despite searches I cant find any examples of that half (ish) flat arbour on the Jacobs and I can't really tell if it's integral or removable. It works, just a bit pitted but if possible I'd like to know if any one can share in case I have to replace it at any time. To be honest I'm 40 and it looks like it's going to outlast me so no panic! Advice always appreciated though!
Regards.
 

Latest posts

Back
Top