What did you do in your workshop today ?

UKworkshop.co.uk

Help Support UKworkshop.co.uk:

This site may earn a commission from merchant affiliate links, including eBay, Amazon, and others.
Status
Not open for further replies.
Finally finished this little C shape table that I've been working on periodically for ages now. Now it's done, I'm not sure I like the design.......oh well, practice makes perfect.
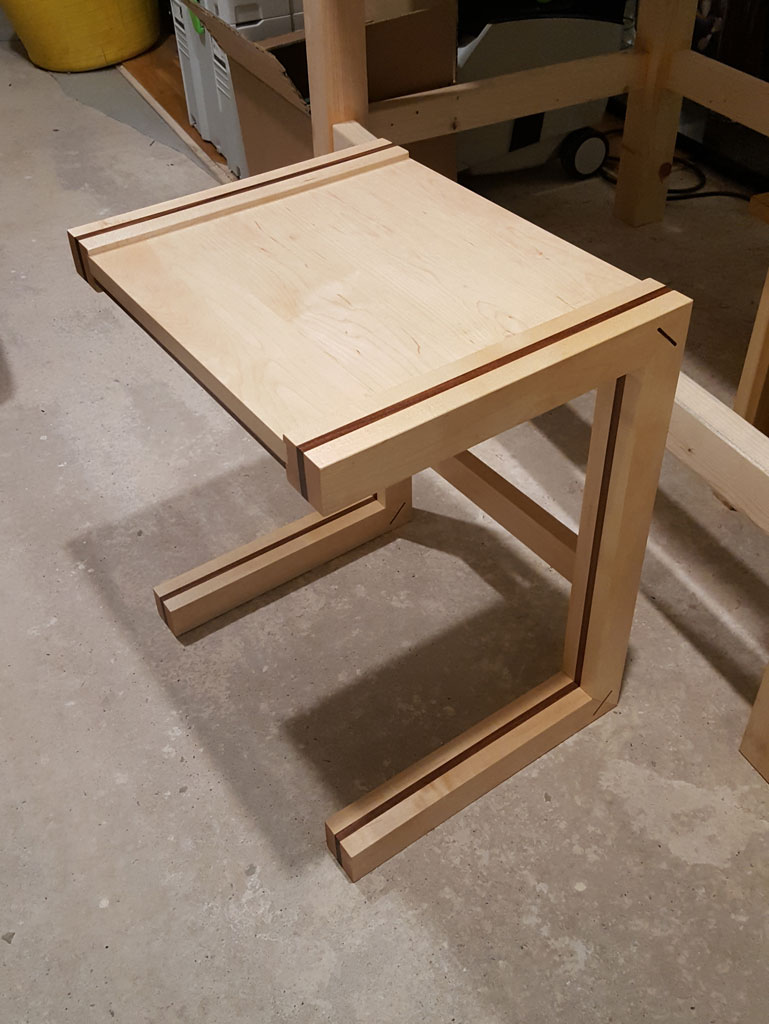
DfMDaTD.jpg
 
MattRoberts":3qu5t522 said:
Looks lovely to me Martin, if a tad sharp! Well done. How did you do the splines on the mitres? Biscuit joiner?

Thanks Matt. The splines were done with a mitre saw and chisel. With hindsight, I wish I'd made them thicker but hopefully they will do the job.
 
After some thefts in the local area, I've beefed up security by adding some steel bars across the window in the workshop.

I picked up some flat steel bar for <£10 from the local DIY shed, cut it in half, drilled a couple of holes in each end and then screwed it into the wall either side of the window.
 
This morning I turned this bay window frame into some useable mahogany

P9090001.JPG


P9090002.JPG


P9090003.JPG


Then spent the afternoon sharpening the planer blades

Alan
 

Attachments

  • P9090001.JPG
    P9090001.JPG
    189.8 KB · Views: 156
  • P9090002.JPG
    P9090002.JPG
    175 KB · Views: 156
  • P9090003.JPG
    P9090003.JPG
    169.5 KB · Views: 156
I made 4 dozen oak pegs from some 300 year old floorboards today, then banged them all in to some big M&T joints. That's all my back would allow me to do.
 
finally tried the scary sharp system today, I am floored with it, absolutely phenomenal!

I lapped my new ray isles plough plane blades, an old beading plane blade, and my no4 japanese laminated blade, it is well worth the money for the microfinishing film.

I am very tempted to re-lap my plane soles with it as well at some point.
 
thetyreman":3f8tzm4a said:
finally tried the scary sharp system today, I am floored with it, absolutely phenomenal!

I lapped my new ray isles plough plane blades, an old beading plane blade, and my no4 japanese laminated blade, it is well worth the money for the microfinishing film.

I am very tempted to re-lap my plane soles with it as well at some point.


I was pleased with it too. What grits did you go with? ... I am using 1200 (Hermes), 2500 (Hermes), 3u (3M lapping 8000) and then leather strop. I am getting pretty good results in that I can cut the hairs on my arm with a few passes, but apparently that isn't sharp enough, and that you should be able to get every hair in a single pass (according to James Wright). So more practise needed I think!

This is with using an eclipse style honing guide. I'm wondering if I might be rounding the edges over on the strop as I do that part free hand.
 
transatlantic":h6t22q91 said:
thetyreman":h6t22q91 said:
finally tried the scary sharp system today, I am floored with it, absolutely phenomenal!

I lapped my new ray isles plough plane blades, an old beading plane blade, and my no4 japanese laminated blade, it is well worth the money for the microfinishing film.

I am very tempted to re-lap my plane soles with it as well at some point.


I was pleased with it too. What grits did you go with? ... I am using 1200 (Hermes), 2500 (Hermes), 3u (3M lapping 8000) and then leather strop. I am getting pretty good results in that I can cut the hairs on my arm with a few passes, but apparently that isn't sharp enough, and that you should be able to get every hair in a single pass (according to James Wright). So more practise needed I think!

This is with using an eclipse style honing guide. I'm wondering if I might be rounding the edges over on the strop as I do that part free hand.

not sure how it compares with wet/dry paper grits, are you sure you mean microfinishing film?

I start with 100 microns, then 40, then 15 and it's getting me good results, from there I can go on to my diamond stones 320, 800 then 1200, and strop it, it ends up being 15-30,000 grit, once the back is lapped and stropped up to that level of shine I am very careful to keep it in perfect condition, only ever breaking the burr.

From then on I only use the diamond stones, for maintenance sharpening. You can keep re using the microlapping film, so far it's going a long way so it actually works out much much cheaper than standard sandpaper. I got the stuff form workshop heaven, which as far as I know is the only place you can buy it in the UK.
 
In terms of stropping, I've switched from a leather strop to MDF with Autosol as I think I was probably rounding over the edge. The edge you can get is amazing.
Peter Sefton also sells Scary Sharp products.
 
Spend hours on end making the top of ours and our neighbours verander.

I did buy an OX cnc for these but ended up cutting them by hand. :cry:
 

Attachments

  • IMG_0081.JPG
    IMG_0081.JPG
    130.8 KB · Views: 442
Today I had finished a cupboard that I started a couple of weeks ago to improve my storage and bench area. Pleased with the result and how much more organised it is.

87d455affeafbe72b7da50c269420c99.jpg


911e36c2a0145c52a258e4672054f704.jpg


99eb8bec0ccd1532bb77eddefb5517d9.jpg


My next project is an additional work bench with MFT top and drawers for all my Festool kit as it's becoming unmanageable in its current storage.

5d3372b9c644f969c9419c896a50ab3a.jpg
:)
 
Didn't know Festool had started doing workshop lockers as well :shock: :?
 
Cleaned out the shed, removed 5 bags of shavings etc, and 2 wheelbarrow full of off cuts, ready for the fire wood store. Oh and a bit of turning when the cleaning got boring.
 
Converted this:

Log.jpg


Into four usable bits:

Oak .jpg


Mike
 

Attachments

  • Log.jpg
    Log.jpg
    138.1 KB · Views: 299
  • Oak .jpg
    Oak .jpg
    102.7 KB · Views: 299
Made some progress on getting the floor down.
IMG_5142.JPG
 

Attachments

  • IMG_5142.JPG
    IMG_5142.JPG
    128.5 KB · Views: 284
Not a piece of furniture but got fed up with fly tying tools and bits all over my desk so an old melamine cupboard door plus offcuts of mahogany and I have a fly tying station.

The contraption at the back which holds completed flies and magnifier and light holder left of the vice just slide off and the whole thing drops into a drawer when not in use. Still got boxes and boxes full of materials but it's a start and saves some earache from the missus. :lol:

It's roughly 600 x 350 x 100 with the attachments removed.

I've got more nail varnish and embroidery threads than my wife and daughter put together. :wink:
 

Attachments

  • tying station 1.jpg
    tying station 1.jpg
    142.5 KB · Views: 262
I know where you are coming from, I used to have an office, its now a full time tying station, more materials than I would ever need, and then I found "Fly's by the dozen" I can't justify staying in the office fly tying when I can get a dozen fly's for a couple of £, its make it a nonsense, but then so is trying to imitate a fly with feathers. #-o

Mike
 
Yebbut tying the flies is enjoyable Mike, especially over the winter.
I've just got back into fly fishing a few months ago after a 20 year break so a lot of my materials are pretty old though in good condition as were in a purpose made box with copious amounts of cedar offcuts for protection.

I confess to being seduced by a few items when in Canada earlier this year though. :wink:
 
Unfortunately Arthritis has taken its toll and fly tying is now a thing of the few and far between, but I still enjoy my fly fishing, especially in the French rivers for Brown's, still have a rod on the Avon, but don't get down there that often now days.

Mike
 
Status
Not open for further replies.
Back
Top