You are using an out of date browser. It may not display this or other websites correctly.
You should upgrade or use an alternative browser.
You should upgrade or use an alternative browser.
Re-plate a saw
- Thread starter MickCheese
- Start date


Help Support UKworkshop.co.uk:
This site may earn a commission from merchant affiliate
links, including eBay, Amazon, and others.
GazPal
Established Member
pedder":l8g7uerd said:")
this hardened spring steel is tougher than one would think. I'd give a sharpened masonry drill bits a try.
Cheers Pedder
I was just about to suggest carbide tipped masonry bits, but Pedder beat me to it.
Matt
I've just looked at Amazon for these drills. A set is £40.
I'm popping over to see Jim after work tomorrow afternoon so will try his punch to see if this works first.
Will let you all know how we get on.
Mick
I've just looked at Amazon for these drills. A set is £40.
I'm popping over to see Jim after work tomorrow afternoon so will try his punch to see if this works first.
Will let you all know how we get on.
Mick
Amazon is expensive then!
Ebay set of 4 Bosch multiconstruction £6.99
Most tools shops have them or an equivalent Alpen/heller/Kwb etc
I wouldn't want you to knacker Jim's lovely punch - try anealling a spot on the blade with a small gas torch or something
Matt
Ebay set of 4 Bosch multiconstruction £6.99
Most tools shops have them or an equivalent Alpen/heller/Kwb etc
I wouldn't want you to knacker Jim's lovely punch - try anealling a spot on the blade with a small gas torch or something
Matt
jimi43
Established Member
I'm sure it will punch through...it's exactly the same one that Pedder uses but I only have one size...still you can then ream it out.
We could always get ALFIE to bite it! :mrgreen:
See you in the afternoon...I'll get the coffee on!
Jim
We could always get ALFIE to bite it! :mrgreen:
See you in the afternoon...I'll get the coffee on!
Jim
bugbear
Established Member
GazPal":1sn0ka22 said:pedder":1sn0ka22 said:
this hardened spring steel is tougher than one would think. I'd give a sharpened masonry drill bits a try.
Cheers Pedder
I was just about to suggest carbide tipped masonry bits, but Pedder beat me to it.
One would presumably need to sharpen them - they're pretty blunt "as supplied", evem if they're hard.
BugBear
jimi43
Established Member
Oh ye doubters!!!
Piece of cake!

No annealing required...not even sitting on it! :mrgreen:
And Mick...you are pretty accurate with that there tool.....
Nice chatting to you again! Good luck with that Syms plane...it is a beauty!
Cheers
Jim
Piece of cake!
No annealing required...not even sitting on it! :mrgreen:
And Mick...you are pretty accurate with that there tool.....
Nice chatting to you again! Good luck with that Syms plane...it is a beauty!
Cheers
Jim
Jim
Thanks for the help, the coffee and the loan of the tool. I thought it would be more difficult than that, went through like it was a piece of card.
Just got to re-assemble it and cut those teeth, the scary bit.
Mick
Thanks for the help, the coffee and the loan of the tool. I thought it would be more difficult than that, went through like it was a piece of card.
Just got to re-assemble it and cut those teeth, the scary bit.
Mick
jimi43
Established Member
MickCheese":2hyaejt9 said:Jim
Thanks for the help, the coffee and the loan of the tool. I thought it would be more difficult than that, went through like it was a piece of card.
Just got to re-assemble it and cut those teeth, the scary bit.
Mick
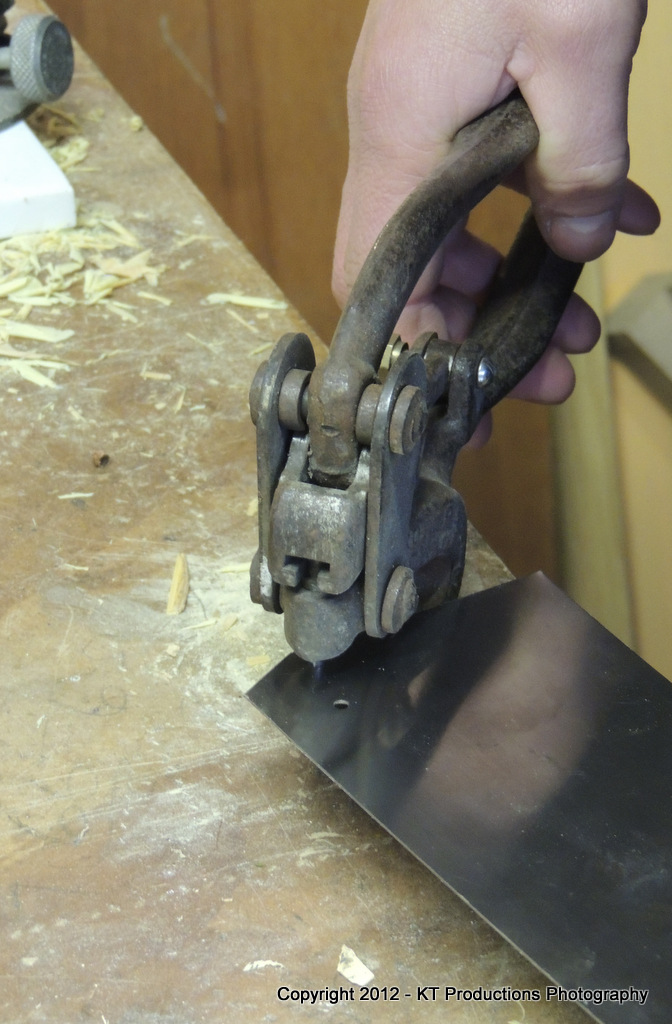
A pleasure just to say not all the strange tools I get at bootfairs are a waste of time. I am not surprised it went through so easily...as we found it exerts 1.2 tons of pressure at that small point!
Looking forward to seeing the saw finished.
Cheers mate
Jim
Put the saw back together again today with the new blade.
Strangely the original blade was not fully captured by the brass back so when I put the back on with the blade fully inserted into the spline the handle wouldn't line up with the holes. In order to get the holes to line up I had to pull the blade from the brass back by about 10mm.
Anyway all seems to be tight fitting now.

Something missing from this saw though! Must cut some teeth.
Now I have never done this before so am a bit apprehensive about doing this. I seem to remember someone posting a link to a set of paper measures that you can print out to stick to the saw to get the spacing right, must do a search for that and give that a try.
Think I will look to give this about 14tpi as I have a 12 and a 16, I find I use the 16 more than the 12 but it is a bit fine so a 14 will be just right.
Maybe of course I use the 16 more just because it is a better saw.
Here is a picture of the other side.

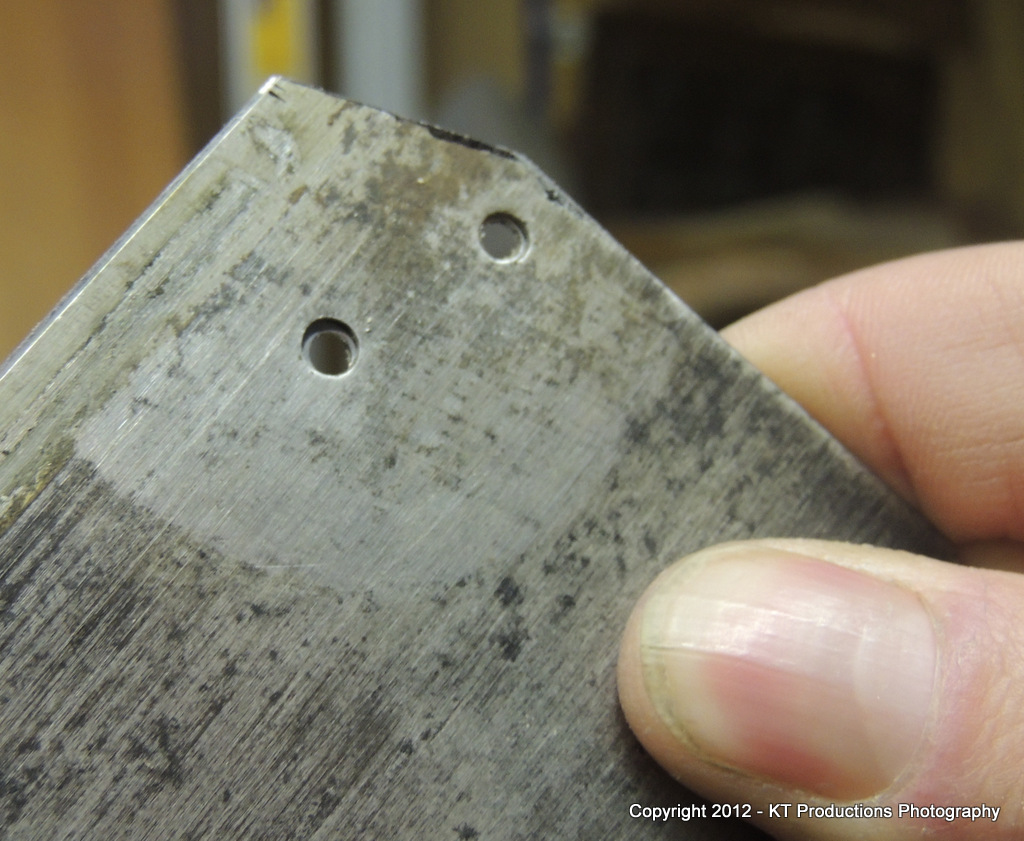
And a close up of the saw nuts with USE written thereon, the brass back has R Groves & sons Sheffield stamped on it.

So what does USE mean? Am I being thick and it's obvious?
Mick
Strangely the original blade was not fully captured by the brass back so when I put the back on with the blade fully inserted into the spline the handle wouldn't line up with the holes. In order to get the holes to line up I had to pull the blade from the brass back by about 10mm.
Anyway all seems to be tight fitting now.
Something missing from this saw though! Must cut some teeth.
Now I have never done this before so am a bit apprehensive about doing this. I seem to remember someone posting a link to a set of paper measures that you can print out to stick to the saw to get the spacing right, must do a search for that and give that a try.
Think I will look to give this about 14tpi as I have a 12 and a 16, I find I use the 16 more than the 12 but it is a bit fine so a 14 will be just right.
Maybe of course I use the 16 more just because it is a better saw.
Here is a picture of the other side.
And a close up of the saw nuts with USE written thereon, the brass back has R Groves & sons Sheffield stamped on it.
So what does USE mean? Am I being thick and it's obvious?
Mick
Attachments
Racers
Established Member
- Joined
- 22 Apr 2005
- Messages
- 9,172
- Reaction score
- 132
Hi, Mick
Bugbear has/had them on his site, he should be along shortly.
The one I did I slowly cut the teeth in about 8 passes a couple of strokes on each tooth, so you can tell by the flats thet get left if you are drifting onr way or the other.
It went fairly quickly I seem to remember.
Pete
Bugbear has/had them on his site, he should be along shortly.
The one I did I slowly cut the teeth in about 8 passes a couple of strokes on each tooth, so you can tell by the flats thet get left if you are drifting onr way or the other.
It went fairly quickly I seem to remember.
Pete
The "Book" has them in Sheffield 1822 to 1911 at the Bee Hive Works (Ltd by 1903)
"Queen Bee" saw? Mark: USE
(Succeeded by Moses Eadon)
(sons: Thomas & William Groves)
Not very helpful unless it means use?
Rod
"Queen Bee" saw? Mark: USE
(Succeeded by Moses Eadon)
(sons: Thomas & William Groves)
Not very helpful unless it means use?
Rod
Sheffield Tony
Ghost of the disenchanted
MickCheese":19tdx0bk said:Something missing from this saw though! Must cut some teeth.
Now I have never done this before so am a bit apprehensive about doing this. I seem to remember someone posting a link to a set of paper measures that you can print out to stick to the saw to get the spacing right, must do a search for that and give that a try.
I gave this a go on a S&J tenon saw, which had teeth ruined by erratic filing at some stage. The templates I found were meant to be folded over the edge of the saw. The trouble I had - apart from needing to visit an optician - was that the file obscured the view, making it hard to start the cut accurately. I had a much better result by first making a small nick with a (fairly blunt) junior hacksaw, then finding those with the saw file on the second pass.
To my great surprise, the saw cut quite well when finished.
bugbear
Established Member
Racers":142jz0fs said:Hi, Mick
Bugbear has/had them on his site, he should be along shortly.
The one I did I slowly cut the teeth in about 8 passes a couple of strokes on each tooth, so you can tell by the flats thet get left if you are drifting onr way or the other.
It went fairly quickly I seem to remember.
Pete
Lots of good stuff (including the templates) in this thread.
life-after-death-for-my-back-saw-t54710.html
BugBea
jimi43
Established Member
Looking fantastic Mick!
Shame the holes didn't line up...you could always punch a few more! :mrgreen:
I suppose you are going "rip" cut?
Jim
Shame the holes didn't line up...you could always punch a few more! :mrgreen:
I suppose you are going "rip" cut?
Jim
Hi Mick, that's looking good.
I never found a blade going the full way to the bow. They're hold by clamping presure.
I've recut teeth with old saw blades as pattern. 14 tpi is a good an very usual size. Good paper patterns on Leif's page
http://norsewoodsmith.com/files/file/sa ... plates.pdf
Cheers Pedder
MickCheese":a74253ds said:Strangely the original blade was not fully captured by the brass back so when I put the back on with the blade fully inserted into the spline the handle wouldn't line up with the holes. In order to get the holes to line up I had to pull the blade from the brass back by about 10mm.
I never found a blade going the full way to the bow. They're hold by clamping presure.
MickCheese":a74253ds said:Think I will look to give this about 14tpi as I have a 12 and a 16, I find I use the 16 more than the 12 but it is a bit fine so a 14 will be just right.
Maybe of course I use the 16 more just because it is a better saw.
I've recut teeth with old saw blades as pattern. 14 tpi is a good an very usual size. Good paper patterns on Leif's page
http://norsewoodsmith.com/files/file/sa ... plates.pdf
Cheers Pedder
I like to thank all who have helped (you know who you are), given advice or just offered encouragement. I've really enjoyed doing this and once I've cut the teeth will report back.
Pedder
Using an old blade is a good idea but the old one is finer. Will try the paper patterns, if it all goes wrong I will file them off and pop it up to Southern Saws in High Wycombe who will do it properly.
Mick
Pedder
Using an old blade is a good idea but the old one is finer. Will try the paper patterns, if it all goes wrong I will file them off and pop it up to Southern Saws in High Wycombe who will do it properly.
Mick
Mick,
if it's not too late, I'd like to add a couple of things I've learned since my experience of re-cutting teeth (in the thread to which bugbear linked, 4 posts back).
a) DO follow Sheffield Tony's advice, when using bugbear's template, to mark/indent the starting positions off the new teeth with some tool, other than just setting to with the saw file. I have become convinced on reflection that my own problems (uneven spacing) arose right from the outset with slightly inaccurate starting positions. I subsequently looked for a tool with a fine hard edge which could be accurately positioned on the template and then struck sharply to make a slight indent which would guide the subsequent initial file cut. I experimented with a small cold chisel (suggested by one poster), but found that it was quickly blunted by a saw plate; I then found in my toolbox an old glass-cutter with a big V-shaped piece of carbide at the business end, which seems to do the job. Sheffield Tony suggests a hacksaw blade.
b) Once you've started filing, it's easy to loose track of which teeth you've filed and which not. One standard suggestion is to use a marker pen. I found that the ordinary ones you get from stationers are next to useless - the part-cut teeth very quickly turn the tip into a fibrous mess, and the ink flow is poor. I've now discovered Sharpie Magnums (the largest one Sharpie makes, I believe) which not only has a big barrel with a large ink reservoir, but also a very fat tip - fat enough that the saw cuts a groove in it, rather than tearing the tip to bits. Well worth the few pounds extra it costs.
Good luck with your re-toothing! Do let us know how you get on.
Chris
bugbear
Established Member
baldpate":3traezjr said:I subsequently looked for a tool with a fine hard edge which could be accurately positioned on the template and then struck sharply to make a slight indent which would guide the subsequent initial file cut. I experimented with a small cold chisel (suggested by one poster), but found that it was quickly blunted by a saw plate;
Wow.
BugBear
Similar threads
- Replies
- 10
- Views
- 2K