Working curved mouldings?

UKworkshop.co.uk

Help Support UKworkshop.co.uk:

This site may earn a commission from merchant affiliate links, including eBay, Amazon, and others.

Jelly

Established Member
Joined
20 Sep 2012
Messages
1,366
Reaction score
340
Location
Sheffield
I fear this is going to be a bit like opening pandora's box, but...

Does anyone have advice on either techniques for or references with information on the working of curved mouldings by hand, obviously it's much easier to achieve with a router, but I try insomuch as is possible to work only by hand...

My intuitive guess is that the curve would need to be cut to shape, as much excess material as required hogged off with a rasp, and then the detail of the moulding shaped with either a profiled blade in a router plane, or freehand with gouges.

Either way a somewhat intricate, involved process...

I'm in the opening stages of designing a coffee table to compliment some Queen Anne furniture in our living room, so I want to do my research now before I get too caught up with a design that's beyond my skills.
 
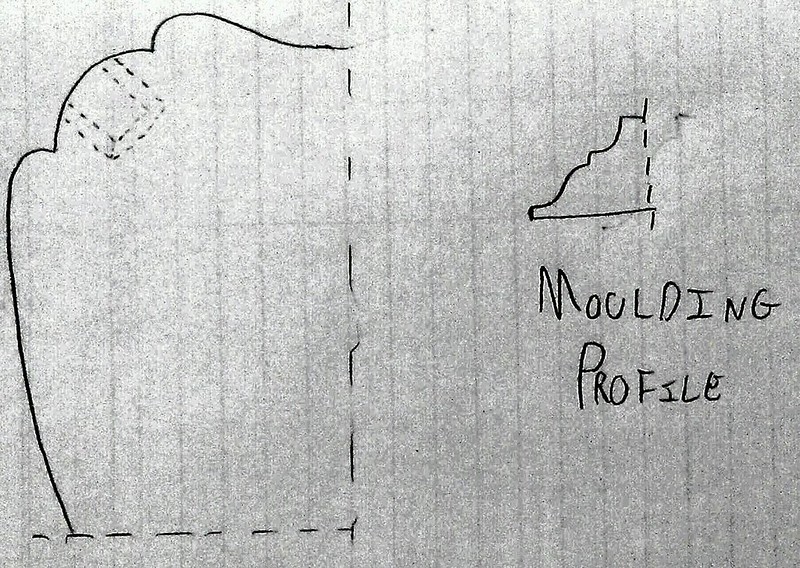
Convex, the intention is to have convex curved mouldings meeting at right angles; to replicate the design of two existing pieces.

I'd also be interested to learn about concaves too, as it would let me add a more subtle, flowing element to the edges lengthwise...
 
I'm struggling to visualise what you have in mind, but this may help.

The commonest places where you might encounter curved mouldings in everyday work would probably be on sash windows with curved tops, round or oval windows and fanlights. They would all be concave mouldings, curving in one plane only.

As far as I know, the basic technique is to start with a wide enough board to contain the curve, mark it out on the flat surface and saw it out with a narrow bladed 'turning saw'. Then use a compass plane or spokeshave to smooth the edge back to the line and make the curve fair. Most mouldings have the curved part contained between square edged fillets, so you would work these first to define the curve. Mark them out with compasses, chop down with a gouge, chisel away the waste and fair the curve with a compassed rebate plane (or a shaped block of wood wrapped with abrasive). To work the curved part of the moulding I think you would use a gouge of suitable size and shape and 'just carve' - that is the most flexible way.

For really common profiles - such as on sash mouldings - the counterpart to a moulding plane would be a sash router - this is one I was given a few years ago:

IMG_0079.jpg


IMG_0080.jpg


It has a pair of cutters so you can follow the grain around a curve. The trouble with a tool like this is that you need a different one for each moulding, so I suspect that they were only common for joinery and that fine furniture would be carved.

I recommend that you watch Roy Underhill's really informative video on the making of a corner cupboard which has arched tops to the door panels. He does what I have been trying to describe.

http://www.pbs.org/woodwrightsshop/video/2900/2912.html
 
8071415628_d85777f965_c.jpg


That's a quick doodle on the back of today's timesheet showing the plan view of a corner, (dashed lines show the intended position of the leg) and the desired moulding...


As this is intended as a one off, using several gouges is probably the best option... Albeit the most intimidating.

I'll have to dial it in on some scrap softwood before I start, I was given a 1300*800*75 board of mahogany which has been earmarked for this for some time; I'd never forgive myself if I didn't do the gift justice.

The idea of sash routers intrigues me though, I may have to make one, if I ever get the logistics of having stuff heat treated sorted...
 
I've never worked a curved moulding, so I'm probably not the right person to be offering thoughts; however, that's not going to stop me!

I think the saw-to-shape-and-carve-with-gouges approach is a good one, but there may be some merit in filing up a scratch-stock blade from an old scraper or similar, and making a home-made stock with a curved fence to help even out the profile once the bulk of the waste is carved out. Mahogany should respond reasonably well to a scratch stock, being a fairly mild timber.

Another thought that occurs is that Rich Arnold posted a thread recently on the making of several handrail wreaths for a prestige retail outlet in London. They're basically curved mouldings, albeit in three dimensions, so a read of that thread may be useful.

(Edit to add - the thread is called 'Handrail Wreath Update', and it's currently on page 4 of the Hand Tools board index. Some super photos of the tools Rich used, the work in progress, and the finished wreaths fitted in situ.)
 
I remember that thread from my preliminary, pre question search (typing my relatively rambling posts on a smartphone, is time consuming; better to try and find the answer before asking). I shall go back and have a detailed read.

I dug out some gouges (and a set of draper carving tools, which whilst awful, were a cheap way to experiment with carving); whilst the somewhat unpredictable grain of my redwood scrap pile was not exactly conducive to the process... its not *as* hard as I thought, but i'm probably going to need more gouges, as i only have incannel, and the convex part of the Ogee will be rather easier with an outcannel...

Ebay will provide?
 
Back
Top