You are using an out of date browser. It may not display this or other websites correctly.
You should upgrade or use an alternative browser.
You should upgrade or use an alternative browser.
wooden window making
- Thread starter mattyboy007
- Start date


Help Support UKworkshop.co.uk:
This site may earn a commission from merchant affiliate
links, including eBay, Amazon, and others.

katellwood
Established Member
Those joints are either scribed or mitred and are cut prior to assembly (in that particular joint I would strongly suggest scribed).
You will not get the same effect if you route the mould following glue up except if you carve out the corner rounding. However if you do this (and it will be extremely time consuming and arguably slower that doing the job right prior to glue up) you will end up with some exposed endgrain similar to a masons mitre
You will not get the same effect if you route the mould following glue up except if you carve out the corner rounding. However if you do this (and it will be extremely time consuming and arguably slower that doing the job right prior to glue up) you will end up with some exposed endgrain similar to a masons mitre
katellwood
Established Member
Actually having a look at your picture again. are you refering to the glazing bar mould or the frame mould.
If its the glazing bar mould you are not going to get a router to cut the mould within approx 75mm of the frame (depending on your router), if its the frame then again you will have to carve out the round exposing endgrain but with the larger section over the glazing bar this should be easier.
If its the glazing bar mould you are not going to get a router to cut the mould within approx 75mm of the frame (depending on your router), if its the frame then again you will have to carve out the round exposing endgrain but with the larger section over the glazing bar this should be easier.
mattyboy007
Member
hello thanks for the info.
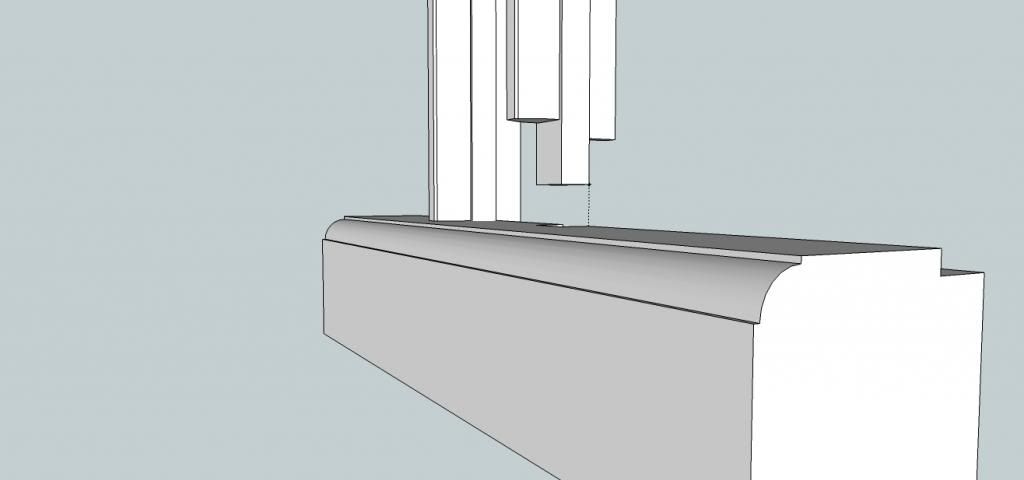
I was refering to the routered curve nearest to my bit of paper shown at the bottom of the picture. So the curve on the frame, not the glazzing bars.
I understand how to do a miter joint which as you say will work. Can you point me to somewhere online where I can see how to make a scribed joint. I'm not sure I know what that is.
I want to use the strongest joint possible.
Thanks again
much appreciated
Matt
Dibs-h
Established Member
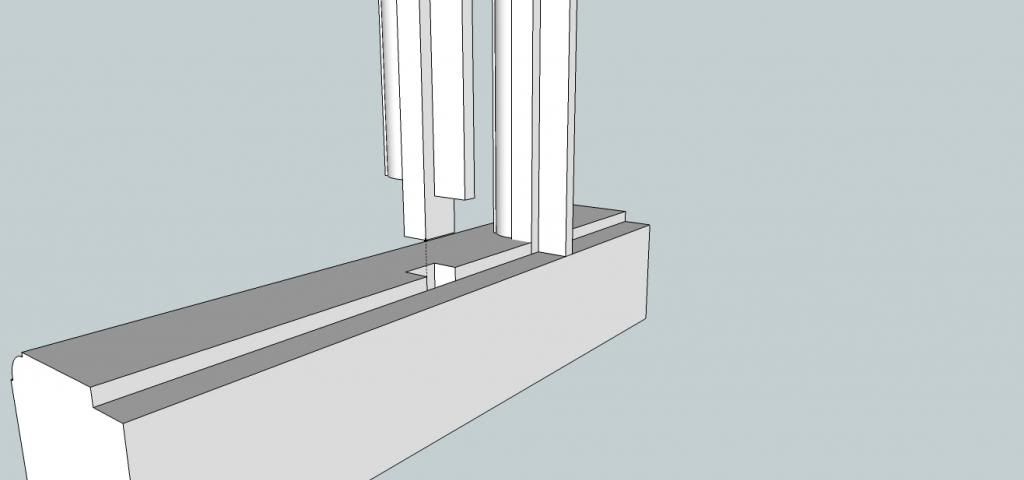
The "curve" in the frame all round by the looks of it - would be done with a spindle moulder. Could be done with a router table - assuming you can get a router bit that does the pattern, or whether it can be done with several passes using different bit.
Plan B - could just be to get someone to run it up for you on say 2"x1" or whatever it is & plant it on. Considering it's painted - who'd know?
HIH
Dibs
Plan B - could just be to get someone to run it up for you on say 2"x1" or whatever it is & plant it on. Considering it's painted - who'd know?
HIH
Dibs
Wildman
Established Member
looks like a standard ovelo moulding to me


£12.50 (£1,250.00 / kg)
£14.45 (£1,445.00 / kg)
JSP M632 FFP3moulded Disposable Dustmask (Box of 10) One Size suitable for Construction, DIY, Industrial, Sanding, dust protection 99 Percent particle filtration Conforms and Complies to EN 149
Amazon.co.uk


£17.99 (£1.80 / count)
£27.44 (£2.74 / count)
3M 8822 Disposable-fine dust mask FFP2 (10-pack)
Amazon.co.uk


£238.91
£360.17
Trend Portable Benchtop Router Table with Robust Construction for Workshop & Site Use, 240V, CRT/MK3
Amazon.co.uk

£24.99
Facemoon Reusable Masks,Safety Masks,Dual Filter Masks, Paint, Dust, Epoxy Resin, Construction, Welding, Sanding, Woodworking, Chemical Reusable Gas Masks
ShenZHEN CIRY MINGYANG LITIAN ELECTRONIC ECOMMERCE


katellwood
Established Member
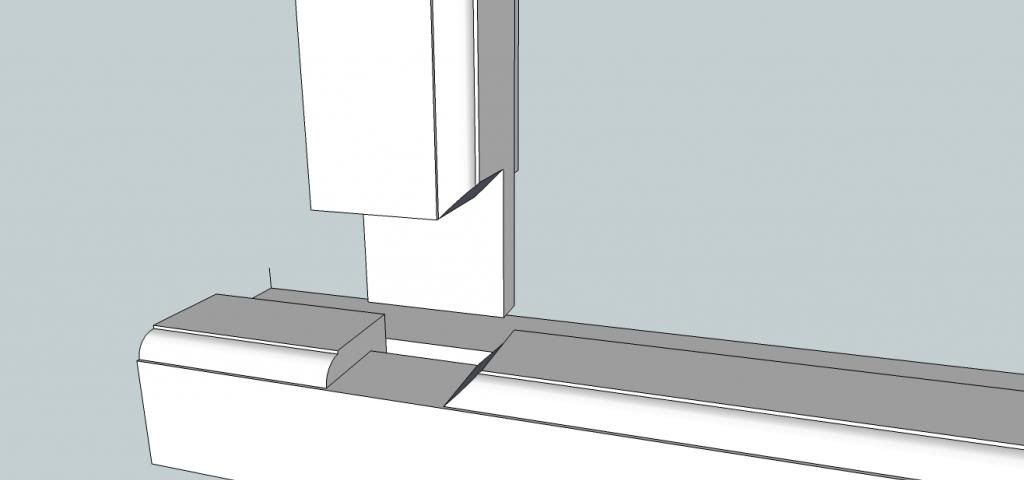
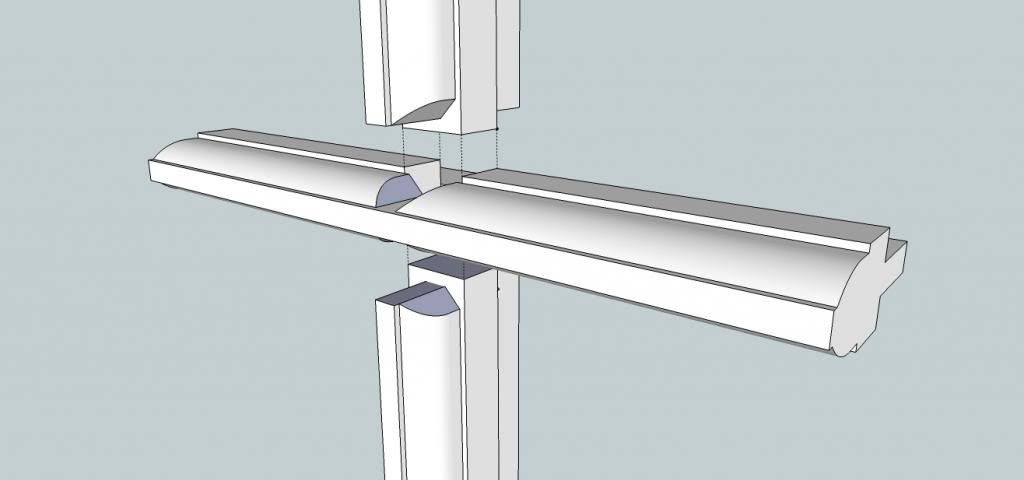
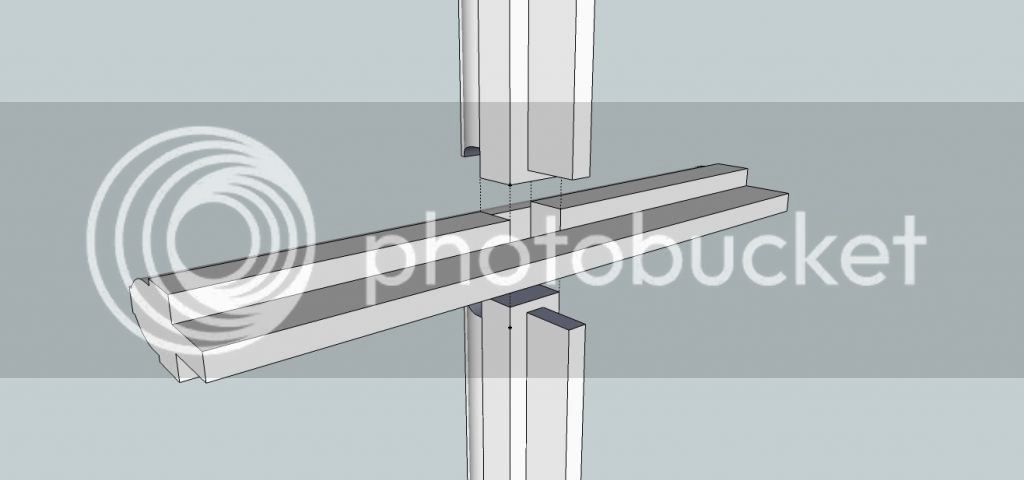
This is a mitred mortice and tenon
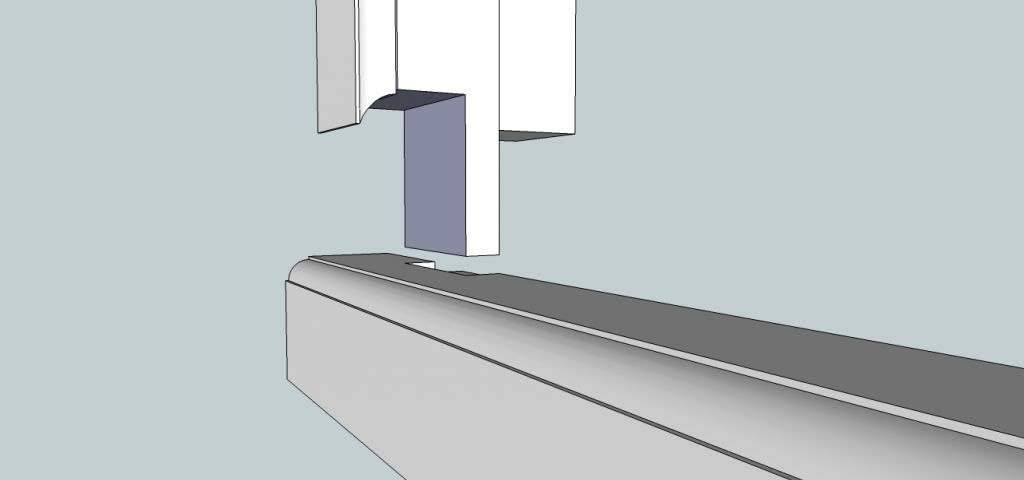
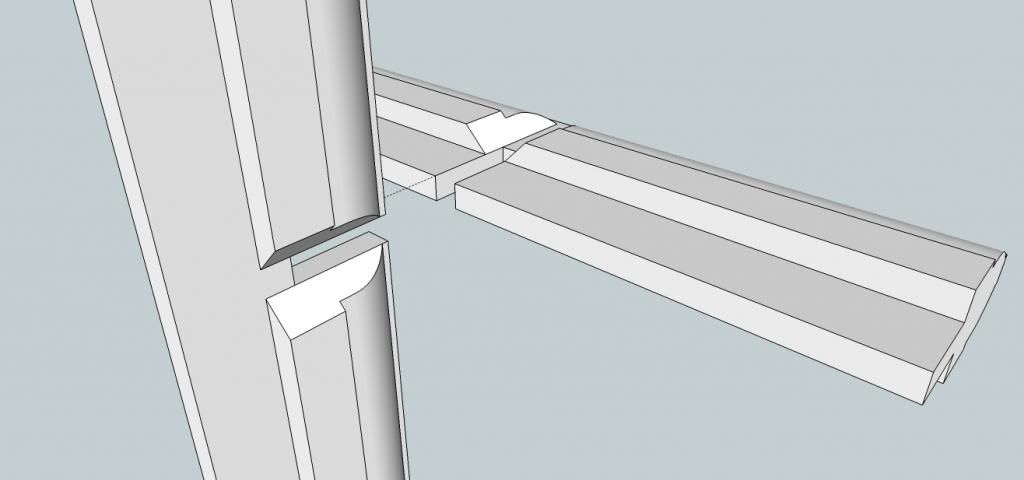
This is a scribed mortice and tenon
As can be seen if cut by hand the mitred can be cut with flat chisels however the scribed will need a suitable gouge to get the curve of the ovolo.
A bit like fitting a piece of skirting you need to cut a mitre on the tenoned piece to ascertain the shape of the ovolo prior to shaping with the gouge.
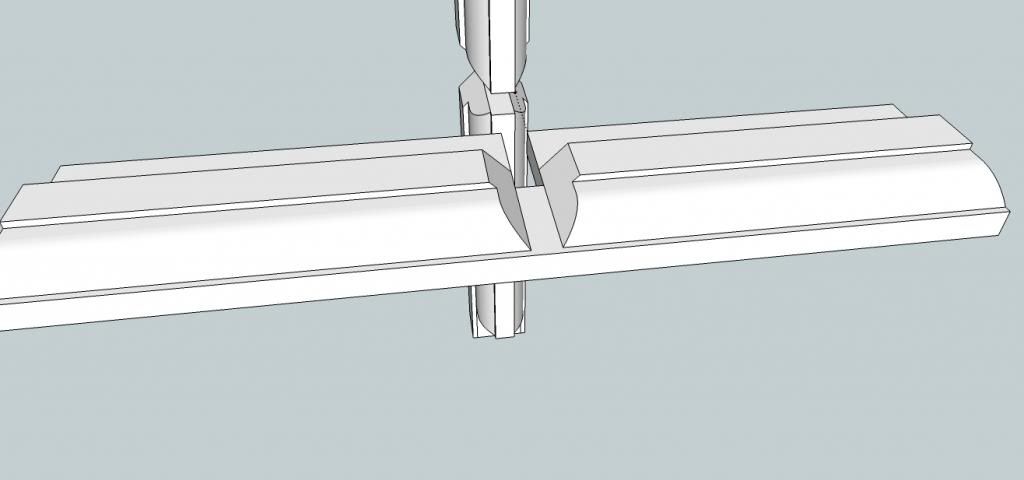
This is how you would actually carry out the scribe if doing it by hand to save scribing the whole shoulder (which is how it would come off of a tenoner)
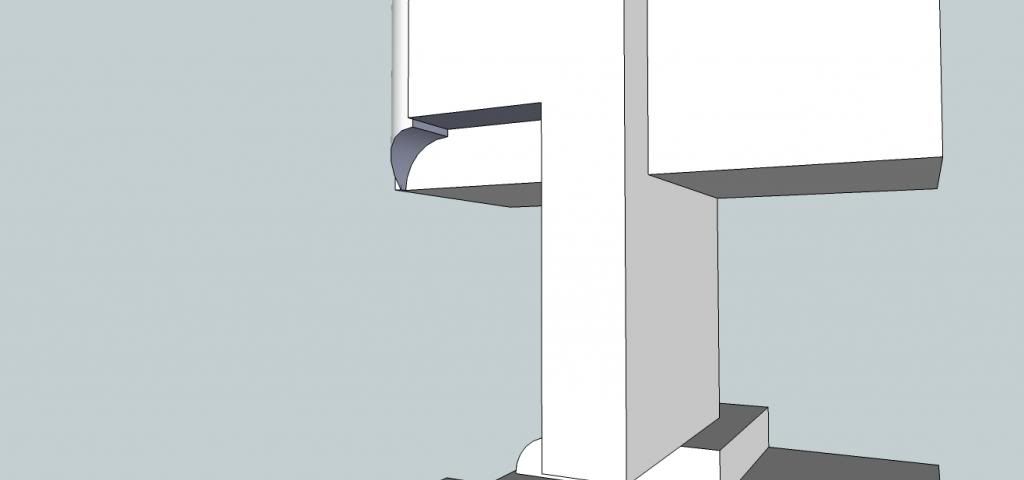
If accurately cut both joints will appear the same however if there is any amount of shrinkage then there is a risk that the mitre will open up (especially in a mullion or transom where both sides are moulded) whereas the scribe will not.
Hope this small tutorial helps
This is a scribed mortice and tenon
As can be seen if cut by hand the mitred can be cut with flat chisels however the scribed will need a suitable gouge to get the curve of the ovolo.
A bit like fitting a piece of skirting you need to cut a mitre on the tenoned piece to ascertain the shape of the ovolo prior to shaping with the gouge.
This is how you would actually carry out the scribe if doing it by hand to save scribing the whole shoulder (which is how it would come off of a tenoner)
If accurately cut both joints will appear the same however if there is any amount of shrinkage then there is a risk that the mitre will open up (especially in a mullion or transom where both sides are moulded) whereas the scribe will not.
Hope this small tutorial helps
mattyboy007
Member
Nice one ... many thanks.
Now i get it ;-)
Time to put my secondary school wood working skills into gear, Hay i was top of the class ;-)
cheers again
Now i get it ;-)
Time to put my secondary school wood working skills into gear, Hay i was top of the class ;-)
cheers again
katellwood
Established Member
Nice to be of assistance
Any problems let me know
Any problems let me know
Benchwayze
Established Member
There you go!
Welcome Matty!
Good 'ere innit?
Welcome Matty!
Good 'ere innit?
mattyboy007
Member
hello, yes it is good here.
I'm about to start building the frame tomorrow, have been busy trying to get all my tools together and build my router table etc.
I'm confident that I'll get the frame sorted tomorrow, however how do the bits between the glass stay in place? there are 6 bit of glass, so one bit of wood down the middle and three bit of wood going across!
Those explosive diagrams are really helpfull.
Thanks inadvance
Matty
katellwood
Established Member
This is certainly honing my sketchup skills
Basically there are four traditional ways to join glazing bars two based on the mortice and tenon and two based on a halving joint
Firstly a mitred mortice and tenon
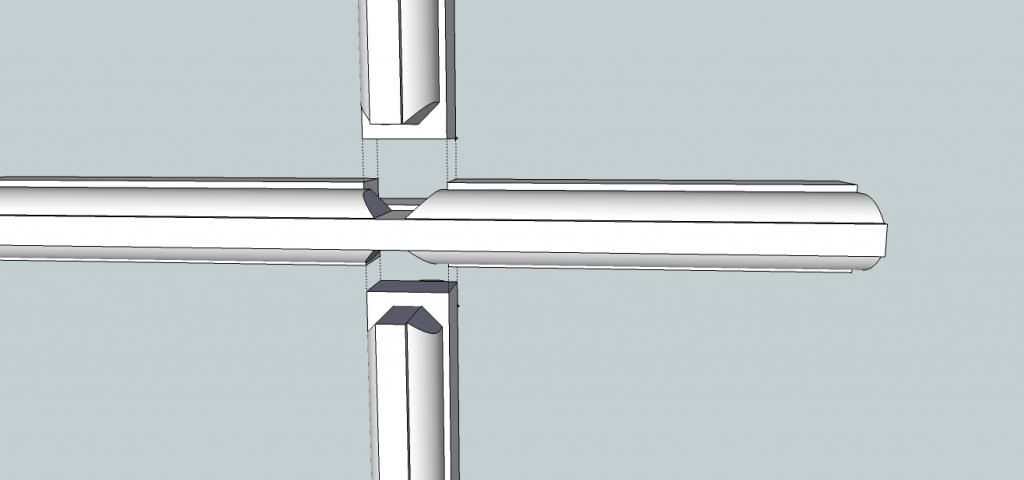
Secondly a scribed mortice and tenon
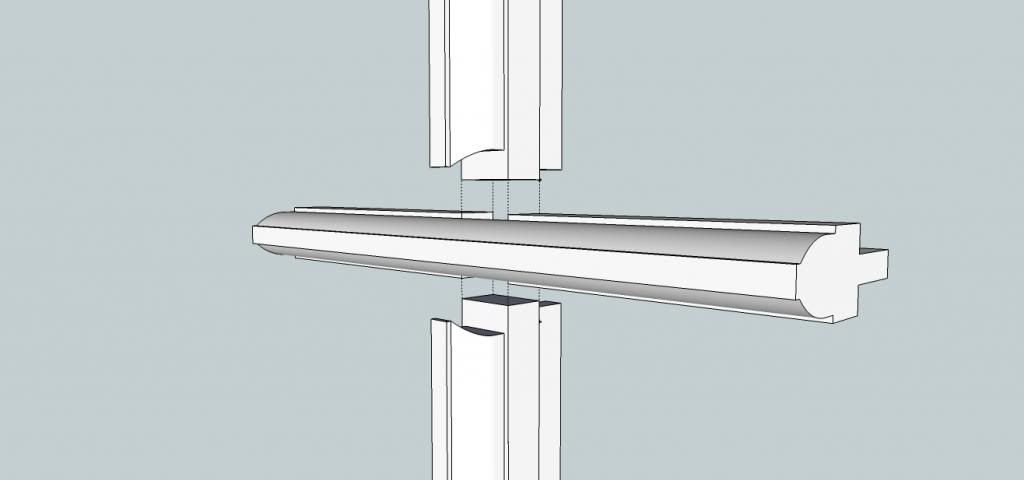
Now a halved mitre
And finally a halved scribe

That being said for double glazed units the bars are now normally glued to the glass with a double sided tape, the examples I have shown refer to single glazing which is only usually done in restoration work
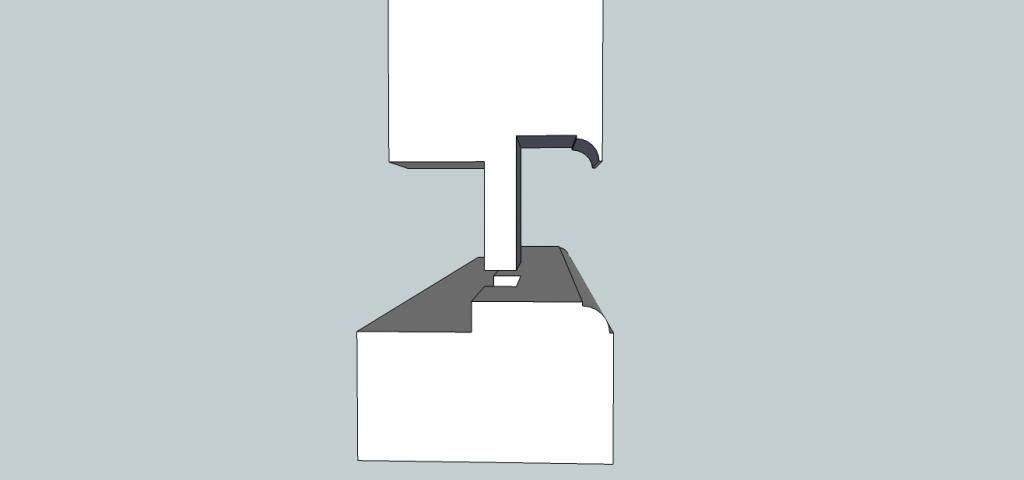
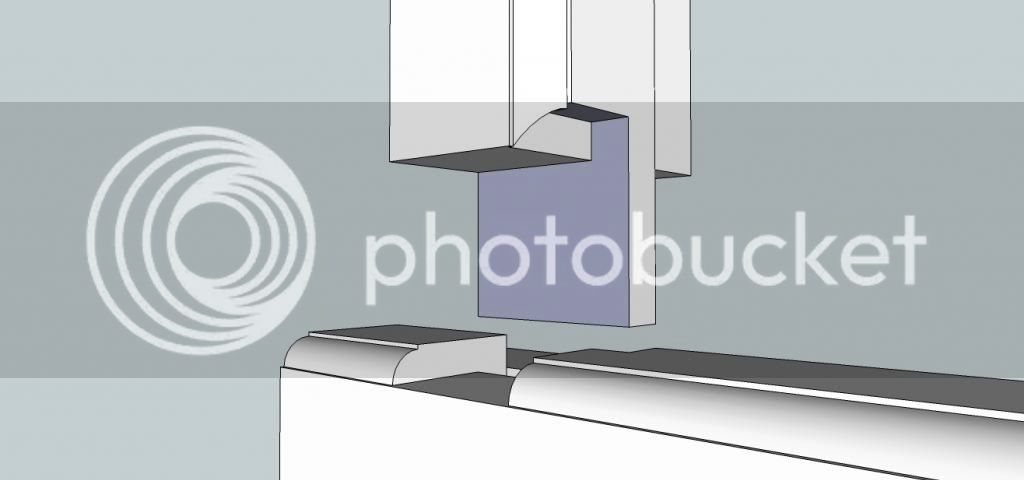
where the bars join the main frame as in your example this is just a basic stepped shoulder
Basically there are four traditional ways to join glazing bars two based on the mortice and tenon and two based on a halving joint
Firstly a mitred mortice and tenon
Secondly a scribed mortice and tenon
Now a halved mitre
And finally a halved scribe
That being said for double glazed units the bars are now normally glued to the glass with a double sided tape, the examples I have shown refer to single glazing which is only usually done in restoration work
where the bars join the main frame as in your example this is just a basic stepped shoulder
RogerBoyle
Established Member
Excellent work with Sketchup
Roger
Roger
mattyboy007
Member
Many thanks again .... whoever you are I wish you all the best.
Jacob
What goes around comes around.
If it's a hanging sash the glazing bars go through top to bottom and are cut going across. Opposite for a side hung casement. If neither (fixed?) than the shortest ones go through. Whichever it is usually works out that the shortest ones go through.mattyboy007":3c5lrd4x said:hello, yes it is good here.
I'm about to start building the frame tomorrow, have been busy trying to get all my tools together and build my router table etc.
I'm confident that I'll get the frame sorted tomorrow, however how do the bits between the glass stay in place? there are 6 bit of glass, so one bit of wood down the middle and three bit of wood going across!
NB you make the cut ones as one piece as if going through, then mitre etc as per drawings above, and finally separate them by sawing through the tenons.
The through ones have wedged M&Ts in the stiles (or rails) and the cut ones just a stub tenon into a blind mortice
Yes good drawings - spot on!Those explosive diagrams are really helpfull.
Thanks inadvance
Matty
neilyweely
Established Member
Katellwood
Did you really do those illustrations on sketch-up? That is really impressive. I was trying, in vain, to illustrate a kitchen we have been asked to do last night. 6 boxes. Beyond me. I ended up drawing them with a pencil and paper, photographing them and emailing the pictures!!
Clearly I need to stay in more. And practise.
Seriously, I am impressed.
Neil
katellwood
Established Member
Thanks for the kind comments,
Jacobs right in relation to long and short bars and where they go however the original photo would dictate that the bars are going straight into the frame as opposed to a casement
One final comment and this comes for experience, in the total length of the bar allow approx 1mm extra which when cramped up will ensure all the joints are tight.
A WIP might be in order to see how you get on.
Thanks again, you know where I am if needed.
katellwood
Established Member
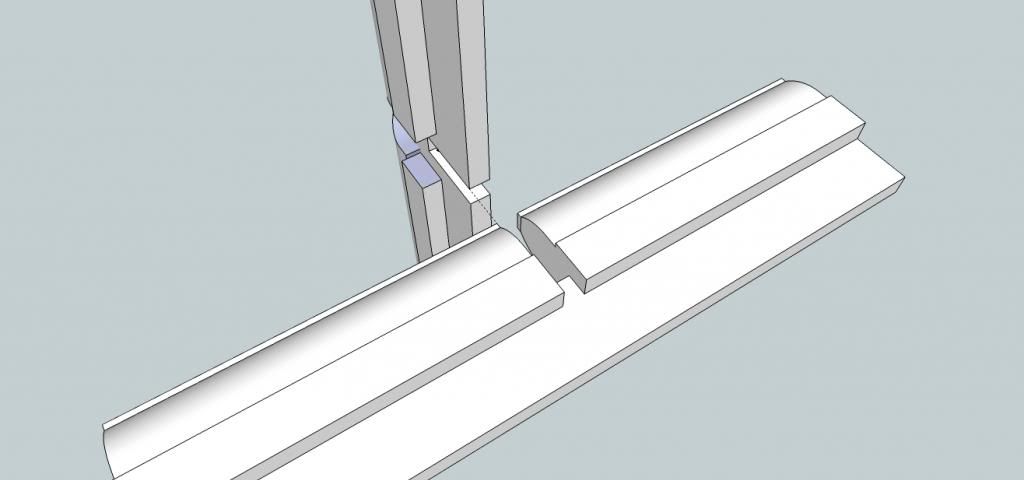
Just found this in the shop
This is the tool (or jig) that is used to make bar scribing a lot easier especially in repetitive work
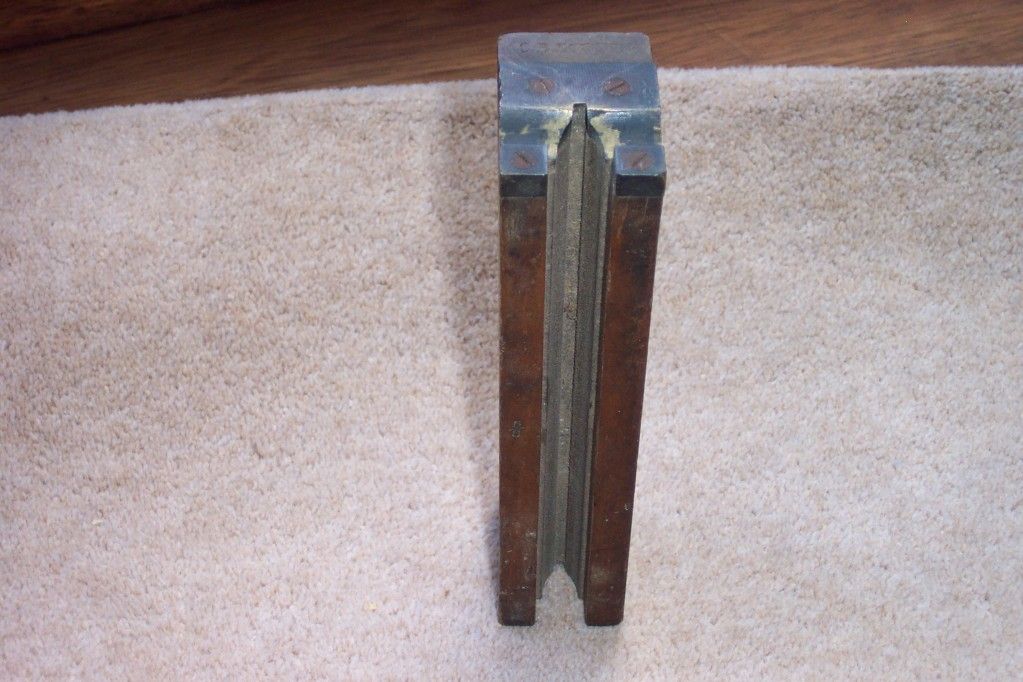
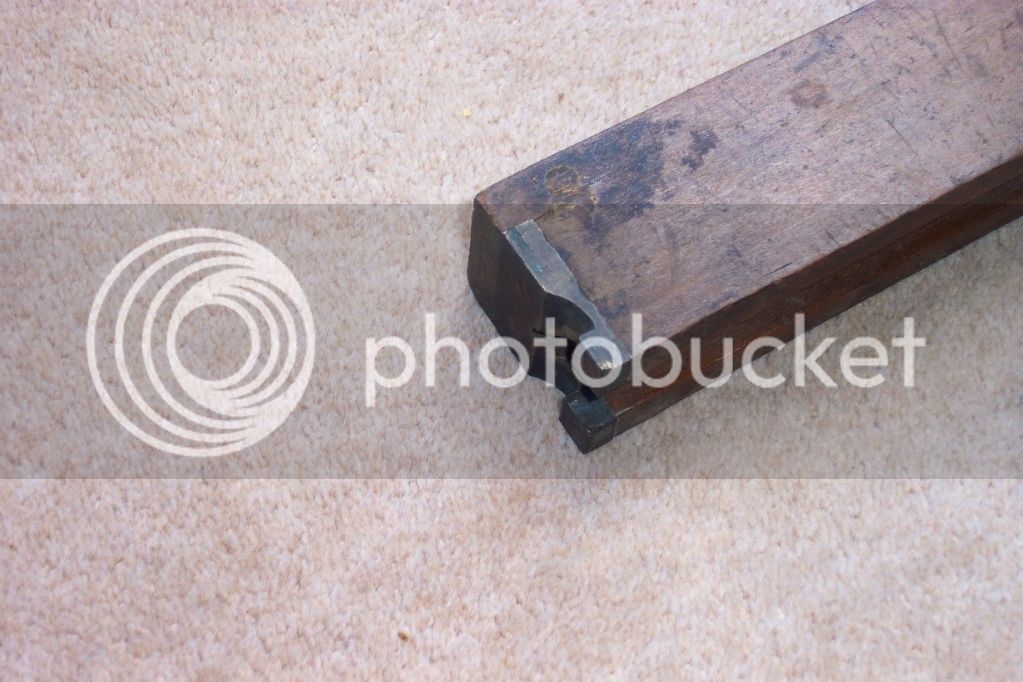
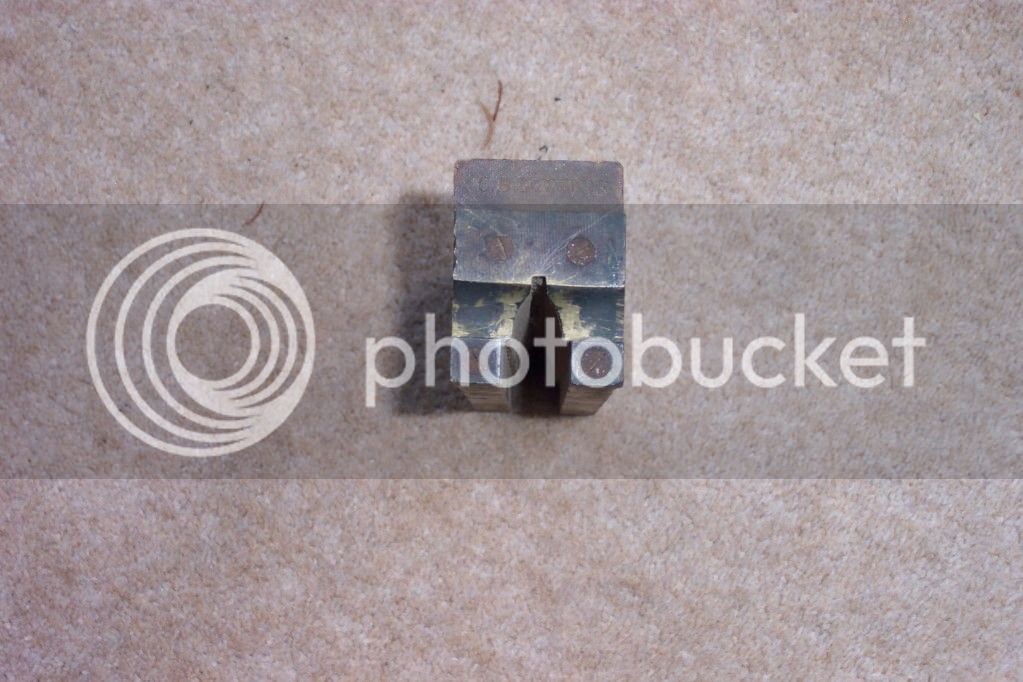
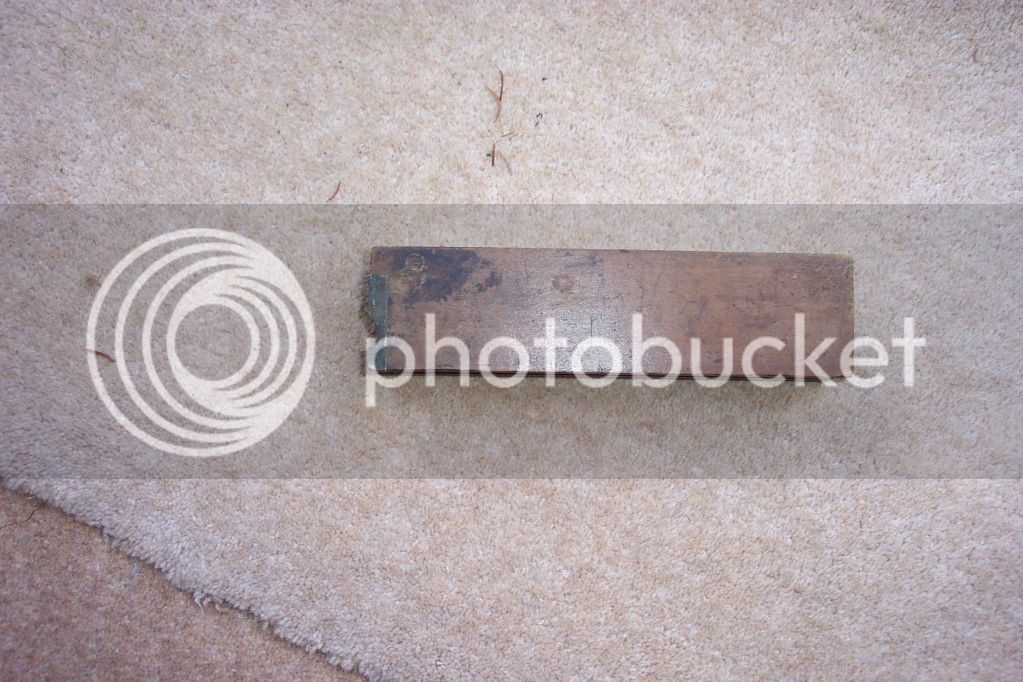
however it needs to be paired up with a suitable moulding plane so as the scribe fits the mould
This is the tool (or jig) that is used to make bar scribing a lot easier especially in repetitive work
however it needs to be paired up with a suitable moulding plane so as the scribe fits the mould
Lightning bolt
Stopped, splayed & wedged scarf joint
A wonderful post, I've been squeezeing my brain hard trying to remember how we did this in college 18yrs ago. I've been asked to make 2 new reproduction Windows for a restoration job & I haven't done one since college! Still have my model but didn't want to bust it apart to see. Thank you so much for these wonderful illustrations. It's always confusing trying follow verbal descriptions of this kind of thing.This is a mitred mortice and tenon
This is a scribed mortice and tenon
As can be seen if cut by hand the mitred can be cut with flat chisels however the scribed will need a suitable gouge to get the curve of the ovolo.
A bit like fitting a piece of skirting you need to cut a mitre on the tenoned piece to ascertain the shape of the ovolo prior to shaping with the gouge.
This is how you would actually carry out the scribe if doing it by hand to save scribing the whole shoulder (which is how it would come off of a tenoner)
If accurately cut both joints will appear the same however if there is any amount of shrinkage then there is a risk that the mitre will open up (especially in a mullion or transom where both sides are moulded) whereas the scribe will not.
Hope this small tutorial helps
I really must pull my finger out & learn sketch up, always did pencil & paper which is great untill clients start making numerous changes!
Thanks again great work. This place is the bees knees for getting one out of a mortice...
Similar threads
- Replies
- 2
- Views
- 443
- Replies
- 10
- Views
- 481
- Replies
- 9
- Views
- 626
- Replies
- 41
- Views
- 2K