Wooden plane questions

UKworkshop.co.uk

Help Support UKworkshop.co.uk:

This site may earn a commission from merchant affiliate links, including eBay, Amazon, and others.

stubtoe

Established Member
Joined
20 Aug 2011
Messages
62
Reaction score
0
Location
Cheshire
Hi,

Picked up this plane on ebay as I was after a jointer to add to my no.4 and no. 5 Bailey style, but thought I'd try a wooden one:

d4b78022-af57-a8a8.jpg


After eventually managing to get the blade out and sharpen/hone it (as was pretty dull), when it came to setting it up I ran into a couple of issues...

Firstly, the blade seems too close to the front edge of the mouth so when I take a shaving it just clogs up. Does this look too close (you can see clogged bits in centre of blade)?:

d4b78022-b04a-cb3b.jpg


To be honest I can't see how I can adjust it so that there would be a wider gap as there is no fore/aft adjustment as with a metal Bailey style plane.

The second problem (and I appreciate this may impact the first issue) is that there is a slight hollow, about 1" wide, that runs in front of and behind the blade/mouth for a good few inches either side.

So how do I go about flattening the sole and Worthington the mouth opening issue?

Any help/suggestions much appreciated.

Cheers,

Jonny

Sent from my Nexus S using Tapatalk
 
I just flattened the sole on my wooden jack with a no4 plane because that was what I had. It needs to be flat, not cambered, very sharp and set to take a very fine shaving. It worked ok for me.

Puzzled by the mouth width problem, must have worked before. I think maybe you haven't got it set fine enough? Took me a bit of practice too. Now my wooden jack is the best of the lot. I think it has a lot to do with the great thick iron compared to my stanley/record planes.

Goodluck.
 
stubtoe":rsfyec6f said:
Hi,

Picked up this plane on ebay as I was after a jointer to add to my no.4 and no. 5 Bailey style, but thought I'd try a wooden one:

d4b78022-af57-a8a8.jpg


After eventually managing to get the blade out and sharpen/hone it (as was pretty dull), when it came to setting it up I ran into a couple of issues...

Firstly, the blade seems too close to the front edge of the mouth so when I take a shaving it just clogs up. Does this look too close (you can see clogged bits in centre of blade)?:

d4b78022-b04a-cb3b.jpg


To be honest I can't see how I can adjust it so that there would be a wider gap as there is no fore/aft adjustment as with a metal Bailey style plane.

The second problem (and I appreciate this may impact the first issue) is that there is a slight hollow, about 1" wide, that runs in front of and behind the blade/mouth for a good few inches either side.

So how do I go about flattening the sole and Worthington the mouth opening issue?

Any help/suggestions much appreciated.

Cheers,

Jonny

Sent from my Nexus S using Tapatalk

I would leave it in your workshop to acclimatise/normalise to the humidity levels before making any adjustments. The adjustments you need are fairly fine, and there's no point making them on a plane that's going to move later.

The plane certainly has a fine mouth, so blade projection must be kept low enough to make a shaving that will actually pass.

The other obvious thing to check is cap-iron fit, which must be near-perfect. Fortunately cap irons are soft, and can be filed, sanded or honed easily.

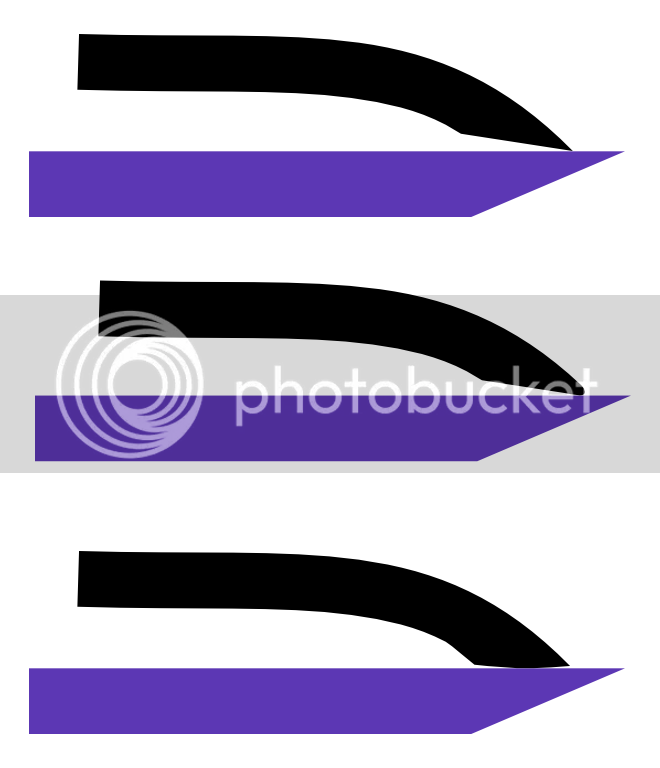
One classic problem to look for is if someone has honed the cap iron edge at a positive angle, creating a trap (like the bottom image).

cap.png


BugBear
 
.

Good old wooden planes are worth having.... the knack is finding good ones that are not worn out / damaged / abused in the first place.....


Agree with Bugbear on the cap iron. It has to be straight, and absolutely flush fitting along the edge as shavings will collect here and cause the problem that you are experiencing. This applies to any cap iron on any plane, not just wooden ones. Same thing with the wedge. A badly fitting wedge will collect debris and choke the plane.

But restoring life to an unwanted old plane that hasn't been used in many years requires some work; there's a bit of fettling to be done first and you need some time and patience.


I usually start with flattening and straightening the contact point along the nose of the cap iron so that it's in contact all the way across; sometime they can be twisted. I then turn it over and spend some time polishing the nose to reduce friction. Also look at the contact of the wedge. It needs to be flat all the way down. You don't want shavings curling up under a badly fitting wedge. Then you do the business with the iron itself.

Your plane mouth is just about right in my opinion. As the planes were used they were flattened and worn to an extent where the mouth became wider and were sometime repaired with an infill. A nice tight mouth provides support for the shaving as it is planed and reduces the tendency to tear out.

As far as the body is concerned I would clean it first (including the wedge).

Let it settle in your climate, then give it a liberal dose of oil (raw linseed). Keep doing this for a while until it has absorbed all it wants (and keep up the occasional oiling in use). The idea is to add weight and stability to the wood. It also prevents mositure movement in the plane body. Put it in a plastic bag in a warm spot with lots of oil to soak in.

When the plane is settled down and well oiled is the time to do your adjustments. Try the wedge fit with the iron in place, then when this is right and with the wedge in place and the iron withdrawn beyond the mouth, square the sides and sole, then more oil on the exposed parts.


You should end up with a good usable plane for many years.

Good luck.


.
 
Cheers for all the good suggestions guys. Some good pointers there. Particularly like the diagram about cap irons which makes me think I need to do a bit more fettling with my other planes... :oops:
 
stubtoe":3g65vsrf said:
Cheers for all the good suggestions guys. Some good pointers there. Particularly like the diagram about cap irons which makes me think I need to do a bit more fettling with my other planes... :oops:

Difficulties with cap irons are one of the driving forces behind the new momentum for high EP bevel up planes!

But fettling cap irons is perfectly doable, just a little fiddly.

BugBear
 
Looks like the iron is not sitting flat in the mouth, there looks like there is a gap behind it, is the iron bent or is there something behind it in the gap preventing it from sitting properly?

Mine sits hard back into the mouth and works well.

I posted a pic of mine in the earnsaw bros post a few days ago.

here it is again with its smaller sister, the miniatures are all made by me and all work.
big plane + miniature med.jpg

Regards

Plover22 (John)
 

Attachments

  • big plane + miniature med.jpg
    big plane + miniature med.jpg
    55.2 KB
Iron seat.jpg
The plane has clearly worked in the past and the gap cannot have got smaller so widening it is not the answer.

I re-iterate that the iron is possibly not sitting properly, the gap indicated by the arrow should not be that large, there will appear a small gap as the sharpening chamfer on the blade will leave one, but it appears much too large on this one, I respectfully suggest you investigate whether the iron is being pushed forward away from it's seat or is bent.

I am sure that if you seat the iron properly the plane will work.

Also if the iron is being pushed forward higher up it will chatter badly when it is cutting as it will not be backed up properly.

Regards

Plover (John)
 

Attachments

  • Iron seat.jpg
    Iron seat.jpg
    40 KB
plover22":13s74p8j said:
The plane has clearly worked in the past and the gap cannot have got smaller so widening it is not the answer.

I re-iterate that the iron is possibly not sitting properly, the gap indicated by the arrow should not be that large, there will appear a small gap as the sharpening chamfer on the blade will leave one, but it appears much too large on this one

In a bevel down design the gap will be as large as the blade is thick, and wooden planes have thick irons. The picture looks fine to me (apart from the jam, obviously).

78726d1216887893-making-wooden-block-plane-wood-plane-mouth.jpg


BugBear
 
Ciao :D ,
If you have troubles with perfect chipbreaker adherence with iron, I found useful to seal gaps by using a thin screwdriver for spread a burr grinded on its back edge.

a45xrr.jpg


1trayx.jpg


Ciao,
Giuliano
 
ac445ab":2r73ja6p said:
Ciao :D ,
If you have troubles with perfect chipbreaker adherence with iron, I found useful to seal gaps by using a thin screwdriver for spread a burr grinded on its back edge.

a45xrr.jpg


1trayx.jpg


Ciao,
Giuliano

Whilst mashing the burr to the iron is a traditional technique, the "grinding" in your first picture will CREATE an opening for the shavings to jam into (as per my picture). Not good.

If you want to do this, grind the TOP of the cap -iron, which will (trust me) create a burr if the grit is coarse, and proceed as per your second picture.

BugBear
 
bugbear":31qlnhq5 said:
ac445ab":31qlnhq5 said:
Ciao :D ,
If you have troubles with perfect chipbreaker adherence with iron, I found useful to seal gaps by using a thin screwdriver for spread a burr grinded on its back edge.

a45xrr.jpg


1trayx.jpg


Ciao,
Giuliano

Whilst mashing the burr to the iron is a traditional technique, the "grinding" in your first picture will CREATE an opening for the shavings to jam into (as per my picture). Not good.

If you want to do this, grind the TOP of the cap -iron, which will (trust me) create a burr if the grit is coarse, and proceed as per your second picture.

BugBear

May be I used the wrong word "Grinding" :oops: . I meant to say slithering the cap iron (backwards, with an angle) FEW times on a coarse abrasive surface. In this case no opening will be created and even if was, mashing the burr would seal it. In fact, after having done this, I cannot see any light passing between the two irons.
If I do this on the top, I'll find the burr on the back side and it could be create some adherence issue. What do you think?

Giuliano :D
 
bugbear":1vnlig34 said:
plover22":1vnlig34 said:
The plane has clearly worked in the past and the gap cannot have got smaller so widening it is not the answer.

I re-iterate that the iron is possibly not sitting properly, the gap indicated by the arrow should not be that large, there will appear a small gap as the sharpening chamfer on the blade will leave one, but it appears much too large on this one

In a bevel down design the gap will be as large as the blade is thick, and wooden planes have thick irons. The picture looks fine to me (apart from the jam, obviously).

78726d1216887893-making-wooden-block-plane-wood-plane-mouth.jpg


BugBear

Of course the gap will be as wide as the iron is thick, but look at the difference between the picture you have posted and the problem plane, the photo of the problem plane is taken almost at the angle of the iron looking up the back of it, you can see the whole of the ground area and there still looks to be a gap behind the back of the iron, the iron appears to be being pushed off it's seat and toward the front of the gap.

If all the parts are original the plane must have worked in the past, so modifying it is not the answer (unless the next paragraph is true).

It is quite possible that the iron is not the original and is too wide or thick for the body, it may even not have been from the same make of plane, (I have bought many tools from car boot sales which were clearly made up of bits), these planes were hand finished (some were even made by the craftsmen themselves and irons could be bought separately), slight discrepancies in the hand made irons would be put right at the time of manufacture by hand fitting, changing an iron later often entails some careful attention.

P.S.
I am new to the site but that does not mean I am new to tools, I have been fascinated by them and collecting and using them since childhood, and I am fast approaching 60 now.

Best Regards

Plover
 
plover22":3eymr98t said:
Of course the gap will be as wide as the iron is thick, but look at the difference between the picture you have posted and the problem plane, the photo of the problem plane is taken almost at the angle of the iron looking up the back of it, you can see the whole of the ground area and there still looks to be a gap behind the back of the iron, the iron appears to be being pushed off it's seat and toward the front of the gap.

Agreed. But bedding problems of the scale you're suggesting are very rare. A more likely explanation of your observation is simply that the blade has been ground with a long, low primary bevel. This is common.

BugBear
 
Very true bugbear, but that does not solve the problem of the Iron being too close to the front of the gap, which is clearly the case from the photo, all my wooden planes have a minimum of 1/4" gap in front of the cutting edge, as I see it there are a number of explanations.

1) The gap has been narrowed by the incorrect fitting of a repair piece, there is no sign of that.

2) The Iron is thicker than originally fitted, that is quite possible but there would have to be a large difference which seems unlikely

3) The Iron is bent and therefore curving toward the front of the plane

4) The Iron is being pushed forward by debris or distortion, or because it does not fit properly into the gap

5) The iron has been reground so many times that the captive nut for the cap iron fixing screw is fouling the bottom of the groove cut for it in the body of the plane as a result of the shortening of the iron, I have had that problem with one of mine and decided to deepen the groove rather than hunt for a different iron.

Can you think of any others?

Let's not forget that we are trying to help stubtoe and not arguing over the possibilities, I would like him to look at all these suggestions and any others from yourself or other members, before removing any material from the body of the plane, once removed it is difficult or impossible to replace.

Do not forget that many of these planes are 100 years old or more, replacement Irons are quite likely to have been fitted during their lifetime.

Best regards

Plover
 
That's good clear logic from Plover.

One thought that I would add:

Without getting too hung up on the names (Jack, Try, Jointer, Fore etc) let's remember that there are two broad groupings of bench planes. There are those designed for rapid stock removal (to get your timber to the right dimensions) where the shaving will be quite thick and therefore the mouth needs to be quite wide.
But there are also those designed to take only a thin shaving, and they can have the benefit of a tight mouth. Smoothers are like this but a longer plane designed to make a board as straight as possible will also be designed to take a thin shaving.

Perhaps that's a long-winded way of saying 'don't think you have to give this plane a wide mouth to make it work.'

If it does need wood removed from the sole (having exhausted the suggestions already given) only take off the bare minimum and then stop.
 
Looking at the photos I reckon that cutting iron has way too much camber. If you hone the middle of it square to eliminate the curvature on all but the last 1/4" on either side you will probably find the problem with the mouth clogging disappears.

Giuliano, if you lay the cap iron flat on the bench with the tip on the abrasive you will create a relief angle behind the edge. This method is also 'self jigging' so the angle remains constant and ensures that only the leading edge makes contact with the cutting iron.
 
Thanks chaps. I'll have a better look tonight at the additional suggestions tor the blade and cap.
 
matthewwh":r4ktprlk said:
Giuliano, if you lay the cap iron flat on the bench with the tip on the abrasive you will create a relief angle behind the edge. This method is also 'self jigging' so the angle remains constant and ensures that only the leading edge makes contact with the cutting iron.

This seems to me a very good advice!
Thanks

Giuliano :D
 
Back
Top