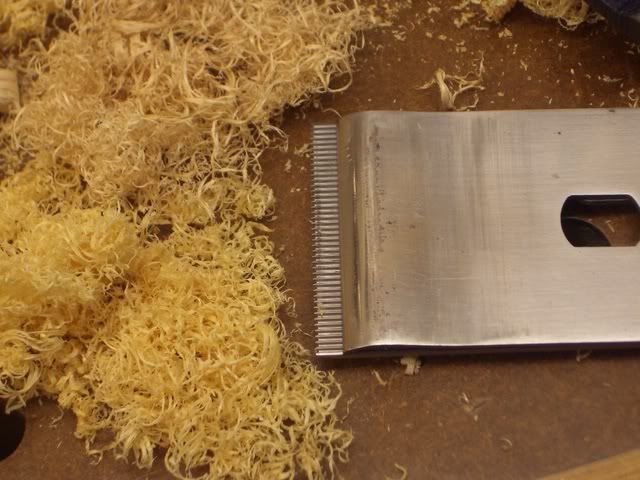
Toothed Irons in Bailey-pattern Planes?

UKworkshop.co.uk

Help Support UKworkshop.co.uk:

This site may earn a commission from merchant affiliate links, including eBay, Amazon, and others.

Jelly

Established Member
Joined
20 Sep 2012
Messages
1,366
Reaction score
340
Location
Sheffield
I just acquired a Footprint No.4 plane for £3, I don't use metal planes as my standard bench planes and already have a No.4 anyway... But I'm an avowed fan of Footprint tools and the seller was going to bin it if it didn't sell, all for a bit of surface rust and want of some oil on the wooden parts! :cry:

My existing No.4 has an iron with a back-bevel on it for a higher angle to smooth awkward timbers; I feel a toothing plane would complement that nicely!

I know that toothed bailey-pattern irons are available, but if i understand correctly, a toothing plane ideally have a higher effective cutting angle than the standard 45-50 degrees, to minimise the risk of the teeth digging in.

I have thought up some possible solutions to this:
  • Rather than buy a toothed iron, which can't be back-beveled, clean up the existing one in the plane, sharpen a back bevel onto it, and then cut teeth into the edge with a needle file and re-dress the edge gently
  • Buy a "proper" toothed iron, and make a wedged hardwood shim to sit on the frog for a higher cutting angle.
  • Buy a toothed iron, fit it and hope it's effective enough at the normal angle.

Of the three, the first* appeals because it's free and easy, but I'm likely to kick myself if I end up using it a lot and have to re-cut the teeth midway through something.
I'm not entirely sure the second is possible, as I'm pretty sure that I'd need a longer screw for the lever cap, and would either have to drill a new hole/mill an extension the the slot in the lever cap or position it a little further up on the iron-chipbreaker assembly and hope that it doesn't then allow the iron to chatter in the cut.

Any opinions on my proposed solutions, or suggested alternative solutions most welcome.

*Rather than a solution, that's more of a "system" to work around the problem; being that a solution to a problem is final, but the second law of thermodynamics dictates that all systems tend towards disorder.
 
Can't help directly but i think i have come across that seller before. If it is the same one he puts on every listing that if it doesn't sell it's going to the tip lol

Also last year i came across someone who had modified their bailey plane to create a higher frog angle. He made some metal - (brass or copper i think ) wedges that he brazed to the frog seat to create a 50 or 55 degree pitch. If i remember correctly after comparing the modified plane to a standard one. He found no difference.
 
I think you might struggle to cut teeth in the blade using a needle file. A Dremel tool with an abrasive cut-off disc may be worth trying.
 
Why bother with all the faffing around , hours and hours of work with an iron plane, that probably wont work. If you need a toothing plane it would be easier to modify a wooden plane
 
Toothing irons are used in two circumstances (as far as I'm aware) : keying the substrate for veneering and for working difficult, figured wood. I don't think you need to set the toothing blade higher than the standard 45 degrees. I bought the Kunz blade that is featured in the link and use it in a standard Plane. You really do have to back off the chip breaker. The finer toothed blades that you see on old woodies and intended for veneering do not work very well for removing material. They are just too fine and clog easily. The Kunz is more like a low TPI rip saw rather than a fine dovetail saw - you get my meaning. Even that can have a tendency to clog.
 
rxh":2qxgf3wo said:
I think you might struggle to cut teeth in the blade using a needle file. A Dremel tool with an abrasive cut-off disc may be worth trying.

It's certainly possible to tooth an edge using a needle or saw file, but a Dremel is definitely the better route - as long as you don't overheat the blade.
 
A couple of years back Paul Chapman gave me a demo of his Record No.6 with a Kunz toothed iron fitted and no other modifications. It cut beautifully at 45 degrees with no clogging or tearout and made short work of dressing a pretty chewy grained board. I know Paul is a highly skilled craftsman who routinely prepares all of his wood by hand, but the point he was making was how wonderfully easy and foolproof it was.

If you want to test the principle you could put some teeth on the original iron with a diamond file. If it works for you then it would be well worth investing in a proper iron, as you will soon tire of cutting teeth every time.
 
.

Well for what it’s worth………….

I rarely need toothed blades but when I do there’s no alternative.

The Kunz variety are available that will fit most of the Stanley / Record models, 4, 5 & 6 etc from Dictum in Germany at a reasonable price, and that’s what I have used.

There’s been some concern about chips clogging the teeth under the cap and this does occur, depending on the variety of timber – some do, some don’t, but most will at some point, so it is an issue.

Additionally the Kunz toothed irons, when new, are just long enough in adjustment for No 4 and 5s, which makes backing the cap iron a few mm back difficult. Push it forward and it protrudes too far through the sole.

One solution that I found works for me is to smear a bead of bathroom sealing silicone (the stuff that sets off quickly) under the tip of the cap iron where it meets the blades, assemble and leave it to gel. Then use the cap iron set at the normal distance. It stops the clogging and can usually be peeled off or scoured off the grooves with a wire brush after use.

Hope this helps because they really do work well on difficult timber at normal setting angles and can be set very fine without messing about with the frog setting.

.
 
matthewwh":1cbjxiop said:
A couple of years back Paul Chapman gave me a demo of his Record No.6 with a Kunz toothed iron fitted and no other modifications. It cut beautifully at 45 degrees with no clogging or tearout and made short work of dressing a pretty chewy grained board. I know Paul is a highly skilled craftsman who routinely prepares all of his wood by hand, but the point he was making was how wonderfully easy and foolproof it was.

On mine, I ground a little off the end of the cap iron so that I could move it sufficiently far back to retain full adjustment and avoid most of the clogging problems. I've found the Kunz blade very good


Cheers :wink:

Paul
 
Argus":1nl93z6q said:
…the Kunz toothed irons, when new, are just long enough in adjustment for No 4 and 5s, which makes backing the cap iron a few mm back difficult. Push it forward and it protrudes too far through the sole...
Hi Argus. It's the cap iron that controls the amount the cutting iron protrudes. You would have the same problem with a short Kunz toothed iron (or anyone else's).

As Paul says, grind a little off the business end of the cap iron.

Cheers, Vann.
 
Vann":3jt97qu3 said:
Argus":3jt97qu3 said:
…the Kunz toothed irons, when new, are just long enough in adjustment for No 4 and 5s, which makes backing the cap iron a few mm back difficult. Push it forward and it protrudes too far through the sole...
Hi Argus. It's the cap iron that controls the amount the cutting iron protrudes. You would have the same problem with a short Kunz toothed iron (or anyone else's).

As Paul says, grind a little off the business end of the cap iron.

Cheers, Vann.


Why b ugger a good cap iron?

The problem is debris choking the grooves on the iron.

I already explained an effective and cheap solution that allows the normal backing distance.


.
 
Argus":2cvbibe4 said:
The problem is debris choking the grooves on the iron.
I already explained an effective and cheap solution that allows the normal backing distance.
Fair enough. If you're happy with your solution.

Shortening the cap iron simply allows the cap iron to be set further back, but it probably doesn't completely eliminate debris getting caught in the grooves. So maybe your solution has advantages.

The reason I mention about the cap-iron controlling the blade depth is that on the Aussie forum they had a batch of M2 steel irons made, and they didn't understand this. So around 100 cap-irons (O1 steel) had to be modified or thrown away.

It helps to realise this if anyone is looking for a solution to blade projection problems.

Cheers, Vann
 
Alternatively, you could file out the rectangular hole in the cap iron (for the depth adjuster). If you elongate it towards the blade, you can set the cap iron higher. The effect would be to give more slop in the adjuster (unless you went overboard), but whilst that's annoying it's not a disaster. My biggest issues with re-forming the bottom end are that firstly there's a lot more filing or grinding involved, and secondly, with the cheapo designs, the cap iron doesn't stand off the blade much, so you can't take much off it without it settling flat and not providing pressure where it needs to.

In any case a cooking Stanley double iron isn't all that expensive, and cap irons tend to linger long after the iron itself has gone in the bin. It should be fairly easy to find one to experiment with. :)

E.
 
Back
Top