Squaring a jewerly box, after a dodgy halving cut.

UKworkshop.co.uk

Help Support UKworkshop.co.uk:

This site may earn a commission from merchant affiliate links, including eBay, Amazon, and others.

54Strat

Member
Joined
14 Jan 2015
Messages
18
Reaction score
0
Location
United Kingdom
Hi Guys,

To get me out from lurking, I was wondering if you could help out with a problem I've created through lack of attention.

I'm in the process of building a box, constructed with splined mitres and I've traditionally added the floating top and bottom panels in grooves and glued it all up. It's not that big, say 150mm x 150mm x 60mm and nothing special and all standard. It came to the point where I had to cut it in half horizontally to create the lid. Without a bandsaw or framesaw, I cut this by handsaw and unfortunately the cut drifted off by a couple of millimetres. I know, it was late and I wasn't paying attention.

So I'm left with having to take off up to about 2mm from the top and bottom edges of each half to square it all up. Fortunately the grain is such that a 4 to 5mm gap of grain wont be too noticeable so it is worth trying to save. I tried planing, but the grain at the mitres is very problematic. I thought about just sanding it down but would worry about keeping it square. I have also thought about re-designing the box, possibly adding a wide convex half finger hole to open it, and so removing the problematic saw drift.

Would anyone have any ideas how to best solve this? I use mainly hand tools, so I've no access to any serious machinery I'm afraid.

Cheers

Paul
 
We've all been there Paul, and you're doing the right thing by pausing to reflect on the best remedy instead of rushing to try and fix it but only making things worse!

As a first step I'd lay the two halves on a flat surface, top down and base down. Then using a spacer block scribe a line right around both halves, that retains as much of the box as possible, and gives you a clear reference to aim for. You know that if you can bring each half of the box precisely to that scribed line you'll have a good accurate fit and the lid will open straight and true.

The second step is to consider what method you'll employ to remove wood down to the scribed line, and the method may vary for different parts of the box. In some areas you might want to saw away a relatively large amount of waste, in others you might want to use a finely set block plane.

When you're down to the line, or even better an even 0.25mm away from the line, then lay a sheet of coarse abrasive paper on the flat surface and rub the entire box carefully on the abrasive to take that final, even step down to a perfect joint.

Good luck!
 
Thanks Custard!

I think the best approach is as you suggested, to creep up to the line then finish off by sanding. There's also an option for lining the edge with walnut to square it up (the box is oak) if it's not as perfect as I'd like but it would make a nice contrasting design feature.

Thanks again for your advice. I think I'll need a better way, or some more practise at this. Previously I've made smaller ring boxes that was pretty plain sailing when halving them, but as these new boxes are much bigger so I'll need to up my game and perhaps acquire a framing saw.

For the next one, I think I might prepare for the cut by adding a deep narrow groove in the middle of the outside face at the same time I add the inside grooves for the top and bottom panels. This will give me a 'safe' place to cut into with minimal clean up afterwards (until my skills match my expectations ;) ). I'll also add and extra 3mm width to the initial cut list to compensate for the waste removed by the groove.
 
I know its "cheating" , but could you just put a straight edge (plywood) on each side and use a bearing guided router bit ?
not sure how u would hold it , double sided tape
just a thought to save the box

Steve
 
SteveF":14kg0md8 said:
I know its "cheating" , but could you just put a straight edge (plywood) on each side and use a bearing guided router bit ?
not sure how u would hold it , double sided tape
just a thought to save the box

Steve

Not cheating at all ;), I prefer hand tools for the challenge and learning, plus I have the luxury of it being a hobby. I also work in the kitchen so it's a little bit quieter.

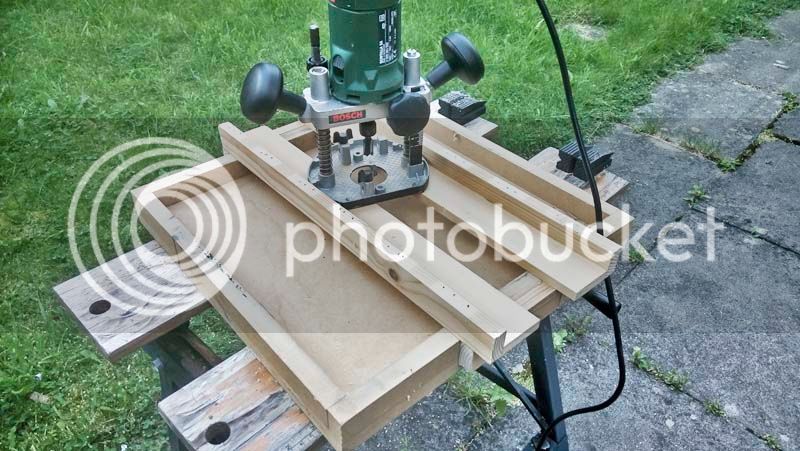
I do have an old Bosch Router and I have a planing jig I built a while back for flattening stock. This jig is deep enough to take the box lids and would work a treat! I'll hold it in place with superglue on masking tape, much less mess than double sided tape.

Considering the alternative is to completely redo the box as I'm not as confident using hand tools to solve this problem to my satisfaction, this is a no brainer. Thanks, I didn't consider the router. :) I guess I've been a bit too focused on a purely hand approach to this which, in this case, wouldn't have got me far.

Cheers

Paul
 
If you've got a router with a bearing template bit or a guide bush then that's a good way to go. Not cheating, just common sense!

Good luck.
 
One other way - though potentially risky in terms of tear out, would be to build a simple "table" that straddles the box (i.e. two uprights and a horizontal top). With a centre hole (and some screw holes) in the horizontal top you could attach your handheld router to it, then with the box top or bottom held onto a flat surface (double sided tape perhaps) you can run the router over the top of the box - effectively cutting away any material down to a specific depth.

A bit like this, but smaller: http://www.woodworkersjournal.com/surfa ... ha-router/
 
Thanks Sploo. Yes, that's very similar to planing jig I previously made. Instead of the two side rails on the link you posted, I made a square shallow box out of mdf. The router runs on a split bridge that rests on the box's two opposite sides and is free to move in one axis and constrained rather like the parallel motion of a drawing board. The router is free to move along the length of the bridge so I get 2 axis of movement. I'll try to post pics when I get home from work.
 
DSC_0224.jpg
 
A traditional hand method for accomplishing what you're after is a technique known as spanning using a plane. In this case, your box is only 150 mm long on each edge, or at least that's how I understand your description. A No 5 jack plane would therefore be a good choice.

The technique is to treat the whole perimeter length as, essentially, one long board, as if you were straightening an edge ready for an edge gluing job to make a wider panel out of at least two (or more) boards. Fix the box or lid firmly to a flat surface e.g., use corner blocks clamped in place to stop it sliding about. Then start planing along one edge. As you approach the corner skew the plane by turning the heel end outwards from the box (or lid) perimeter so the cutting edge passes in a slicing diagonal cut across the corner. Once past the corner straighten up the plane along the next side, then skew it around the next corner, and so on. You keep going round and round until the upward facing edge is straight and true. In doing this you'll find that, just as in straightening the edge of a long board, the plane will take off the high spots, and miss low spots to start with, but gradually you'll get to a point where you take a full length shaving meaning the perimeter edge is now straight: or at least that's the result if you do the job correctly - it may take some practice.

Large boxes, even as big as chests can be done in a similar manner, although here the weapon of choice would be something like a No 7 or No 8 plane. You did say you like to use hand tools, so there's a traditional hand tool option for you to have a go at. Slainte.
 
Interesting technique Richard, but does that also mean it's good practise to orient the grain around a box accordingly?
 
rafezetter":1dunbkb2 said:
Interesting technique Richard, but does that also mean it's good practise to orient the grain around a box accordingly?
I suppose that's the ideal scenario but, just like straightening the edges of boards to glue up for a wider panel you don't always have cooperative grain and you work with what you've got as best you can. I can vouch for the box spanning technique having used it many a time over the years. Slainte.
 
Spanning, I gather refers to the sole of the plane spanning the edges of the box to get it's level. I initially tried planing it, but didn't think to rotate the plane and continue onto the adjacent edge so gave up for fear of tear out when hitting the 90 degree edge. I did use my 220, then my no.4 so that may also have contributed to my misgivings. The grain issue would be fine in this case though, as I've carried on the direction of the grain around the box, as is expected of a mitred box. I know for me, it would take a fair amount of practice, and I wouldn't risk it on a semi-finished piece. In the end I used the router planing jig I posted a pic of earlier, and with some care got a good result and I'm happy I've managed to salvage it.

I did however, use my no.5 with the blade retracted to see how it felt, and if I've understood you correctly, I did get a feel for it. I found the action of rotating the plane out quite easy but for only two corners before I had to swap hands then continue. Very interesting technique, and one I'll remember and be sure to try when the opportunity comes round again. I think I've got some old dovetailed boxes I did as test pieces, maybe I'll have a bash at them with this.

Thanks again guys for all your help for a first time poster :)

Cheers

Paul
 
You seem to have got the essence of 'spanning', and it looks as if you've got the concept, i.e., spanning across from the first edge to the second edge after a slicing cut at the corner as you steer the plane through it, followed by straightening up the plane on the second edge prior to slicing across the next corner, and so on. In practice, it helps to be relatively ambidextrous in using the plane, and there are circumstances where you don't push it from the back and you end up pulling from the front.

The technique is certainly effective once you've got the knack, which I didn't find hard to learn as I recall, but that was probably more than forty five years ago and my memory may be flawed, ha ha! Slainte.
 
Back
Top