Snapping pen blanks

UKworkshop.co.uk

Help Support UKworkshop.co.uk:

This site may earn a commission from merchant affiliate links, including eBay, Amazon, and others.

spannermonkey

Established Member
Joined
14 Dec 2008
Messages
94
Reaction score
0
Location
Lowestoft Suffolk
hi bought some hardwood pen blanks and drilled a 7mm hole through the middle but as soon as the wood goes onto the lathe and I begin cutting the wood falls to bits or snaps in half! have I cranked up the tailstock to tight?

MTA.
 
The tail stock should make no difference and by hand it should be too hard to over tighted the mandral
Could be some fault line in the timber you cant see.
I had a bit of this with my batch of pens, I found it happened when I was trying to turn off too much wood at one. Sharp chisel and shallower cuts.
Keep at it :D
Rich
 
as Rich says the blank shouldn't be taking the loading from the tailstock - that's the domain of the tube.

I'm wary when I am deliberately cutting cross grain - spalted woods, birds eye maple cut the 'wrong way' etc which could easily rip/crack with too deeper cut; but becuase I'm wary I take careful shallow cuts!

What diameter tube and what glue are you using - as well as which wood?
 
Ae you trimming the blank back, at both ends, to the tube? If you aren't then the pressure is on the wood and not the tube? Also, are you using a mandrel?

I have just been doing some burr elm that I have made up my own blanks from. I started with 8 blanks but 3 broke up at the ends and 2 had to be scrapped, so I just turned the wood off of the tubes and they went back in the bits box. The third was salvaged by grafting a bit of walnut where the wood had broken away. Not fiished , but when I have I will post the photo of what I mean, hopefully?

I also had the same happen to a bit of spalted beech and I spliced a bit of walnut on the clip end. When they are done I will post the pikkies.

No real problems if they do break away, just turn the wood off the tube and start again. I haven't yet seen any reason to buy wooden blanks. It is so very easy to cut your own and you can do so from just about anything unless you are looking for something VERY special?
 
No I dont have a mandrel this hole through is not got any lining in I assumed that went in last. I use a Clarke Lathe.

and use the main tail stock which came with it. perhaps I should be using a mandrel
 
spannermonkey":1z0l9k6s said:
No I dont have a mandrel this hole through is not got any lining in I assumed that went in last. I use a Clarke Lathe.

and use the main tail stock which came with it. perhaps I should be using a mandrel

:shock:

Ok Sp - Have a look at some tutorials then have a go.

Its normal to glue in the brass before turning wether you use a mandrel or just go between centers.

Have a look at Johns Tutorial

http://www.woodturned.co.uk/html/wooden_pen.html
 
By lining I assume you mean the pen-tube. The tube needs to be glued in after you drill the blank and before you turn it.

If you're not using a mandrel and are winding the tailstock centre up with no tube in the wood it WILL split due to the pressure.

How are you planning on gripping the wood at the headstock end in order to turn it?
 
myturn":ih99jwom said:
How are you planning on gripping the wood at the headstock end in order to turn it?

It is possible - Before i got my rotur kit i used to go between centres, with a dead centre in the drive and a live center in the tail, slight pressure - not too much.
 
loz":14o2h9gk said:
myturn":14o2h9gk said:
How are you planning on gripping the wood at the headstock end in order to turn it?

It is possible - Before i got my rotur kit i used to go between centres, with a dead centre in the drive and a live center in the tail, slight pressure - not too much.

easy enough to turn a small 7mm stub, preferably with a very very slight taper, upon which to locate a drilled blank but why would you turn such a blank before installing the tube?

as John said (and I have to admit to having done :( ) it's easy enough to turn off a screw-up and re-glue the tube if necessary. I certainly wouldn't want to mess about gluing on in after turning!
 
Not glueing the brass tubes in before you turn the blanks is certainly a challenging way to do it me-thinks.

I use 5 minute epoxy if I'm only doing a couple of blanks and 30 minute stuff if there are more to do and I bung the end of the tube with a small bit of paper towel to shove the tube into the blank. That way the glue doesn't get into the tube. Just push it out holding the very edge of the tube with my finger nail to stop it being pushed out aswell.
 
Jonzjob":3v6wwbpe said:
...... I bung the end of the tube with a small bit of paper towel to shove the tube into the blank.

On this subject, I picked up some dental wax sheets on ebay for about 20 pence a sheet which lasts ages, these are a pink sheet of wax, about 2 mm thick and about the size of a DL envelope (The A4 folded 3 times one..)

I use this to seal one end of the tube before gluing. The improvement over using a potato is there's no juices to affect the glue and it pops out as soon as you trim the tube, it also takes a lot less effort to do, no more spud gun effect potatoes..

Paul.
 
When you have got it clyndrical SpannerM just use light cuts, especia;;y when you get near the tube. Also make sure that you get the tube glued the complete length by working it back and forth and round and back or you will get bits break off from where the glue hasn't reached.

I was doing some burr elm yesterday and I had 3 out of 6 break at the ends due to the wild grain directions. All I did with 2 of them was to use my skew to cut a slot to the brass tube and turn the broken bit off. Then I cut a small bit of a short, contrasting blank and glued it on the bare end. Back on the mandril, turned it down to match, all the usual finishing sanding, sealing and melamine laqure and they look good.

When they are buffed and finished I will see if I can post a photo or 2 of them?
 
jumps":1yywfkzo said:
loz":1yywfkzo said:
myturn":1yywfkzo said:
How are you planning on gripping the wood at the headstock end in order to turn it?

It is possible - Before i got my rotur kit i used to go between centres, with a dead centre in the drive and a live center in the tail, slight pressure - not too much.

easy enough to turn a small 7mm stub, preferably with a very very slight taper, upon which to locate a drilled blank but why would you turn such a blank before installing the tube?

as John said (and I have to admit to having done :( ) it's easy enough to turn off a screw-up and re-glue the tube if necessary. I certainly wouldn't want to mess about gluing on in after turning!

I never mentioned not gluing barrel in first.
 
Hi
I would suggest doing the "kiss test" before you start turning your blanks. If your centres are out of alignment, the wall of your pen will be too.

Cheers,
Dave
 
I don't think that it is totally clear to any novice Dave?

By the kiss test Dave means to bring the tail stock up to the head stock. Put a live cone center in the tail stock and something like a 4 prong drive in the head stock and they MUST just kiss point to point when they meet. Then everything is lined up to start.

If you have a fixed head stock and they don't line up properly I'm not sure whay you do, but mine is a swivel head jobbie and I do make sure they are lined up corectly!
 
loz":16biyndo said:
jumps":16biyndo said:
loz":16biyndo said:
It is possible - Before i got my rotur kit i used to go between centres, with a dead centre in the drive and a live center in the tail, slight pressure - not too much.

easy enough to turn a small 7mm stub, preferably with a very very slight taper, upon which to locate a drilled blank but why would you turn such a blank before installing the tube?

as John said (and I have to admit to having done :( ) it's easy enough to turn off a screw-up and re-glue the tube if necessary. I certainly wouldn't want to mess about gluing on in after turning!

I never mentioned not gluing barrel in first.

I never said you did............... :?:
 
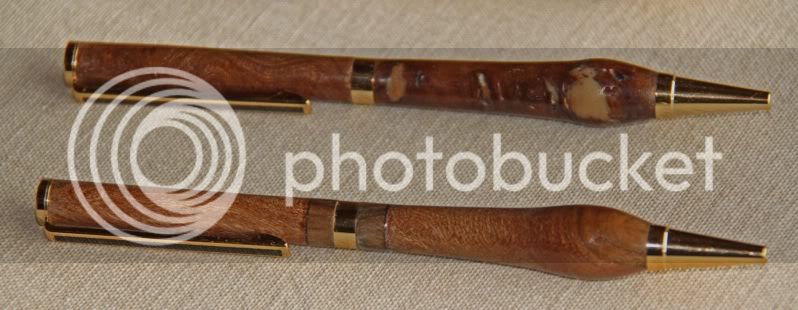
Earlier on I said that I would see if I could post a photo of how I saved a pen blank when it had split at the end. This is a couple of pens that I was playing with using some very burred elm. The top one had some holes because of the burrs and they were wher I wanted them not. So I turned the blank down to the shape I use, mixed up some 5 min epoxy and mixed in some fine chopped fibre glass and carefully filled the holes, the main ones anyway. Then when the epoxy was 'green', that is just before it goes hard but is dry to touch, I put it back on the lathe and turned it smooth again. Then when fully cured I sanded it through to 400, 0000 steel wool and buffed with wood shavings.

The bottom one. The edge of the blank ripped out due to the grain change. So I cut the middle ends off of the blanks and cleaned up the brass tube as it turned. I then got a walnut blank with the hole already drilled, but that was too short, cut 2 slices of the end and glued them onto the bare brass tube. When the glue had cured it went back on the lathe, carefully turned down to match, finished and I had a really nice pen with the slight contrast in the center.

Pensburelm.jpg


Well, I like them anyway :mrgreen: :mrgreen:
 

Latest posts

Back
Top