RI Dovetail Transference Jig

UKworkshop.co.uk

Help Support UKworkshop.co.uk:

This site may earn a commission from merchant affiliate links, including eBay, Amazon, and others.

woodbloke

Established Member
Joined
13 Apr 2006
Messages
11,770
Reaction score
1
Location
Salisbury, UK
It being a wet Bank Holiday Saturday afternoon :roll: I thought I'd knock up a Robert Ingham dovetail transference jig. In his book, he uses mdf as the main woodie material, but as I didn't have anything quite so esoteric as that so I've used an oddment of rock maple instead:

001small-4.jpg


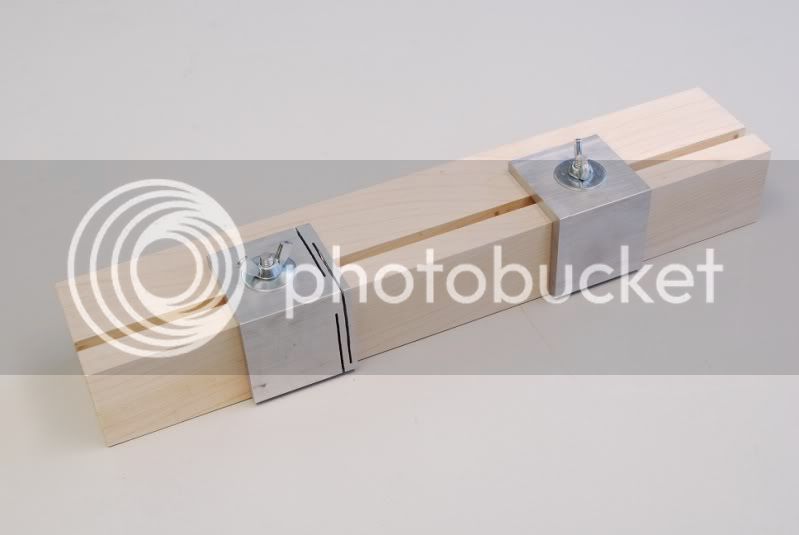
The two aluminium angle brackets are made from some 50x50x6mm thick stuff (bought from Ringwood Precision Engineers, see also their ebay site) and had to be made dead square, didn't take as long as I though it would.

003small-4.jpg


They're held in with a couple of sliding 'T' nuts made from a bit of old 6mm bolt to form the studding and some gash 10mm mild steel strip, the 'T' slot was made with a suitable cutter from Axminster. Having got hold of some Zona razor saws at Yandles in April I ought to be able to cut some half-respectable dovetails now...I just need some decent dovetail chisels.

Matthew? :wink: :lol: - Rob
 
It'll probably be obvious once you've explained Rob and I'll feel pretty dumb :lol: but how do you use it ?

Cheers, Paul :D
 
paulm":3vevkmik said:
It'll probably be obvious once you've explained Rob and I'll feel pretty dumb :lol: but how do you use it ?

Cheers, Paul :D
Easy peasy Paul. The pin board goes in the vice along with the jig (the wood needs to be a tad thicker than the ali) with the top level with the top of the maple. The tail board goes on top and then the left hand angle thingie is pushed up against it. As there's a little bit of spring in it by nature of the saw cuts, both pieces are aligned dead square...tighten the butterfly nut to hold it securely in place.

...and I've just tried it out, works a treat 8) - Rob
 
Do you plan to make spacers ( one for through and one for blind) to bring the pins out so that you can cut on the line itself?

I know Robert does but I have always puzzled about this, since the line would then be gone therefore any chance of paring to the line would be gone.

Nice jig by the way...


Mike

8)
 
Mike H":25v6qrue said:
Do you plan to make spacers ( one for through and one for blind) to bring the pins out so that you can cut on the line itself?

I know Robert does but I have always puzzled about this, since the line would then be gone therefore any chance of paring to the line would be gone.

Nice jig by the way...


Mike

8)
I haven't seen that idea tbh and intended to use it just for marking out through d/t's but I suppose it would be equally suitable for lapped dovetails.

Unless I'm reading the post wrong (which wouldn't surprise me) there's no cutting facility with this jig...it's purely for marking out - Rob
 
It is just a question really (since I tend to use a different method anyway, based on using the groove for a bottom, for example).

I see that some people, including famous cabinet makers, when they use such transfer jigs, make spacers (some built into the jig) so that they bring the pins out, if marking from tails from example.

The idea is have spacers suited to the saw kerf to then mark in such a way that they then cut on the line, instead of on the waste side of the line. It takes trial and error since the shift is half saw kerf times slope, very small.

Robert Ingham explains it all in his book.

This is fine providing it is all dead on, but the line has then disappeared for good and there is no chance of paring for a perfect fit.

As somebody who normally cuts just on the waste side of the line, like most , I would be nervous of methods where the line disappears .

Just wondering, thats all


Mike


8)
 
All the jig seems to do is hold one board in line with the mating board. I find the Rob Cosman method perfect for this and it needs no jig.

I suppose this jig relies less on the board ends being square but if one cannot do that reliably then maybe dovetails shouldn't be on the menu either!
 
I tried this out yesterday on some 150mm wide d/t'd boards for a little unit that I'm making. It just needed a little bit of sorting out to find out the best way to use it, but after that, it was dead easy to align both boards for marking out the pins.

I don't do RC :p - Rob
 
Chris Knight":2juetadb said:
All the jig seems to do is hold one board in line with the mating board. I find the Rob Cosman method perfect for this and it needs no jig.

I suppose this jig relies less on the board ends being square but if one cannot do that reliably then maybe dovetails shouldn't be on the menu either!

I could not agree more. If the boards are not exactly the same width then the jig won't work so well, even out by half a mil.

I have always found that for a drawer or box it is more important to line up the bottom groove with a tight test piece as part of the method, having machined it first. There is nothing more ennoying at glue up time or after if not glued, for the bottom not go in easy. This jig cannot guarantee that.

I made a large jig of this type (one stop only) a few years back, I find it useful for long dovetails say 15 inches plus on the side of a chest, but for smaller work I use the method above with no problems. Being a good right angle it mainly doubles up as a bicuiting and dominoes assist.

Having said all that people new to dovetails would find it a good developmental aid.
 
Mike H":tgvsiu3y said:
If the boards are not exactly the same width then the jig won't work so well, even out by half a mil.

Having said all that people new to dovetails would find it a good developmental aid.

What needs to be born in mind is that this jig was developed by a guy who works to a tolerance of .1mm. I'm not saying that I can work to that sort of tol, but it's easy enough to shoot in mating parts so that they're equal and then the jig works well.

It's a great aid (in my view) to aligning the parts of the joint and I'm not new to dovetails...I've been cutting them for nearly 40 years - Rob
 
Nobody said you are and that was not my intention, but for some of us, regrettably, 40 years is still a little young in the Art, try 50 mate!

The jig is fine, but I have just done a poll of 4 mates in the trade today and they don't feel that they need a jig. Three use the same method as me and the other his plane and the vice as we were taught 50 years ago. They have no trouble selling their work!

I will have to discuss the question I posed about shifting the pin board and cutting on the line when using the jig to Robert Ingham when I see him at Art in Action, he at least will have no problem with it!

Cheers

Mike

8)


PS : New to the forum does not mean new to woodwork! I sometimes feel that a few of you would prefer a small forum to yourselves.
 
Mike H":2dta21kl said:
Three use the same method as me and the other his plane and the vice as we were taught 50 years ago. They have no trouble selling their work!

I will have to discuss the question I posed about shifting the pin board and cutting on the line when using the jig to Robert Ingham when I see him at Art in Action, he at least will have no problem with it!

Cheers

Mike

8)


PS : New to the forum does not mean new to woodwork! I sometimes feel that a few of you would prefer a small forum to yourselves.
...as was I, plane on it's side, pin board level with the top, position the tail board, square up, hold firm with one hand, strike the lines etc etc and it works but it's just awkward and cumbersome. RI's jig works well (and I have no problem with it) and takes the the guesswork out of the set up. I guess that he developed it for use on the smaller sized boxes that he does and anything over 150mm might be pushing it's limits.

I had quite a long chat with him at Rycotwood earlier in the year where he had his own jig and his Zona saws (which I also now use for smaller stuff)

As to another forum, some of us do have access to another one :wink: :lol:

Suffice to say that we clearly have differing views. I'm happy that this works for me and provides a more secure way of positioning the two pieces of wood, so I'm going to leave it there before a simple thread turns into a 10 pager! - Rob
 
Fancy being proud of the fact that there is a sub forum facility for the chosen few! Congratulations, I am sure 6000 odd users are thrilled to hear that they are second class citizens after all!

You missed most of the points I was trying to make. A much more useful variation on this jig, to my mind, can be seen in F&C 164 page 42. This one can be adapted for other uses like mine, which my sons keep pinching.

There is also a good anecdote on using dividers to mark dovetails, but the method new to the author is as old as the hills.

Regards and out

Mike

8)
 
I suppose if you want to use a jig to line up tails/pins.. No problem. Even Even Krenov (arguably the 'man'.) used a vertical guide for the back of his chisel when chopping out. I have no problem with that either.

As far as I see it, all the jigs and marking in the world, however you do it, won't help if you miss the mark with the saw! And that takes practice!

If Rob wants to use Ingham's jig so be it. Main thing is, he is in the shop cutting by hand.


I like Klausz's method myself. Not even marking out the joints.

BTW Mike, as a matter of interest do you prefer tails first or pins?
Pins first for me. Like I was taught by my mentor.

He always said, 'Woodwork joints? Well, you 'cut an 'ole first, then you make a piece to fit the 'ole!' I confess I find that more straightforward, probably because that's the way I always did it. Also you HAVE to do it that way to make a Secret Mitred Dovetail. Which I don't do very often! :lol:

And I don't think Rob meant there is a 'sub-forum'. I think he is referring to one or more of the other Fora that exist on-line.

Now I am going to break-in my false knee a bit more, with some hand planing, to get back into the swing.... Look out for some WIPs.


John :wink:
 

Latest posts

Back
Top