Rememberance Cabinet Construction

UKworkshop.co.uk

Help Support UKworkshop.co.uk:

This site may earn a commission from merchant affiliate links, including eBay, Amazon, and others.

Shultzy

Established Member
Joined
10 Oct 2006
Messages
2,196
Reaction score
2
Location
Near Lichfield, Staffordshire
I posted this in the design section but only had 1 reply so I've reposted it here to see if it has a better response.

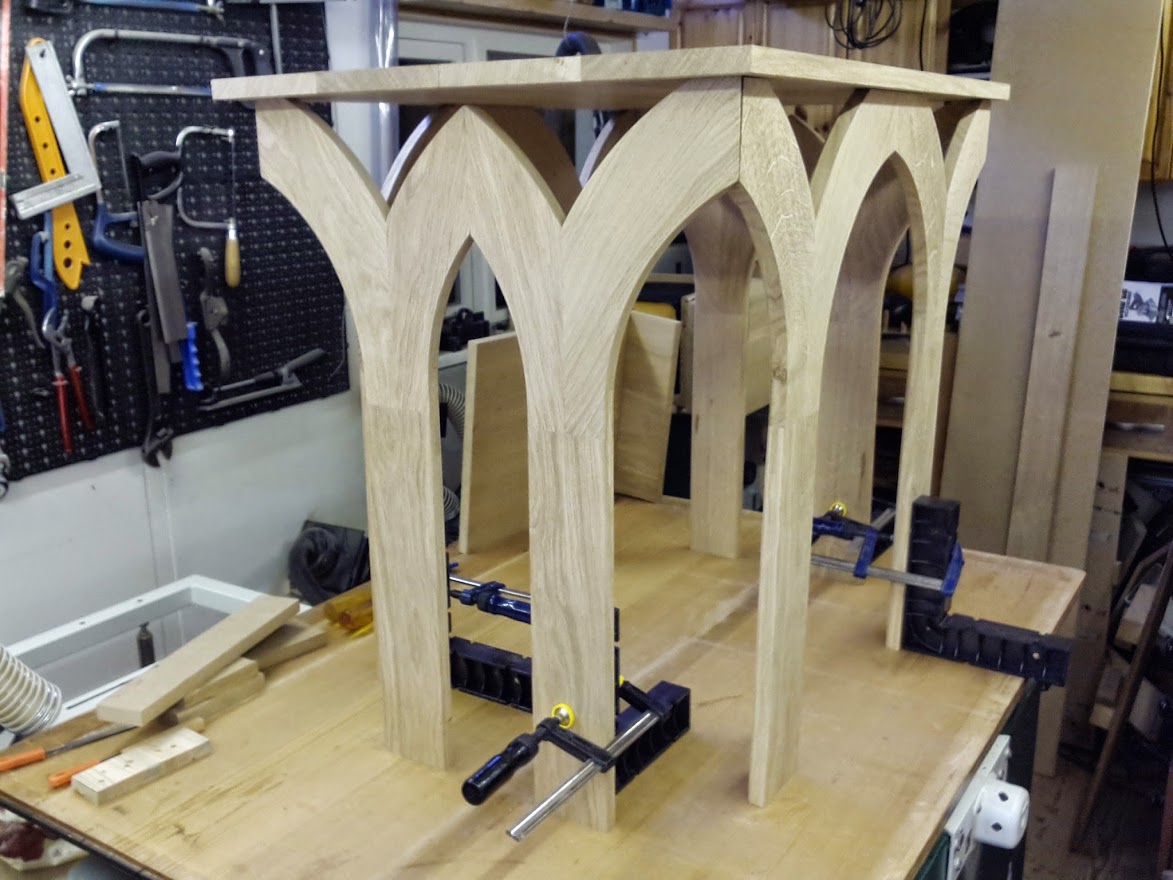
About 10 years ago I made a remembrance cabinet for a friend, to be displayed in a church. They recently asked me if I could make a table for it to make it free-standing. 10 designs later they have plumped for this one.

RememberanceCabinet05.jpg


I will make all the parts out of 18mm thick oak. The top and plinth are the easy bits. The "legs" are slightly more difficult as there are a few ways to construct them.

RememberanceCabinet05a.jpg


Do I :
plank the top parts, "Y", with the grain running top to bottom then cut out,
cut the "branches" out with the grain running along the curve and connect with biscuits or a half lap,
cut all the legs out of 9mm oak, with the grain running along the curve, and laminate in two halves.

I am going to screw the parts to the top and base, these won't be seen, as I thought M&T would be overkill.

Your comments would be much appreciated.
 

Attachments

  • RememberanceCabinet05a.jpg
    RememberanceCabinet05a.jpg
    230.4 KB · Views: 2,563
  • RememberanceCabinet05.jpg
    RememberanceCabinet05.jpg
    216.3 KB · Views: 2,563
Here's one potential solution. The four parts could also be reinforced with strategically placed cross pinning pegs or dowels, perhaps only visible on the inner face if they're not driven all the way through. Of course, I don't know what kit you have for cutting the slots. A spindle moulder with a slitter or sawblade of some sort and a sliding carriage to carry the parts would be a good choice. Slainte.


*Edit* On reflection, there is an error in the doodle of the suggested method of construction. The spline would need to be much wider to fill the slot cut in the parts that make up the two upper legs (perhaps better named as arms). After assembly the spline would need to be trimmed flush with the outside faces of the assembly - a bandsaw followed by a spokeshave, or a router with a bearing type flush cutter would do the job.
 
Thanks for your advice Richard. How long do you think the spline should be, 3"? My spindle moulder slotter is only about1/2" deep so not suitable. I could use the band saw to make the bridle joints. Would a halving joint be any better/easier?
 
I like that. Good solution given the style and its place, that joint will look right I think. Bridle is nice and also far stronger surely, the lapped option not so attractive or strong. I think it's similar to the way the arch of a Gothic window would have been made - just seems to suit where it's going.
 
Shultzy":1zyzwwkp said:
Thanks for your advice Richard. How long do you think the spline should be, 3"? My spindle moulder slotter is only about1/2" deep so not suitable. I could use the band saw to make the bridle joints. Would a halving joint be any better/easier?
I'd prefer a spline that's 90 mm or longer. Wealden, Trend, CMT, etc sell spindle moulder groovers that can cut up to 47 mm deep. You should be able to get one for about £100 including VAT. I think you'd be likely to struggle to get a good job done on the forks with a bandsaw. You could do a variation of a scarfing joint which I think is what you're describing as a halving joint, but I'd probably be concerned about long term structural integrity. Slainte.
 
Douglas, thanks for your comment, I'd forgotten that the style of joint should be in keeping with its place. Do you think making the spline in a different darker wood is a good idea?

Richard, I'll have to think about the spindle moulder groover, at £100 its a bit steep for a one off job. Having said that I expect it will come in useful for other jobs.
 
Shultzy":2thd8ncr said:
Richard, I'll have to think about the spindle moulder groover, at £100 its a bit steep for a one off job. Having said that I expect it will come in useful for other jobs.
Of course, you could simply buy some veneered MDF and cut the shapes out with a router and template, or other methods for making multiples, even use CNC routing, all of which would work easily enough, and save a lot of time which may have a bearing if you're charging for the job. But you'd need to decide which way to orientate the grain, decide how you'd finish the edges, and get the client to agree to the look. The 'look' would be similar to the SketchUp images you included in your opening post, but functionally I suspect this construction method would be more than adequate. Slainte.
 
I'd be inclined to do the long bit with two 45 degree angles on it- kind of like pointy picky fence, then cut the curvy pieces to suit. lastly just route in some mortices and pop in some loose tenons.
 
Richard, this table and its accompanying cabinet is to spend its life in a 150 year old church and I'd like it to be there in another 150 years so mdf is out, so I'll go with European oak. I'll buy the groover and make the legs to your design with a 90mm spline. The Wealden Tools, 6 wing groover is out of stock is I'll have to buy the 4 wing groover + spurs (F414060).
 
Sgian Dubh":14xqeviy said:
I'd prefer a spline that's 90 mm or longer. Wealden, Trend, CMT, etc sell spindle moulder groovers that can cut up to 47 mm deep. Slainte.

I've bought the 6mm slitter from Wealden. Bearing in mind that the wood is oak, can I cut the 45mm slot in one go on the spindle moulder or take two passes.
 
Shultzy":zjvp0hnt said:
I've bought the 6mm slitter from Wealden. Bearing in mind that the wood is oak, can I cut the 45mm slot in one go on the spindle moulder or take two passes.
It depends on the power of your moulder, but I'd normally expect to do the cut in one pass - it's a quite small cut. Try it on one or two scrap test pieces of the same species working up to the depth you require, and if a full depth cut works fine in one pass on the test piece it should work fine on the actual piece. Slainte.
 
Update on progress. I adjusted the design slightly so that I only had one template which I used to cut out the other two which are trimmed to different arm lengths. I've cut out all the pieces using the templates shown at the top of the picture. The long straight side is used as the datum to make sure the top and bottom edges are square to each other.

This picture shows the difficulty in glueing irregular parts together. The right hand arm has a mitred end and the fixed off-cut is being used to protect the end. The clamped block stops it riding up.I used biscuits to join the two pieces.

Remembrance%2BCabinet02_1.jpg


This picture shows two sections tested for fit.

Remembrance%2BCabinet03_1.jpg
 
After a lot of jig making to hold the pieces for gluing I've finally managed to complete the legs. The picture shows the test fit, which I'm happy with. I'll glue the legs together before I fit the top and bottom boards.

IMG_20150511_130908.jpg
 
The joinery for the Y shaped legs has come out well. I find it interesting that I didn't properly appreciate the relative proportions of the leg to the two arms forming the upper part of the Y from the drawings in your first post. What I mean is the intersecting straight edges of the two parts making up the Y are significantly longer than I'd surmised was the case. I guess it goes to show that sometimes a drawing can fool a viewer- maybe I didn't look hard enough, or perhaps it shows I can be pretty dense, ha, ha. Now that I see it I think your approach of joining the parts with biscuits was a good one, better than my suggestion of a single longish tongue to join the leg section and the two arms. I assume the arms of the Y part are biscuited or loose tongued to the top of the leg. Anyway, it looks like you've developed a neat solution.
 
Richard, I've been fooled by drawing as well, I think its because there was no scale to visualise how big the parts were. As you say I jointed the two arms with two biscuits but I took your advice on the straight leg and and used a 80mm loose tenon. I thought that the end grain joint might have been suspect with a biscuit. You can just make out the tenon on the right hand side leg. Thanks for your advice.
 
Here are the final photos of the table and cabinet in their "natural habitat". The church committee were very pleased, which is all you need when you have made something by hand.

f8t5Kw2fliJIxD_0HaJVIyq_ctIvrJMm-K8TKs3s6ok=w1335-h1001-no


sF81pVU_scOyCXPB1vPfXlbrJS5jqRK8hlj9bdTWnoA=w1335-h1001-no


x-xpe7RxPeKfUntEwL5Hxx3AxXSDT43qbDQJBVTxRLY=w1335-h1001-no


zzuu7aZ0HmpjxwK36Cl-dhP9qgyjzG_nmVrc7RgiCjo=w1335-h1001-no
 

Latest posts

Back
Top