[Q] Fixing skirtingboard the traditional way

UKworkshop.co.uk

Help Support UKworkshop.co.uk:

This site may earn a commission from merchant affiliate links, including eBay, Amazon, and others.

Fromey

Established Member
Joined
22 Sep 2010
Messages
570
Reaction score
0
Location
Frome, Somerset, UK
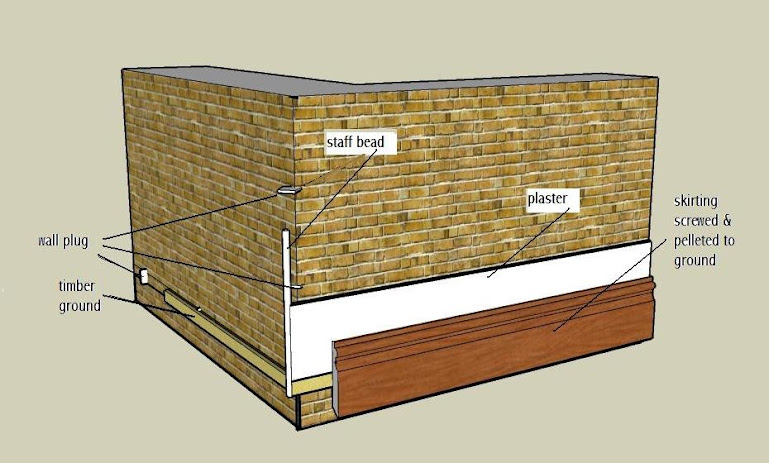
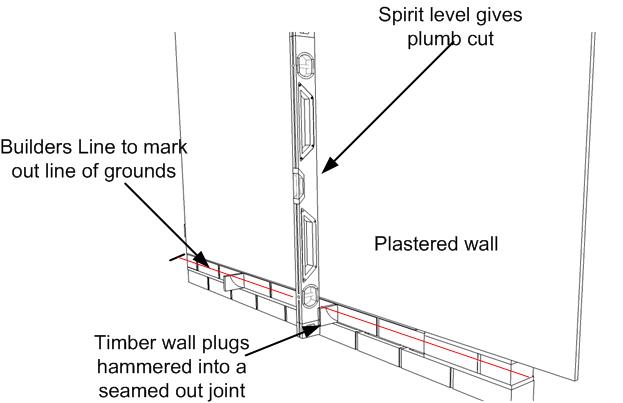
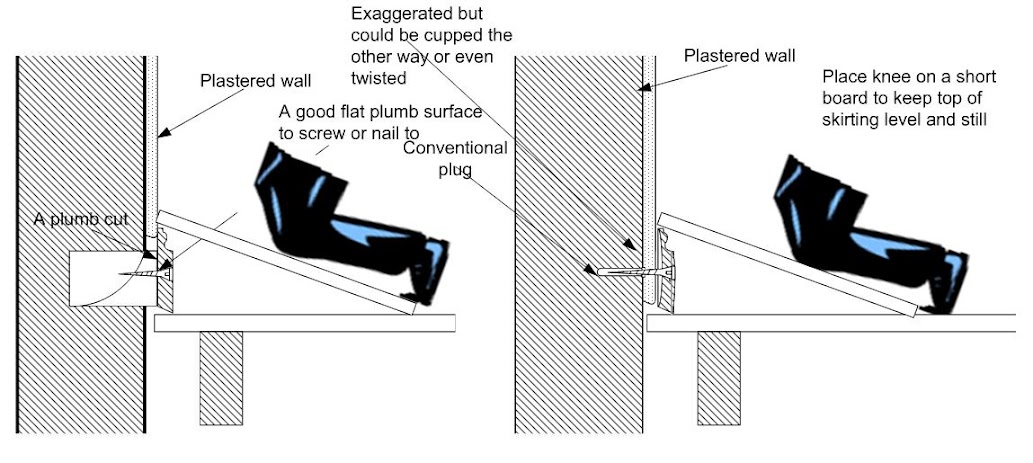
My house is about 1900 vintage and shows the typical palimpsest of past (usually incompetent) renovations. When it comes to the skirting boards there are two types of fixings. The modern bang a hardened nail into the brick at any convenient location and the more traditional bore holes in the wall, ram in wooden dowels and then nail the skirting into the dowels. (I'm assuming the latter is the traditional way as the dowels and nails I've dug out are always ancient looking.)

Although the traditional way is a lot more work, I'd like to install some new skirting in this manner for the traditional value of it plus the nails don't appear to rust like they do when driven straight into the brick (we have a reasonable amount of rising damp).

However, I'm stumped as to how they did this so accurately (granted you can see where sometimes they didn't get the nail quite so aligned). I'm sure there is some traditional trick to this and am wondering if anyone here knows the lore.

Thanks in advance.
 
My grandfather who was a cabinet maker and carpenter showed me as a teenager to cut out the vertical mortar with a plugging chisel every 18" to 27" behind the skirting and then make propeller shaped wedges with an axe or wide chisel starting at 5/8" or so thick down to 1/4" thickness. They would be 4" to 8" high depending on the size of skirting.

Leaving them over length (5”long) and driving them home into pre-cut slot. Once installed they would be cut of plumb to the finished plaster and gave a great fixing for the cut nails.

The marking out of them on the skirting was a fairly easy measure and mark process on the skirting’s face once they had been cut and scribed to length.

A very tradition and lost building practise. Give it ago it can be very satisfying but raw plugs are a lot quicker.
 
In my parents house, built 1900-ish, the wooden plug was a wedge into the vertical mortar line between bricks sawn to be flush(ish) with the plaster surface above. The skirting was nailed through into this wedge. This method would need no drilling, tough in some of the old bricks, and would also give a bigger unseen target for the nail.
Have fun
xy
 
Peter Sefton":3uj2iljx said:
My grandfather who was a cabinet maker and carpenter showed me as a teenager to cut out the vertical mortar with a plugging chisel every 18" to 27" behind the skirting and then make propeller shaped wedges with an axe or wide chisel starting at 5/8" or so thick down to 1/4" thickness. They would be 4" to 8" high depending on the size of skirting.

I've removed miles and miles of skirting fitted this way, it was the way to do it for several hundred years. the drill a hole and bash a peg in method is much less common (only seen it done in one property).

the brick joint method will hold well for a few decades if done well,

although I did do one house where a meter length of skirt in the hall had always been loose (well at least for the 80 odd years the owners had lived there) it was fascinating to see the various bits of vintage folder newspaper wedges and bluetack ect that had been used to try and fix it
 
Peter Sefton":1j6ff96x said:
My grandfather who was a cabinet maker and carpenter showed me as a teenager to cut out the vertical mortar with a plugging chisel every 18" to 27" behind the skirting and then make propeller shaped wedges with an axe or wide chisel starting at 5/8" or so thick down to 1/4" thickness. They would be 4" to 8" high depending on the size of skirting.

Leaving them over length (5”long) and driving them home into pre-cut slot. Once installed they would be cut of plumb to the finished plaster and gave a great fixing for the cut nails.

The marking out of them on the skirting was a fairly easy measure and mark process on the skirting’s face once they had been cut and scribed to length.

A very tradition and lost building practise. Give it ago it can be very satisfying but raw plugs are a lot quicker.

This is the exact way I was shown as an apprentice 22 years ago. Then my boss passed me the sds drill and said 'but we don't do it like that any more'
We still scribed the skirtings to the old stone flag floors with an axe though. Much quicker than a jigsaw. I doubt you'd be allowed an axe on site these days?!
All skirtings I fit these days are glued with panel adhesive and pinned with a nail gun. Mitres are fixed with mitre bond or pva with a pin through the joint. Quick, easy and effective.
 
Peter, what do you mean by 'propeller shaped' wedges? Thanks.
 
phil.p":39zdcyc0 said:
Why nail them? It's miles easier to stick them.

I have seen them curl away and pull the plaster of the wall if only stuck, but painting both sides before fixing helps.

Propeller shaped wedges start off with timber which may be 4" x 3/4" but you carve a corner off one long side and do the same to the opposite long side, which makes the wedge twist and lock in position when being knocked home.
 
Peter Sefton":4d5u645q said:
My grandfather who was a cabinet maker and carpenter showed me as a teenager to cut out the vertical mortar with a plugging chisel every 18" to 27" behind the skirting and then make propeller shaped wedges with an axe or wide chisel starting at 5/8" or so thick down to 1/4" thickness. They would be 4" to 8" high depending on the size of skirting.

Leaving them over length (5”long) and driving them home into pre-cut slot. Once installed they would be cut of plumb to the finished plaster and gave a great fixing for the cut nails.

The marking out of them on the skirting was a fairly easy measure and mark process on the skirting’s face once they had been cut and scribed to length.

A very tradition and lost building practise. Give it ago it can be very satisfying but raw plugs are a lot quicker.
That's how I was taught. Have done it a bit, not always for skirting as long screws and plastic plugs are so fast.
You'd start with a longish piece of say 3x1, trim two opposite corners to make the prop shape taper, hammer it into it's slot, saw it off (over length) and start again with the same bit of wood (now shorter!)
When all in then to cut them precisely to a string line or to be same distance from wall etc
 
Nice to see such enthusiasm for the old ways.

Here's the relevant bit from Cassell's Carpentry and Joinery from 1907:

BookReaderImages.php


BookReaderImages.php


I expect "common work" is what most of us would need, but if you want to get ambitious you could always do an upgrade -
Note that for first class work, you will be doing secret mitre dovetails on the external corners!

BookReaderImages.php


BookReaderImages.php


(Rest of the book - start here: http://openlibrary.org/books/OL24760370M/Cassells'_carpentry_and_joinery)
 
I think the traditional method is the best or should I say the most positive. It has fallen out of use mainly because of the change in the size of skirtings. The old skirtings were a min of 9” with an involved moulding on the top. Sometimes it could be a built up moulding. With the hair plaster and an uneven internal wall (In a stone house or big home these walls were built from scalpings from the dressing of the main stone). The traditional plug could assist in setting the line of the wall with the use of a ground. The plasterer would work to this ground. Also the carpenter would set a 1” staff bead on external corners again using the traditional plug set in the horizontal joint. These staff beads and grounds were a first fix item.

JPEGGD+wlldetal.jpg


If the skirting was hardwood it would be screwed and pelleted to the ground. Sometimes there would be two grounds in parallel to each other especially if a built up skirting. One had to consider the architraves as well if a skirting block is used to sit the architrave on or even a panelled door lining.

Everything is dependant on levels so a 3’ 0” datum (these days a meter) above finished floor level is marked on all walls throughout the building.

The plugs are made like an aeroplane propeller so when you hit them in they twist tight in to the joint.

DSCN4998.JPG

If the joints are soft or crumbly they can be pointed up in cement mortar.

The Tools needed to form cut out the cement and sand joint is a seaming chisel also known in Scotland as a dukin iron (pronounced dooking) and a trusty lump hammer not too big as it gets heavier as the day progresses. Seaming joints was given to the apprentice and for a 15/16 year old one developed a few calluses and right arm biceps.

sketch+of+plug.jpg


This is my original set of plugging tools bought in 1956 I need a new lump hammer but keep cant bring myself to throw this one away. Silly I know but there you go.

plugged+wall+JPG.jpg


Just a bit more involved than just sticking to a wall with nonails depending on how true the plaster is. In the old days the plasterer depended on the joiner for him to make a true wall. Carlite browning is a godsend with the metal corner laths.
 
Wow, I would never have thought a thread on skirting boards would be so interesting. I have also wondered how the very large skirtings were built up in the past. Now I know.
8)
 
adzeman":286ljxwz said:
......
The plugs are made like an aeroplane propeller so when you hit them in they twist tight in to the joint.......
I thought it was more because it's easier to axe off the opposite corners of the plug rather than same both sides.
NB carpenters axe was essential item in the kit, for this and a host of other little jobs such as scribing boards or making dowels. Dowels were usually square but you wouldn't know as they were hammered into round holes - except they leave a little clue - they don't squash into a perfect round but tend to have points at opposite sides, due to the grain, leaving a sort of pip shape on the surface
 
Evening all , I used to work with an "old school" chippie , Long deceased and he did pass comment on the same conundrum , "when he were a lad" he said they used to more often than not used to fit the skirting before the plasterer did their bit , an so the skirting was their guide . And it also gave them the visibility of the plug behind the board as they were fixing .

I am sure there are regional differences and every one has / had different methods even if there was a recommended method . I do own a small axe , but mainly used for dressing stone .

Kind regards Sam
 
I did cut my plugs with an axe or as in our area called a blocker till someone thought they would own it. ( Never lend out tools especially to family) with reference to square plugs in round holes we used to cut those on the slant so they had a twist. Modern plugs are great though. Bye the bye in 1963 when shooting grounds on the wall of a school I shot a fellow carpenter in the leg through a plastered wall with a Hilti gun. The charge was too strong for the timber and went through a joint in the blockwork. You could not see where the joints were because of the plaster. After that we usd a short end of timber over the ground to give more resistance. Hilti started making lower charged cartridges as mine was not the only incident at that time.
 
About 15yrs ago I did some work for a relative who lived in a bungalow which was built buy my father's firm in the late 60's. I had to strip a load of 3"bullnose skirting out, and replace it with 5" ogee. No problem I thought, til I realised that not only had they skimmed down to it, but they'd parquetted up to it as well. So, I run a stanley knife around the walls to stop the skim tearing off - that's no problem. Now I have to break up the skirting because it was below the level of the floor - I couldn't just lever it off. Now I find that for some reason best known to themselves, the fuquits that fitted the skirtings nailed them.....with obo's.... dovetailed.....every fifteen inches! There must have been skirting board thieves operating in the area. I've never seen them fixed that way again.
 
Thank you all for a very enlightening thread on skirting boards. I'll see what I can do to resurrect the old ways but I think I'll have to bore a hole and plug with a dowel as this particular wall has all its mortar and it will be too much work for its worth the dig it out for wedges.
 
I think I'll have to bore a hole and plug with a dowel as this particular wall has all its mortar and it will be too much work for its worth the dig it out for wedges.
post a picture so we can see what you are up against. If you are using a deep skirting it can cup or bow and normal plugs are awkward to pull this straight or resist cockleling The traditional plug has hieght and with care you can get in two screws in line plus a flat surface to give pressure/resistance. Cutting the plug marked with your spirit level gives a plumb cut with round plugs you will have to use packings a bit hit and miss.

Skirting+fixing.jpg


I prefer the traditional way but the one on the right is how if fix skirtings using plastic plugs
 
Back
Top