


OPJ
Established Member
This is something I wanted to get on with months earlier but only managed to get around to and finish it during the Christmas holidays, six months ago. It's a cabinet/stand for my Clarke Pillar Drill. Not a bad little machine for the money, just in need of somewhere to store all the little bits and pieces I've accumulated for this drill over time. It's made of 1/2" B&Q plywood held together with a little glue in places and drywall screws (of which I seem to have far too many!) I also bought some rubber swivel and brake castors for it from Toolstation - where it worked out cheaper to buy four individually than what it was to buy a set of four from Screwfix! :wink:
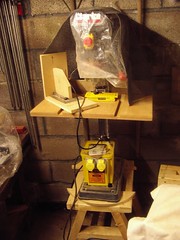
This photo shows my old setup. It worked well enough and was stable. But it badly lacks storage space and isn't easily movable. Incidentally, it is currently playing host to my 12" bandsaw until I can make a similar plywood cabinet for that too.
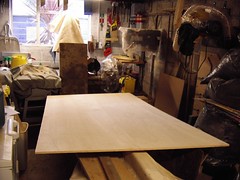
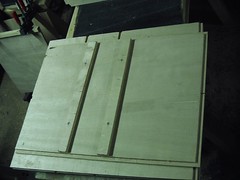
We all want a bigger workshop, it's no secret. Quite how I managed to cut this 8'x4' sheet of ply' inside though... I'm still amazed to this day!
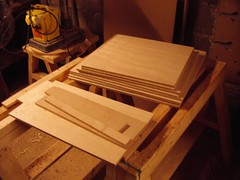
After a couple of hours with the Makita circular saw and some of those cheap Silverline straight-edge guides, I had something I could work with easily.
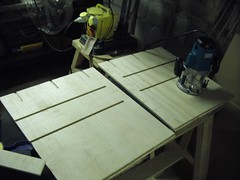
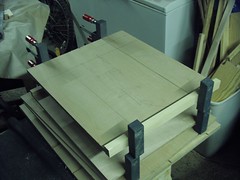
I ran a couple of housings in to each side to help easily locate the two shelves and give a little extra rigidity to the unit. Those three housings at the top you can see running vertically will take three 76mm plywood rails which will take the load of the machine on top and give a fixing for the mounting block - both of which I learnt about in the book, Woodshop Storage Solutions.
A couple of cleats at the back help prevent any risk of sagging or distortion to the shelves.
I also added a couple of softwood edgings to the front of each shelf for appearence only - although, admittedly, I forgot to trim them to length because of the housings until assembly time came!
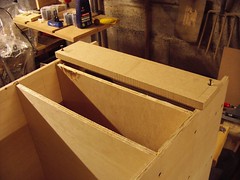
After fixing the shelves to the sides, I realised I'd also forgotten to make allowances for the thickness of the back panel when cutting the shelves! My Makita 3612cx router came to the rescue with a straight cutter and guide bush run along an MDF straight edge. Ear defenders were an absolute MUST! The partially assembly cabinet made a truly deafening cry for 5-10 minutes which would've scared off those reindeer on Christmas Eve!! :?
By the time I finally got the back in place and came to secure the top, I noticed a 2-3mm gap which needed filling - fast. A nice thin slice of pine did the trick and made a good bed for the screws which secured the top without distorting it. This was all before the front panel, of course...
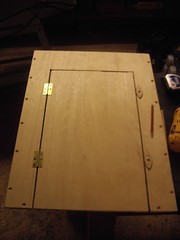
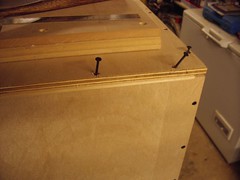
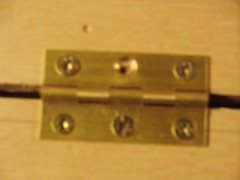
Now, it's not what you're probably thinking - I actually cut this door out of the same panel using my nasty little biscuit jointer (a tip I picked up from another book; Success with Biscuit Joiners). The kerf may be a little wider than I'd like, but it seemed safer and more accurate than doing it with my larger saw. The router was already set for the rebates around the edges. Notice the use of biscuits and roundhead screws with washers to hold the door closed. Not lock of fancy latch required! Another tip acquired from 'that book'! :wink:
I lost a good two or three drill bits, 1.5mm and 2mm, used for the pilot holes, in this project. Some, like in the 'missing screw' hole here, are still partially stuck inside the cabinet at various point... And shall remain there until the end of time. :wink:

I haven't got any photo's to help make this explanation any clearer, but perhaps my only real dssapointment with this project is that it's virtually inaccessible towards the back of the upper shelf; simply because I left to small a gap between it and the rails above - meaning I cannot securely fasten the two large bolts which hold the pillar drill in place at the back. I may get the old coping saw out one day and hack it to pieces or I may not. It doesn't seem to be going anywhere right now but I do need to plan a little better with the next one!
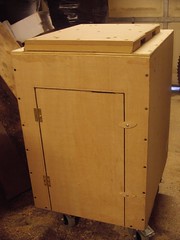
And here's a shot of the finished article; albeit without the pillar drill in place but you can see the chunky MDF mounting block on top and locking castors below the base. I have since added a wooden knob to the door (which replaces the convenient "finger pull", created, top right of the door, by a slip with the biscuit jointer! :wink: ) and a coat or two of finishing oil for protection.
I also have plenty of room inside to store drill bits, router cutters, instruction manuals, my 110v transfomer and also my extension reel. I don't know how I'd survive without it and I hope you guys like the idea too.
Thanks for looking. I look forward to building animproved 18mm version for my bandsaw within the next six months!
This photo shows my old setup. It worked well enough and was stable. But it badly lacks storage space and isn't easily movable. Incidentally, it is currently playing host to my 12" bandsaw until I can make a similar plywood cabinet for that too.
We all want a bigger workshop, it's no secret. Quite how I managed to cut this 8'x4' sheet of ply' inside though... I'm still amazed to this day!
After a couple of hours with the Makita circular saw and some of those cheap Silverline straight-edge guides, I had something I could work with easily.
I ran a couple of housings in to each side to help easily locate the two shelves and give a little extra rigidity to the unit. Those three housings at the top you can see running vertically will take three 76mm plywood rails which will take the load of the machine on top and give a fixing for the mounting block - both of which I learnt about in the book, Woodshop Storage Solutions.
A couple of cleats at the back help prevent any risk of sagging or distortion to the shelves.
I also added a couple of softwood edgings to the front of each shelf for appearence only - although, admittedly, I forgot to trim them to length because of the housings until assembly time came!
After fixing the shelves to the sides, I realised I'd also forgotten to make allowances for the thickness of the back panel when cutting the shelves! My Makita 3612cx router came to the rescue with a straight cutter and guide bush run along an MDF straight edge. Ear defenders were an absolute MUST! The partially assembly cabinet made a truly deafening cry for 5-10 minutes which would've scared off those reindeer on Christmas Eve!! :?
By the time I finally got the back in place and came to secure the top, I noticed a 2-3mm gap which needed filling - fast. A nice thin slice of pine did the trick and made a good bed for the screws which secured the top without distorting it. This was all before the front panel, of course...
Now, it's not what you're probably thinking - I actually cut this door out of the same panel using my nasty little biscuit jointer (a tip I picked up from another book; Success with Biscuit Joiners). The kerf may be a little wider than I'd like, but it seemed safer and more accurate than doing it with my larger saw. The router was already set for the rebates around the edges. Notice the use of biscuits and roundhead screws with washers to hold the door closed. Not lock of fancy latch required! Another tip acquired from 'that book'! :wink:
I lost a good two or three drill bits, 1.5mm and 2mm, used for the pilot holes, in this project. Some, like in the 'missing screw' hole here, are still partially stuck inside the cabinet at various point... And shall remain there until the end of time. :wink:
I haven't got any photo's to help make this explanation any clearer, but perhaps my only real dssapointment with this project is that it's virtually inaccessible towards the back of the upper shelf; simply because I left to small a gap between it and the rails above - meaning I cannot securely fasten the two large bolts which hold the pillar drill in place at the back. I may get the old coping saw out one day and hack it to pieces or I may not. It doesn't seem to be going anywhere right now but I do need to plan a little better with the next one!
And here's a shot of the finished article; albeit without the pillar drill in place but you can see the chunky MDF mounting block on top and locking castors below the base. I have since added a wooden knob to the door (which replaces the convenient "finger pull", created, top right of the door, by a slip with the biscuit jointer! :wink: ) and a coat or two of finishing oil for protection.
I also have plenty of room inside to store drill bits, router cutters, instruction manuals, my 110v transfomer and also my extension reel. I don't know how I'd survive without it and I hope you guys like the idea too.
Thanks for looking. I look forward to building animproved 18mm version for my bandsaw within the next six months!